Tag: エラー

  • [Updated December 2022] How to install YOLOX

    [Updated December 2022] How to install YOLOX

    What is YOLOX?

    Among the many releases in the YOLO series, the newest one, YOLOX, came out in July 2021.

    The YOLOX paper is available here (currently a preprint).
    The GitHub repository is here.

    YOLO is an object detection algorithm.
    It is designed to run in real time, so it is extremely lightweight (inference alone can even run on a smartphone), it is easy to build systems around, and it has been adopted in many IoT devices.

    “Object detection algorithm” may sound complicated, but an easy example to picture is a camera’s automatic face or eye focus.
    A marker appears telling you “here is a face”; the same idea applies to other objects as well, and each one can be classified as to what it is.

    There are many versions in the YOLO series: YOLO, YOLOv2, YOLOv3, YOLOv4, YOLOv5, and YOLOX.
    It also runs not only on Python but on MATLAB as well, so you can adapt it to whichever platform you use.

    Unlike the system used from YOLOv3 onward, YOLOX is based on the system of the original YOLO (the first published method), and it is said to be both faster and considerably more accurate.

    Other blogs cover the details as well.

    How to install YOLOX

    Installation instructions are given on the GitHub page, but they are in English and do not cover using a virtual environment, so here I explain how to do it with an Anaconda virtual environment.

    On both Windows and Mac, following the YOLOX manual exactly produced a string of errors.
    The errors will likely keep changing with future versions, so look them up as they come up.

    See below for how to use the conda command in the macOS Terminal.

    On Windows, I recommend using Anaconda Prompt.

    Open Terminal (Anaconda Prompt), and a black window filled with text will appear.
    To the left of the last line you should see (base).
    At this point you are not inside a virtual environment.

    YOLOX will run without a virtual environment, but since environments can conflict with other packages, I recommend creating one.

    First, enter the following code to create the virtual environment.

    conda create -n YoloX python=3.8

    YoloX is the name of the virtual environment; you can use any other name.
    You can also specify the Python version with python=3.8.

    Then enter the virtual environment with the following code.

    conda activate YoloX

    If the (base) on the left has changed to (YoloX), you have succeeded.

    Installing CUDA

    First, if this is your first time installing machine learning libraries and you plan to train YOLO on a GPU, install CUDA.
    (Training on a CPU takes an absurdly long time, so I do not recommend it. Note, however, that GPUs cannot currently be used on Apple Silicon machines.)
    CUDA can be downloaded from the official site.

    As for the CUDA version, I suggest checking which CUDA version PyTorch supports and then installing that version.
    PyTorch official site

    To install an older version, click Download now and then, on the following screen, scroll down to Resources and use Archive of Previous CUDA Releases.

    The latest version may well work too, but for now, matching the version to PyTorch should let you run everything without trouble.

    To check whether it is installed on Windows, open “Edit the system environment variables,” go to Advanced > Environment Variables, and
    check whether there is a path beginning with CUDA_PATH.
    The number after the V indicates the version.

    Installing PyTorch

    Before installing, update pip.
    Enter the virtual environment in Anaconda Prompt and run the following command.

    python -m pip install --upgrade pip

    Go to the PyTorch official site and select the installation method that matches your environment.
    One thing to watch out for is the Package field: here, choose pip.
    Installing with conda will cause errors later on.
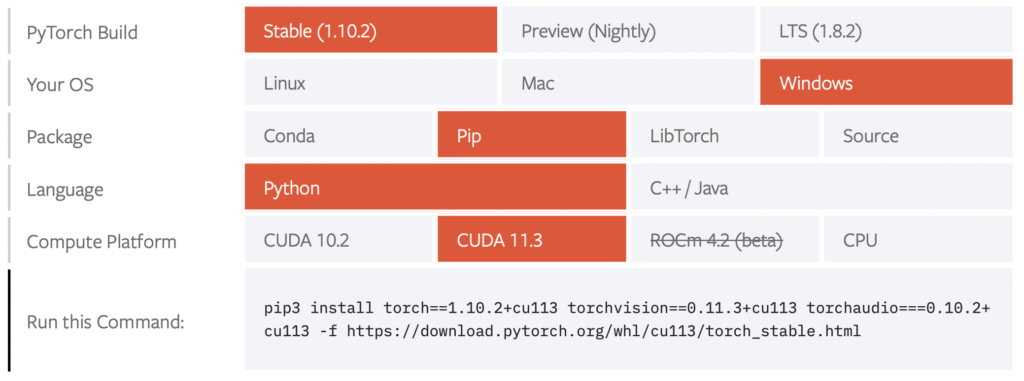
    Copy and paste the command shown under “Run this Command” to install it in your virtual environment.

    Once the installation finishes, use the following command to check that PyTorch is installed.

    pip list

    As long as torch appears in this list, you’re good to go!!!
    Just to make sure everything works, launch python and run the following command.

    import torch
    print(torch.cuda.is_available())

    If the output is True, the installation went through without problems and torch is ready to run on the GPU.
    (On a Mac or on a computer without a GPU, you will get False, but as long as the import works you’re fine.)
    If you get an error, go back and check the installation again.

    Installing the packages required for YOLOX

    Download (clone) the various YOLOX files from GitHub.
    If you can use Git commands, you can clone it with the code below.

    git clone git@github.com:Megvii-BaseDetection/YOLOX.git

    Next, navigate into the cloned folder and install the required packages.

    First, edit the contents of requirements.txt in the cloned YOLOX folder as follows.

    # TODO: Update with exact module version
    numpy
    #torch>=1.7
    opencv_python
    loguru
    tqdm
    #torchvision
    thop
    ninja
    tabulate
    
    # verified versions
    # pycocotools corresponds to https://github.com/ppwwyyxx/cocoapi
    #pycocotools>=2.0.2
    #onnx==1.8.1
    onnxruntime==1.8.0
    onnx-simplifier==0.3.5

    It seems that packages such as pycocotools cannot be installed with this command.

    Once you’ve done that, save requirements.txt and run the command below in the terminal (Anaconda prompt).

    cd YOLOX
    pip3 install -r requirements.txt
    pip3 install cython pycocotools

    The YOLOX folder you downloaded contains a file called “requirements.txt” that lists the required packages. The second command opens this file in read-only mode and installs the packages listed in it.

    pip3 install cython pycocotools

    This command installs cython and pycocotools.
    It appears these need to be installed separately.

    When you run this command, some of you may see the following error.

          building 'pycocotools._mask' extension
          error: Microsoft Visual C++ 14.0 or greater is required. Get it with "Microsoft C++ Build Tools": https://visualstudio.microsoft.com/visual-cpp-build-tools/

    Apparently pycocotools requires Microsoft C++ Build Tools. (Even though there is no Mac version, the error still shows up on Mac.)
    If you’re on Windows, it’s a good idea to install it just in case.

    Install it, then try installing again with the code below.

    pip3 install "git+https://github.com/philferriere/cocoapi.git#egg=pycocotools&subdirectory=PythonAPI"

    If that still doesn’t work, install it with the following command.

    conda install -c conda-forge pycocotools

    In general we’ve been installing these packages with pip, but since this one simply won’t install that way, we fall back on the last resort of installing it with conda.

    Next, download yolox_x.pth.
    The download starts as soon as you click the link.

    Move the downloaded file into the YOLOX folder you cloned from GitHub.
    This gives you the model used for detection in the demo, placed wherever you like.

    Add the following lines near the top of tools/demo.py so that the script can access the yolox folder.

    #demo.pyの中身に書き込みましょう。
    import sys
    import os
    sys.path.append(os.path.join(os.path.dirname(__file__), '..'))

    Without this, you will get an error saying that the yolox package cannot be found.

    Then run the following command in the terminal.
    This lets you check whether the demo runs correctly.

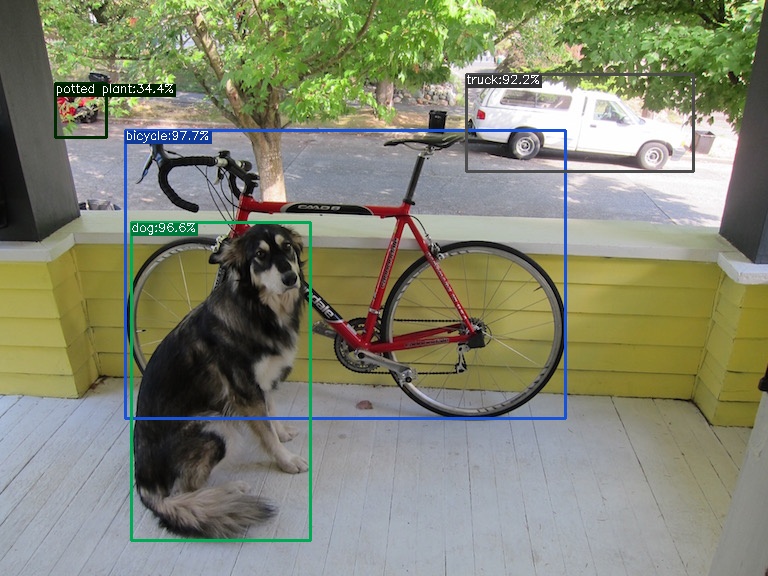
    python tools/demo.py image -n yolox-x -c yolox_x.pth --path assets/dog.jpg --conf 0.25 --nms 0.45 --tsize 640 --save_result --device gpu 
    #gpuで動かさない場合には、gpuをcpuに書き換えてください。

    Change –device gpu to –device cpu as appropriate for your setup.

    You should now find the following image inside YOLOX/YOLOX_outputs/yolox_x/vis_res/20……..
    Bonus

    For those who aren’t sure which computer to buy, I’ve started offering computer purchase consultations on Coconala!

    あなたの要望に合わせてパソコンを選び、提案します パソコン選びに困っている方々へ!様々な目的に対応できます!

    I often pick out computers and give advice on them, and many friends told me I could make money doing computer consultations.
    Inspired by that, I decided to give it a try!

    I’ll recommend a computer that suits what you plan to use it for and your budget.
    In particular, I’ve chosen and used many computers for machine learning.

    And if you’d like, I can also advise you on what to look for the next time you buy a computer.

    Computers I’ve picked out so far include lab analysis machines, everyday-use machines, game-streaming machines, machines for incoming university students, machines for architecture students that can run CAD, and basic no-frills machines.

    I use both Mac and Windows, so I can talk about and recommend either!

    Please feel free to make use of it.

  • My elif conditional branching isn’t working!! [Python]

    My elif conditional branching isn’t working!! [Python]

    Have you ever wanted to branch on multiple conditions with an if statement, tried using elif, and found that although no error was raised the results still weren’t right?
    If so, the situation described below might be what’s happening.
    I made this mistake myself, so I’m writing it down here for reference.

    The problematic program

    The problem arises when you write two conditions in the if and elif statements of a program that includes elif.

    def trable(a, b):
        if a >= 10 & b >= 10:
            print("patern A")
        elif a >= 10 & b < 10:
            print("patern B")
        elif a < 10 & b >= 10:
            print("patern C")
        else:
            print("patern D")
    
    trable(11, 11)
    trable(11, 9)
    trable(9, 11)
    trable(9, 9)

    When you run the program above, you might expect the cases to be sorted into patterns A, B, C, and D in order from the top, but what you actually get is the output below.

    patern A
    patern B
    patern C
    patern B

    So what happens if we swap the order?

    def trable(a, b):
        if a >= 10 & b >= 10:
            print("patern A")
        elif a < 10 & b < 10:
            print("patern B")
        elif a >= 10 & b >= 10:
            print("patern C")
        else:
            print("patern D")
    
    trable(11, 11)
    trable(9, 11)
    trable(11, 9)
    trable(9, 9)

    If you swap the code for patterns B and C, expecting the output to come out as A, B, C, D, what you actually get is the output below.

    patern A
    patern D
    patern D
    patern D

    elif itself is used as follows when you want to define multiple conditions.

    if 条件式A:
      条件式Aが真(True)となった場合の処理
    elif 条件式B:
      条件式Aが偽(False)で、条件式Bが真(True)となった場合の処理
    else:
      条件式Aが偽(False)で、条件式Bも偽(False)となった場合の処理

    However, once the conditional expressions in the if and elif statements contain two conditions, the problem described above is likely to occur.
    As a result, you don’t get the output you intended.

    The tricky part is that no error is raised, so you can’t tell whether things are working until you actually look at the results.

    How to fix it

    When you want to branch into multiple cases using compound conditions, avoid specifying multiple conditions in the elif statement.

    def resolve(a, b):
        if a>= 10:
            if b >= 10:
                print("patern A")
            else:
                print("patern B")
    
        else:
            if b >= 10:
                print("patern C")
            else:
                print("patern D")
    
    resolve(11, 11)
    resolve(11, 9)
    resolve(9, 11)
    resolve(9, 9)

    It’s more cumbersome, but doing it this way gives you exactly the output you expect.

    Programming has unexpected pitfalls like this, so it’s a good lesson in carefully checking the code you write.

    Addendum (August 2022)

    It turns out the problem was that I hadn’t wrapped the conditions in parentheses.

    def trable(a, b):
        if (a >= 10) & (b >= 10):
            print("patern A")
        elif (a < 10) & (b < 10):
            print("patern B")
        elif (a >= 10) & (b >= 10):
            print("patern C")
        else:
            print("patern D")

    With this change, the branching worked correctly.
    Alternatively, you can also fix it by writing and instead of &.

    def trable(a, b):
        if a >= 10 and b >= 10:
            print("patern A")
        elif a < 10 and b < 10:
            print("patern B")
        elif a >= 10 and b >= 10:
            print("patern C")
        else:
            print("patern D")

    & and and may seem equivalent, but & also acts as a bitwise AND, so in the original program

    a >= 10 & b < 10

    this apparently means a >= (10 & b) < 10, and
    with a=9, b=9 the inequality becomes
    9>=8<10, which evaluates to True.

    Tricky stuff…

  • What to Do When Your PC’s Fans Spin Up at Full Blast the Moment You Turn It On

    What to Do When Your PC’s Fans Spin Up at Full Blast the Moment You Turn It On

    When you turn on your computer and the fan starts spinning at full blast, you might worry that the machine has broken.
    When a computer suddenly starts behaving strangely, it’s easy to assume there’s nothing you can do, but you can often fix these problems yourself.

    That said, you do this at your own risk, so be very careful, and if you know someone knowledgeable, it’s a good idea to work on it together.
    Computers are expensive, after all…

    In this post, I’ll describe—based on my own experience—what to do when the fan spins at full speed at startup and doesn’t calm down even a while after Windows has booted.

    Symptoms

    I had left my desktop computer on overnight, and in the morning I noticed the fan was running at full speed.

    I shut the computer down once, but the fan kept spinning, so I flipped the power supply switch off and unplugged the power cord.
    I pressed the power button a few times to discharge it and then booted up, but the fan was still running at full speed.

    Other than booting somewhat slowly, though, there were no other apparent problems.

    What I did

    I checked the CPU temperature in the BIOS setup screen, but it only reached about 30 °C, so there was no problem there.

    I set the PC to power-saving mode in the BIOS, but nothing changed.
    I also lowered the minimum fan speed, with no effect.

    I unplugged every cable connected to the computer, including the power and USB cables, pressed the power button a few times to discharge it, and then opened up the case.

    I removed the coin cell battery and pressed the power button several times (clearing the CMOS).
    [There are other ways to clear the CMOS. It’s also a good idea to disconnect the power supply cables to the motherboard at this point.]

    Clearing the CMOS is a way of resetting the motherboard’s BIOS: after removing the coin cell battery, you drain the residual electricity from the motherboard.

    I put the coin cell battery back in, reconnected the keyboard, power, and video cables, and turned the computer on.
    The fan then returned to its normal speed.
    Just to be safe, I also updated the BIOS.

    For now, everything is running normally.

    Cause

    The direct cause seems to have been a BIOS error.
    Something apparently went wrong, resulting in the fan running at full speed.

    BIOS errors can often be fixed by clearing the CMOS, so whenever you suspect a BIOS error is to blame, resetting the BIOS with a CMOS clear will frequently solve the problem.

    BIOS errors can be caused by leaving the computer powered on for long periods, dust building up inside the case, shutting the computer down abruptly at an inopportune moment, or installing dubious software.

    Dust buildup inside the case is especially common, so you can prevent it by cleaning the interior with compressed air about once a year.

    I updated the BIOS at the end this time. The reset alone is probably enough, but updating may also clear latent errors.
    It’s the same idea as a camera that won’t power on starting up again after a firmware update.

    Being able to fix computer errors yourself is a genuinely valuable skill, since it saves on repair costs.
    Also, when a computer won’t boot, there are surprisingly few things you can do besides replacing parts, so it’s worth looking into other options first.

    Bonus

    I’ve decided to offer consultations on computer problems through Coconala!

    パソコンが動かなくなった時の対処法を提案します パソコンが突然動かなくなった駆け込み寺として

    I’ve worked with all kinds of computers and seen all kinds of problems.
    My Coconala listing mentions computers that won’t turn on, but I’m happy to help with any trouble you run into while using a computer.

    I’ve only just started using Coconala, so I may still be getting the hang of it, but please give it a try the next time you run into computer trouble.

    I use both Mac and Windows, so I can help with problems on either platform.