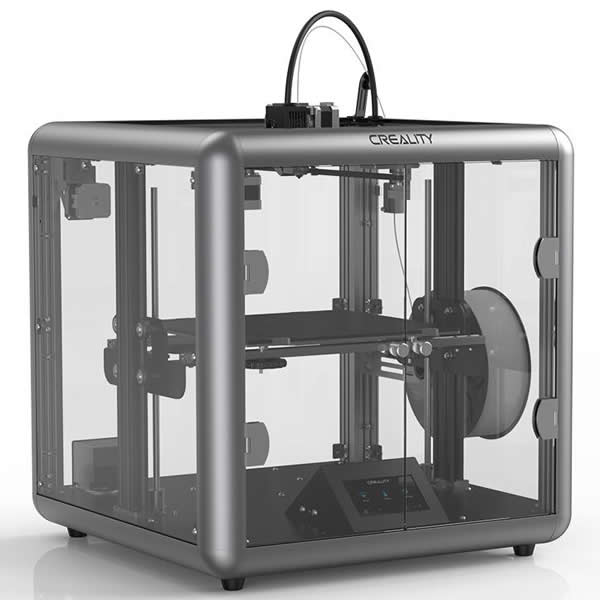
This article was automatically translated from Japanese using AI. The Japanese version is the authoritative version.
(*This article was updated on December 20, 2021.)
Hello.
I’m a cash-strapped biology major who kept saying “Once I get into university I’m definitely buying a 3D printer!!” and, now that I’m a senior, has finally managed to buy one.
Between classes and research I was too busy to work many part-time hours, so money was tight, but I made up my mind to buy the 3D printer I’d always dreamed of. Still, I didn’t want to waste money….
And if I compromised on my choice, I’d just end up wanting a better one later….
I wanted something I’d be truly happy with, so I searched the web endlessly, asked people at my university who know engineering, and bought one only after researching it thoroughly.
When you decide you want a 3D printer and actually start searching, you find a huge number of models, from ones in the ten-thousand-yen range to ones costing over a million yen.
You’ll probably agonize over which one is best, and honestly it’s hard to tell what the differences even are.
This article is for people wondering, “I want a consumer 3D printer as a hobby, but I don’t know what to look out for when choosing one”
“Which one should I actually buy?”
I’ll walk through it, including the reasons behind my own choice.
What’s the difference?
With prices ranging from tens of thousands to millions of yen, you’re bound to wonder what actually differs.
First, as a premise: print accuracy and how clean the finished object looks don’t change much with the price of the 3D printer.
Accuracy and finish vary a lot depending on the printing method, but within the same method there isn’t much extreme difference.
Basically there are two printing approaches: FDM (melting filament with heat and building up layers) and optical/resin curing (hardening with light). Generally, the optical method gives a cleaner finish (build marks are less visible) and better accuracy, while FDM has the advantage of being easy to work with.
I’ll explain the differences between the two in my next blog post.
Print accuracy and finish are determined by the detailed settings that tell the 3D printer how to print.
So even a cheap printer can print beautifully if you configure it properly, and it’s quite common for an expensive printer to fail to print at all if you set it up carelessly.
So what does change with the price?
In a word, it’s the extra features on top of the basics.
To give a few examples:
- Supports a wider variety of filaments
- Larger printable size
- Built-in Wi-Fi
- Heated build plate
- Two filament nozzles, so you can print with two materials — and so on
On top of the basic performance, the price changes depending on which options are included.
If you think about which features you want, the list of candidate models will narrow down naturally.
Criteria for choosing
That said, you may not even know what features exist, or which ones are actually useful.
So let me introduce a few points worth paying attention to.
Print size
The size you need depends on what you want to make and where you’ll put the printer.
Roughly speaking, the 3D printer itself will be about 1.5 to 2 times the size you want to print.
If you’re making small containers or pen stands, a small printer is fine, but if you plan to make headphone stands or cases, you need to think about size.
What I realized after buying one is that very large prints are a hassle and take a long time, so I didn’t print big things very often.
But when I made a headphone stand, I needed quite a bit of size, and I was glad I’d bought a large one.
A larger printer also has the advantage of letting you print multiple parts at once.
Number of usable materials
Different materials require different melting temperatures.
Optical 3D printers can only use light-curing resin, but with FDM you have the commonly used PLA, ABS which is a bit harder than PLA, TPU with its slightly rubbery feel, and even printers that can handle carbon fiber.
The more material types supported, the higher the price.
Most printers can handle PLA and ABS at a minimum.
I use almost nothing but PLA and have never found that inconvenient, so maybe you don’t really need support for many materials… perhaps?
Number of filament feed mechanisms
Some models have two or more nozzles for extruding filament.
This lets you use multiple materials and, for example, color different parts of the object differently.
Another popular recent approach is water-soluble filament, which can be used as support material so you can print even complex geometries.
Supports are something you absolutely have to think about when making an object, but with water-soluble filament you can print without leaving support marks.
One caveat: with multiple nozzles, apparently the idle nozzle can sometimes collide with the object depending on what you’re printing.
Whether the build plate can be heated
This is a feature that budget 3D printers often lack.
The nozzle heats up and melts the filament to build the shape, and when the build plate is heated as well, the molten filament adheres to the plate more easily and the print is less likely to peel off during printing.
Also, once printing is finished the temperature drops, which makes it easier to remove the print from the plate.
Personally, I have benefited from this feature to a surprising degree. Because prints stick firmly to the plate, large objects don’t shift during printing, and tall objects can be printed as well.
The structure of the printer
Enclosed or open-frame? Aluminum frame or plastic?
An enclosed design keeps odors from printing (especially with ABS) contained, and it also keeps the interior somewhat warm, which prevents warping caused by prints cooling too quickly.
With an open design, you can check the print from every angle. Access is also better when the nozzle clogs, so maintenance is much easier.
As for the frame material, it affects how stable the printer’s motion is.
A metal frame is rigid and very stable.
The downside is the added weight, which makes the printer much harder to move around.
Ease of operation
One thing you really shouldn’t overlook is how easy the printer is to operate.
There’s a wide range, from models with nothing but buttons, to ones with an LCD plus buttons, to touchscreen models.
A common issue with cheap 3D printers is that they’re advertised as having a touchscreen, but when you actually try to use it the responsiveness is terrible.
That in itself becomes a source of frustration.
Check reviews for comments on touchscreen responsiveness, and be wary if the ratings are lukewarm.
Personally, I find touchscreens very pleasant to use and recommend them, since you can operate them intuitively without reading the manual.
Other features
As for other features, I’d like to mention Wi-Fi and camera functions.
With Wi-Fi, you can send print data to the printer over the network.
Normally you put the file on a USB drive or SD card and plug it directly into the printer, but Wi-Fi saves you that trouble.
The camera function means a camera is installed inside the printer so you can check on the state of your print even when you’re away from home.
If you’re the kind of person who leaves the printer running for hours while you’re out, having a camera might be worthwhile.
Recommended models
Creality Sermoon D1
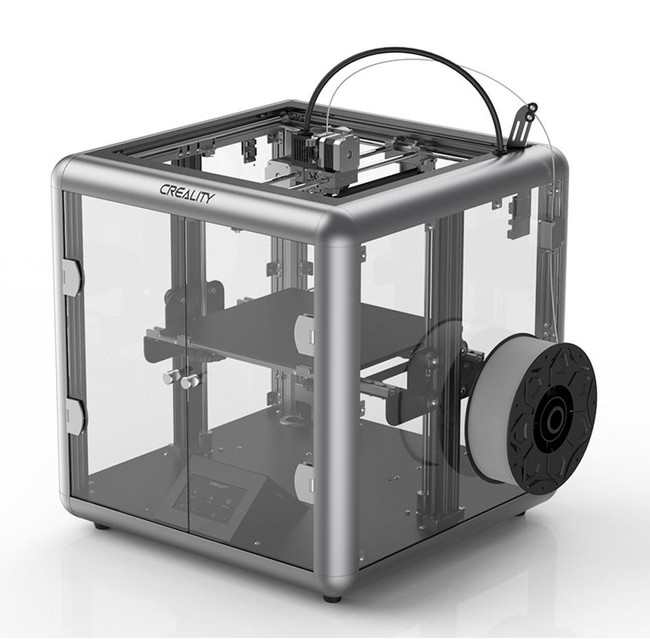
This is the model I actually use myself.
Although this model is enclosed, the panels are transparent, so you can check your print from every angle.
The frame is aluminum, so it’s extremely rigid.
Because the build plate moves along the Z axis, prints don’t shift during printing, and the printer is also very quiet.
I keep it next to my bed, and I can take a nap with no problem while it’s running.
The build volume is 280 × 260 × 310 mm, so you can print fairly large objects.
It’s operated via touchscreen, which is very intuitive.
The supported materials are PLA, ABS, and TPU. There’s no Wi-Fi or similar extras, so my impression is that it’s simply a well-performing 3D printer.
One drawback is that loading filament into the nozzle takes a bit of a knack.
The first time, you might struggle with it for about ten minutes.
Other than that, I’ve had no trouble using it and I’m very satisfied.
The price is just under 100,000 yen, which is a little steep for home use, but the performance is more than worth it.
Creality Ender-3 V2

This is probably the best-performing and most user-friendly model you can buy for under 50,000 yen.
The build volume is 220 × 220 × 250 mm, and the supported materials are PLA, TPU, and PETG.
It covers all the basics: the build plate is heated, and it’s operated via touchscreen.
The body is metal and nicely rigid.
There’s a storage compartment under the build plate where you can stash various tools — a quietly welcome touch.
The printer costs under 50,000 yen, which puts it among the cheaper home 3D printers.
This is the kind of model that will leave you with no real complaints, so if you’re thinking of just giving 3D printing a try, why not start with this one?
Original Prusa i3 MK3S+ 3D printer

The Prusa i3 is a 3D printer made by a Czech company.
What’s distinctive here is that they make their 3D printers using 3D printers — apparently their factory is filled with their own machines.
It’s a world-famous printer, and among machines in the 100,000 yen range it’s the most highly recommended and simply the best there is.
It comes in kit form and pre-assembled, and the kit version can be had for around 100,000 yen.
The basic specs are beyond reproach: a heated build plate and quiet operation while printing.
The build volume is 250 × 210 × 210 mm, which is roughly enough for most needs.
What’s impressive about this model is that the nozzle reaches very high temperatures, so it supports a huge range of materials:
PLA, PETG, ASA, ABS, PC (polycarbonate), CPE, PVA/BVOH, PVB, HIPS, PP (polypropylene), Flex, nGen, nylon, wood-fill, and more.
The only drawback for me personally is usability.
I haven’t actually tried it, but instead of a touch panel, it uses a physical dial for control.
The display shows text only.
It will probably take a little while to get used to operating it.
In terms of basic specs alone, it easily surpasses 3D printers costing over 200,000 yen.
I agonized quite a bit over whether to get the Sermoon D1 or this model.
Incidentally, although it isn’t available on Amazon, Prusa’s website also offers the Original Prusa MINI+. Its print volume is smaller, but the price is kept to around 50,000 yen, making it an excellent product as well.
Flashforge Creator Pro

Flashforge is a fairly popular 3D printer company in Japan, and if you look around, you’ll find it featured in all sorts of places.
Among their lineup, the model I’d recommend here is the Creator Pro.
Because this model has two nozzles, you can print with the two types of material mentioned earlier at the same time.
What’s more, the unit costs about 80,000 yen, which is by no means expensive for home use.
It supports materials such as ABS, PLA, and HIPS, and its print volume is W227 × D148 × H150 mm, which is a bit smaller than other models.
The filament holder is at the back, so it isn’t noticeable from the front.
The downside is that swapping filament is a bit of a hassle.
Control is via physical buttons and a text-only LCD, so usability probably isn’t as good as a touch panel. Still, it’s perfectly workable once you get used to it, and with Japanese-language support and a large user base in Japan, a quick search will turn up instructions for just about anything, so you’re unlikely to run into much trouble.
Since the front is enclosed, temperature control is very easy, but you can only check the print from one direction, and maintenance is a little awkward.
That said, being able to use two materials at this price is very appealing.
There are plenty of other good models besides the ones introduced here.
I hope this proves helpful as a starting point.