If you work at a desk with a laptop, sooner or later you will probably spill a drink on it. I once spilled a drink on my own MacBook Pro and nearly lost the files I needed to graduate. So here I want to share what to do when your computer gets soaked.
What to do right after a spill
First of all, when you spill a drink, avoid doing anything careless like turning the computer on.
Instead, shut the power off immediately and stand the computer up on the side where the drink was spilled, so that no more liquid seeps inside or spreads to areas that are still dry.
Photo
Once you have confirmed that the surface of the computer is dry (after several hours to a day), try turning it on and check its condition.
What to do next
Depending on the condition, there are several options.
Coverage from the retailer or manufacturer
Some manufacturers’ warranties include accidental damage coverage, so check whether your case qualifies.
If you can use this kind of coverage, it is likely to be the cheapest way to get your machine back.
With a standard manufacturer’s warranty, liquid damage is very likely to be excluded. That said, many manufacturers still accept repair requests, so it is worth asking for a paid repair.
Computer repair shops
Many computer repair shops handle water-damaged machines.
Some also work on MacBooks, so it is well worth considering this option.
They can also inspect the inside of your computer, so even if you only spilled a small amount and simply want peace of mind, they will check it for you.
And if a repair is needed, they can handle a wide range of work, so the chances of recovery are very high.
Why leaving it alone is a bad idea
Even after a spill, a computer will often work again a day later.
Even so, I do not recommend just leaving it at that. If moisture has reached the circuit board, it can cause a sudden short circuit or corrode the board.
You often hear about machines that worked for a while after getting wet and then suddenly died, so get the computer repaired as soon as you can.
Acting early may mean a simple cleaning is enough, and it keeps the cost down.
What you can do in advance, just in case
When a computer gets soaked, recovering the data is often difficult.
For exactly that reason, back up your computer regularly.
Computers tend to break down precisely when you need them most, such as when you are up against a thesis deadline.
Not being able to retrieve your data at a moment like that is a serious problem. I have been in exactly that situation myself….
I often help people choose computers and give advice, and many friends told me I could make money doing PC consultations.
Inspired by that, I figured I’d give it a try!
I’ll recommend a purchase that fits how you plan to use the computer and your budget.
And if you’d like, I can also advise you on what to look for the next time you buy a computer.
Computers I’ve helped pick out so far include:
analysis machines for the lab, everyday-use PCs, PCs for game streaming, PCs for incoming university students, PCs that can run CAD for architecture students, and just-something-that-works PCs.
I use both Mac and Windows, so I can talk about and recommend either one!
These days, with more apps using location services and more time spent on social media, smartphone batteries often fail to last a full day even as their capacities keep growing.
At the same time, with things like mobile payments, running out of battery has become a serious inconvenience in daily life — which is exactly why demand for power banks is greater now than ever.
What is MagSafe?
With an ordinary power bank, you also need a cable to connect it to your phone, so you end up carrying more stuff, and the power bank itself is fairly heavy — all rather annoying.
Some batteries come with an attached cable, but the cable is so short that it isn’t well suited to using your phone while charging.
Recently, Apple introduced MagSafe — magnet-based wireless charging — starting with the iPhone 12 series. Magnets are embedded in the back of the phone, so the wireless charger snaps into place magnetically and there’s no worry about it slipping out of alignment.
MagSafe has been included since the iPhone 12, and some models don’t support it (such as the iPhone SE), but as long as your phone supports wireless charging, you can buy a MagSafe-compatible case and use MagSafe accessories with it.
The magnetic hold isn’t noticeably weaker either — it’s very strong. (I’m actually using this setup with an iPhone SE 3.)
The Anker 622 Magnetic Battery is just too good
You can attach chargers or phone grips as MagSafe accessories, but personally I think a power bank is the best choice.
There are several MagSafe power banks out there, and the most impressive of them all was the Anker 622.
Some models are just plain batteries, but this one also works as a stand.
You can also toggle charging on and off with the button on the battery, so you can leave it attached and charge only when you need to — meaning it doubles as a simple stand. And because the magnet is circular, you can use your phone in landscape orientation too.
The magnet is strong enough that the battery won’t fall off if you shake the phone, yet it detaches easily when you want it to — just the right amount of holding force.
It comes in plenty of colors, and the size and weight are modest enough not to get in the way. Excellent all around.
As for the all-important charging speed: it isn’t as fast as a wired connection, but it’s fast enough that your battery percentage still climbs even while you’re watching YouTube.
What’s more, you can charge the battery itself while it’s attached to and charging your phone (pass-through), which effectively gives you the same experience as if the iPhone’s charging port were USB Type-C.
The downsides are, unsurprisingly, weight and charging speed. There’s no getting around the added weight — the combination is heavier than the phone alone, so you definitely notice it in your pocket. And since charging isn’t rapid, it’s best to think of it as an extended battery for your phone.
It’s been a while since I came across such a great product, so I wanted to share it.
Apps that let you earn points or miles just by getting around have become popular in recent years. The trouble is, many of them make you open the app and watch an ad every single time you move, or they simply bombard you with ads. It gets so irritating that you start to wonder whether you’re collecting points or just collecting frustration.
Recently I came across two apps featured in a magazine that are remarkably convenient: none of the tiresome ads I’d come to expect, and you can actually enjoy racking up miles.
They made quite an impression on me, so I thought I’d write up a blog post about them.
About the two apps
The two apps use almost the same system, and you can run both at once, so I’d recommend using them together.
With both apps, you accumulate miles as you travel, and those miles can be exchanged for points or goods. Note that neither offers a cash-back option.
The rate at which you earn miles depends on your mode of transport, with walking earning more per unit distance than driving.
Your mode of transport is classified automatically, and if it gets it wrong you can request a manual correction.
You can also view your travel history, so you can check how far you moved on any given day.
In my experience, both apps track movement quite accurately—they properly register even a quick trip from home to the convenience store, and you earn miles for it!
The one drawback is that your phone’s battery drains unusually fast. Well, of course it does—they’re using location services continuously. That’s just something you have to live with.
About Miles
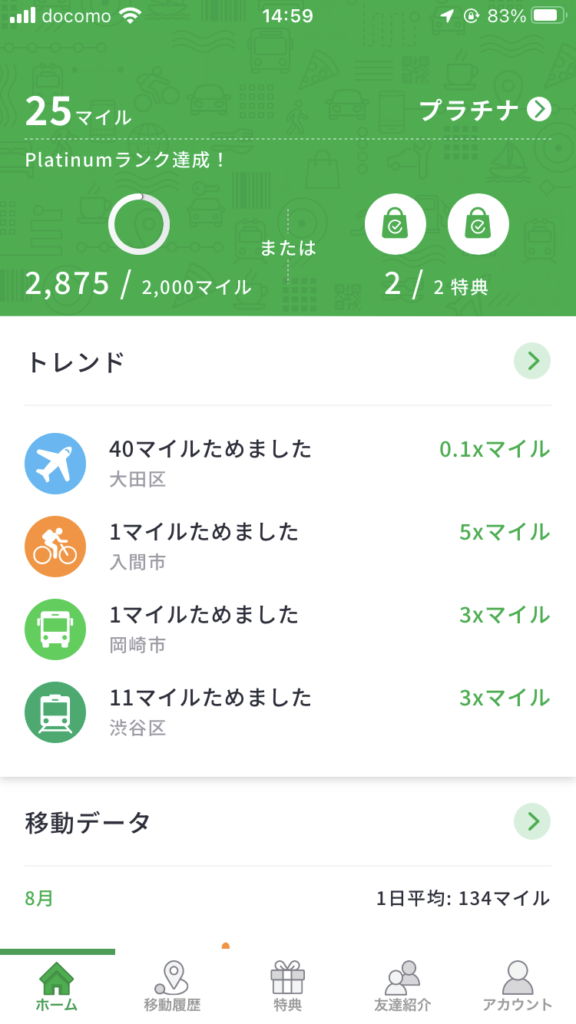
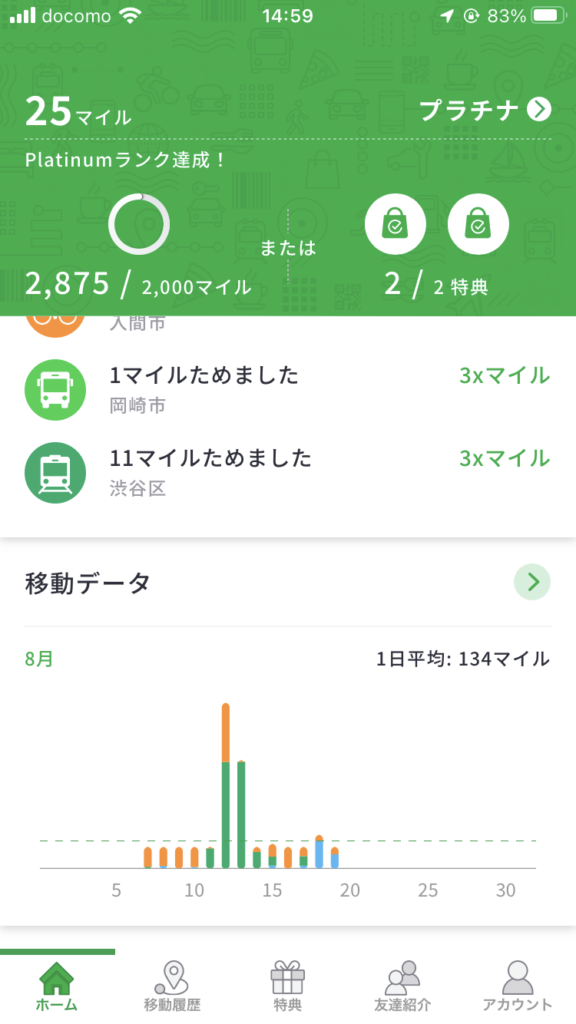
Miles is an app made by Miles Japan Inc., and as the original app of the two, it’s very solidly built. The actual screen looks like the one below: beyond your earned miles, it shows travel data and lets you view detailed trips in your history, which makes it handy for getting a rough picture of your health and daily activity.
The miles you accumulate can be exchanged for all sorts of things—JAL miles, campaign entries, convenience store coffee, and more.
There’s nothing you have to do on a daily basis, so you can just leave it installed and check in whenever you feel like it. That’s a nice difference from ANA Pocket.
Invitation campaign code (Install the app using the code below and you’ll get 100 yen in Amazon gift credit!)
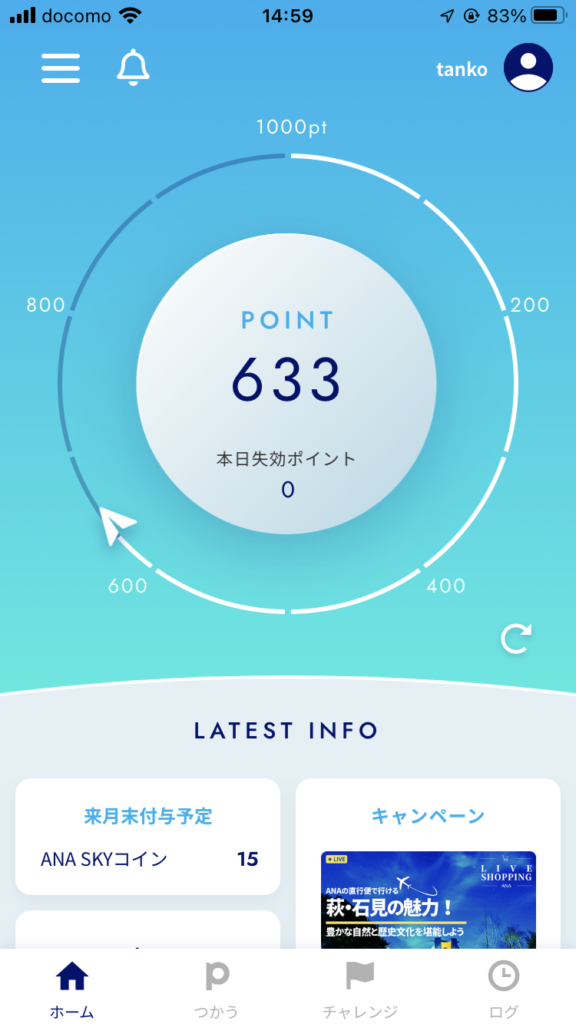
ANA Pocket is ANA’s app, which runs on the Miles system. As you’d expect from a major company, the home screen is extremely easy to read.
Here you accumulate points instead of miles. ANA Pocket has a “Challenges” system: you sign up for a challenge, and if you meet its conditions you earn bonus points.
The best thing about ANA Pocket is that you can convert your points into ANA miles, and there’s also a gacha you can spend points on, so you’re never at a loss for how to use them.
Converting to ANA miles always feels like good value, so if there’s nothing else you want, that’s a perfectly fine default.
Like Miles, it also lets you view your travel history, so you can review your activity in the same way.
The biggest sticking point is probably that it isn’t available on Android… Here’s hoping that changes.
Invitation campaign code (Install the app using the code below and you’ll get 5,000 pt!)
I replaced my iPhone for the first time in four years. My previous phone was an iPhone XR, which had no home button.
When the first iPhones without a home button came out, my reaction was “seriously?” But as things stand now, the home-button-less iPhone 12 and 13 actually outsell the iPhone SE.
So, honestly, what’s the deal with the iPhone home button? And did switching to the iPhone SE make any difference? Let’s take a look.
About the home button
First, the home button question, which was what I cared about most. I’m firmly in the anti-“iPhone without a home button” camp. On my iPhone XR I never used Face ID and always typed in my passcode. Holding the iPhone up in front of my face for Face ID was a hassle, and I found it more convenient to just quickly punch in the passcode.
The biggest difference, I think, is whether the screen wakes when you touch it. On the iPhone SE, touching the screen doesn’t wake it, whereas on the home-button-less models the screen turns on with just a tap.
Personally, I prefer a phone that doesn’t wake on touch alone. The reason is that when the phone is in your pocket, the screen turns on and off from accidental input, wasting battery. (For some reason the screen responds even through clothing.) And if you leave it somewhere you might brush against it, the screen suddenly lights up and you mistake it for a notification.
Having the screen wake via the home button is extremely useful for preventing accidental screen input.
Coming back to a home button, I was reminded that fingerprint authentication really is the best. The iPhone SE uses the same chip as the iPhone 13, so unlocking is extremely fast. (So fast that the lock screen barely serves a purpose anymore.)
They say Face ID works with a mask on the iPhone 13, but I’ve heard mixed reactions. With a fingerprint sensor, when the phone is sitting on the desk and I want to open it quickly, I don’t even have to pick it up, and I can unlock it in any situation without depending on my face. It’s just too convenient.
The home button and fingerprint authentication really are the best!! Glad I bought it!!
Other aspects of the iPhone SE
As for other features, the first is battery life. Surprisingly, the battery doesn’t last as long as I’d hoped.
When I switched to the iPhone XR, I thought the battery was infinite, but with the iPhone SE I was only impressed to the extent of “yeah, about what I expected.” Honestly, batteries may have reached the point where further improvements are hard to notice.
That said, the battery life isn’t bad. Four hours of YouTube seems to be no problem, and it lasts a day well enough.
As for heat, my impression is that it stays fairly cool. I thought the small, thin body might trap heat, but it hasn’t gotten hot at all so far, so it doesn’t seem to be an issue.
The camera obviously can’t compete with something like the iPhone 13, but I think it’s more than good enough for practical use. iPhone cameras have always been excellent. If you own a separate DSLR or mirrorless camera, the iPhone SE may be plenty; it’s certainly not impractical. If anything, the small camera on a small phone makes for a nice compact package.
On home-button-less models, notifications and Control Center are pulled down from the right and left of the notch, but on the iPhone SE it’s top and bottom, which I think is another plus. The display isn’t interrupted by a notch, so you get a clean rectangular screen.
Still, now that so much functionality differs depending on whether there’s a home button, I’m a little worried about where iOS is headed. It seems like a lot of things have to be built twice, once for each design. I really hope they don’t drop support any time soon.
My best recent purchase is a pair of Cutipol forks. My sister bought me the cutlery I’d wanted for ages as a housewarming gift.
Features
What I bought is from the GOA series—a design so well known that it’s fair to call it the emblem of the brand.
The handle is resin and the eating end is stainless steel. They have a pleasant heft: substantial without being heavy, exactly the right weight.
The weight is distributed evenly, so they feel very well balanced.
Personally, my first impression when I saw them in the shop was, “These are huge!!!” It’s hard to judge the scale online, but seen in person, even the smaller sizes of Cutipol cutlery are fairly large. So I’d recommend seeing them in a shop before deciding which size to buy.
There are many imitations of Cutipol, and lookalikes of the GOA series in particular are extremely common. Here are the differences from other products, as listed on Cutipol’s website.
The resin joint on the GOA is roughly made and risks coming apart
The stainless steel section is heavy
It looks like a GOA but is made entirely of stainless steel
As this suggests, the genuine article is well made and will last a long time.
How they feel to use
They are very comfortable to use, and my hand never gets tired even after long use. The handle is thicker than it looks in photos, so even with my thick fingers it feels perfectly natural to hold.
I love the design too. Once you buy good cutlery, all sorts of ideas about what to eat with it start coming to mind. I can’t wait to have some cake…
Comments
They come in many colors, so I think they’d suit all kinds of plates and meals. I’d admired this cutlery ever since I saw it at a café, so I’m delighted to finally own some.
They make a great gift or a treat for yourself, so do take a look in a shop or on their website.
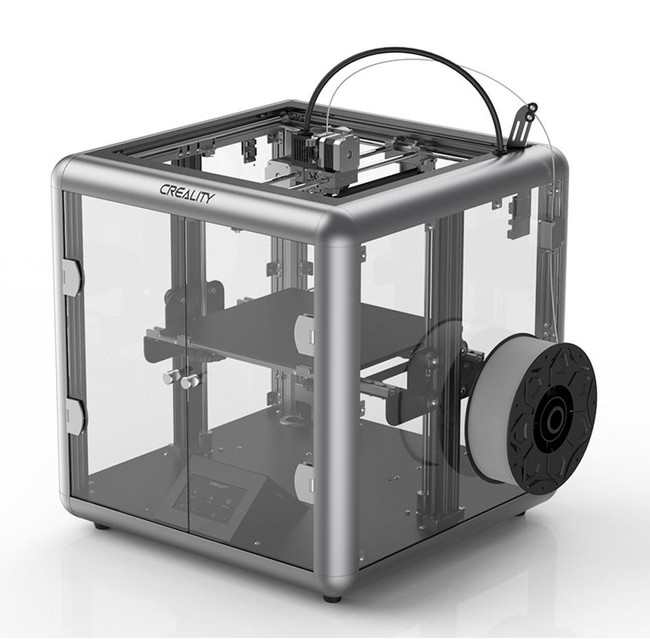
As a home 3D printer, this is a machine that personally makes me think there may be nothing better.
It is an excellent machine in every respect: cost performance, practicality, and design. It does have some drawbacks, but even so, considering the price, you have to wonder whether anything could beat it.
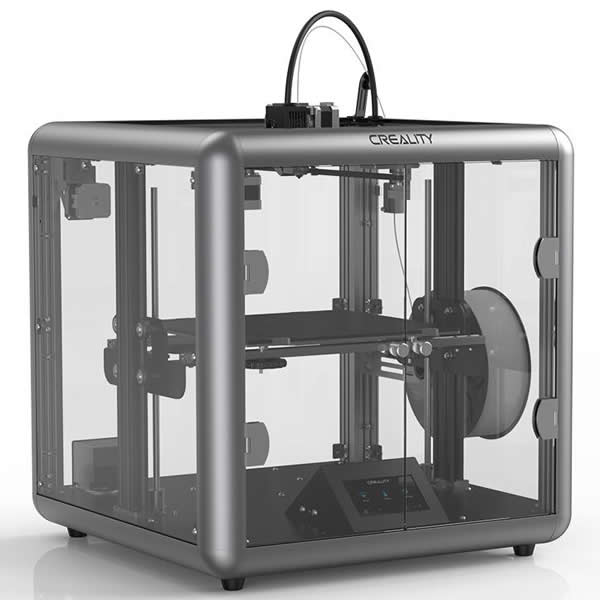
Creality 3D Sermoon D1
Features of the Sermoon D1
Unusually for a low-priced home model, it is a fully enclosed 3D printer, so heat does not escape easily while printing, making it easier to get clean prints.
And because it is built from an aluminum alloy frame with transparent side panels, you can watch the printing process from every direction.
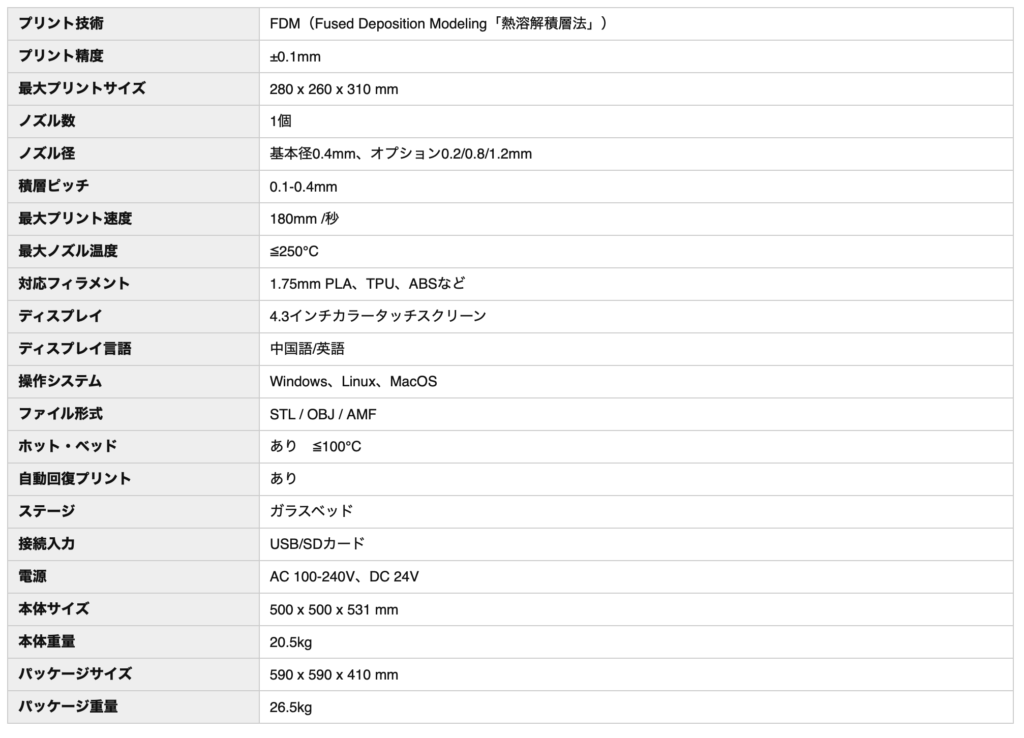
The build volume is a very generous 280 x 260 x 310 mm, which is extremely handy for printing large objects.
It handles PLA and ABS without any problems, of course.
Operation is via a touchscreen and is very easy.
Sermoon D1のスペック(販売ページより)
Buying it and using it
The first thing that surprises you after buying it is the size. When the box arrived and I tried to bring it into the room, it barely fit through the door.
Apparently there are cases where the outer box will not fit through the front door when it arrives at your home.
The printer itself is smaller than the outer box, so you can get it in by taking the contents out, but even so the size is overwhelming.
The unit measures about 500 x 500 x 531 mm, so you need a fair amount of space to place it in a room.
This too comes down to it being fully enclosed: the build volume is 280 x 260 x 310 mm, but the width is nearly twice that.
Assembly after delivery was very easy—just attaching two parts.
I think the greatest feature of this model is how quiet it is. Even with the fan running at 100%, it is remarkably quiet.
Sleeping right next to it at night is admittedly not feasible, but taking a nap is no problem at all, and if you are on the phone beside it, the printer is barely audible.
Even when you print with a raft, the raft comes off easily.
And depending on the object, you can print beautifully without a raft at all.
During printing the bed is warm so the print sticks to it, but once printing finishes the bed cools down, so the print is easy to remove. The bed is made of some curious material, and having prints come off it so easily after printing is genuinely fun.
Recommended settings
The default settings already print cleanly enough, but I tuned the settings myself to get even better prints, and here I share the configuration that worked well for me.
These are settings for Creality Slicer. Basically, you set the infill (how densely the interior is filled) however you like. I use 15%.
I lowered the retraction speed—the speed at which the filament is pulled back—and slowed the print speed. I raised the head travel speed as high as I could while still getting properly formed prints.
Once you understand what each parameter means and what values it takes, you can customize things yourself to a fair degree.
Keep in mind that what I present here is just one example, and since other people’s recommended settings did not work all that well for me, please treat it as a reference for finding settings that suit your own setup.
Drawbacks
Being a home model, it does have a few drawbacks.
– It has no auto-leveling, so getting a feel for leveling at first is difficult for beginners.
– Changing the filament is difficult (is this true of all printers?).
– There are few reviews, so there was not much to refer to when I wanted to tweak the settings.
– You have to put your data on an SD card, so sending data over Wi-Fi and the like is not possible.
Among home models it is very easy to use, and I can recommend it to beginners and advanced users alike. If you are thinking about getting a 3D printer, definitely give it a try.
When you live alone, dirty dishes pile up endlessly, and washing them is honestly a pain. Even when you plan to cook for yourself, the thought of the washing up kills your motivation and you never quite get around to it.
When I started living alone I decided I’d really commit to cooking for myself, and I bought a dishwasher to keep myself motivated!! After a lot of deliberation, I went with the MOOSOO MX-10.
In this post I want to explain why I chose this dishwasher, and why I didn’t go for the very similar MAXZEN JDW03BS01.
Why MOOSOO?
The first decision when buying a dishwasher for your home is whether to get an installation-free tank-type model or a conventional one. I’m in a rental, and installation work sounded like too much hassle, so I went with a tank-type model that requires no installation.
With a tank-type unit, you just plug it in, fill the tank with water, add detergent, and it washes your dishes. You can use it the day it arrives, which is incredibly convenient, and it’s easy to move around too.
There are plenty of tank-type models out there these days, from cheap ones to expensive ones. So the next thing to think about is where you’ll put it.
In my case, the spot was on top of the fridge — fairly high up. If you live alone in a place with no spare space, isn’t the top of the fridge by far the most likely place you can actually fit a dishwasher (somewhere reasonably wide and close to the sink)?
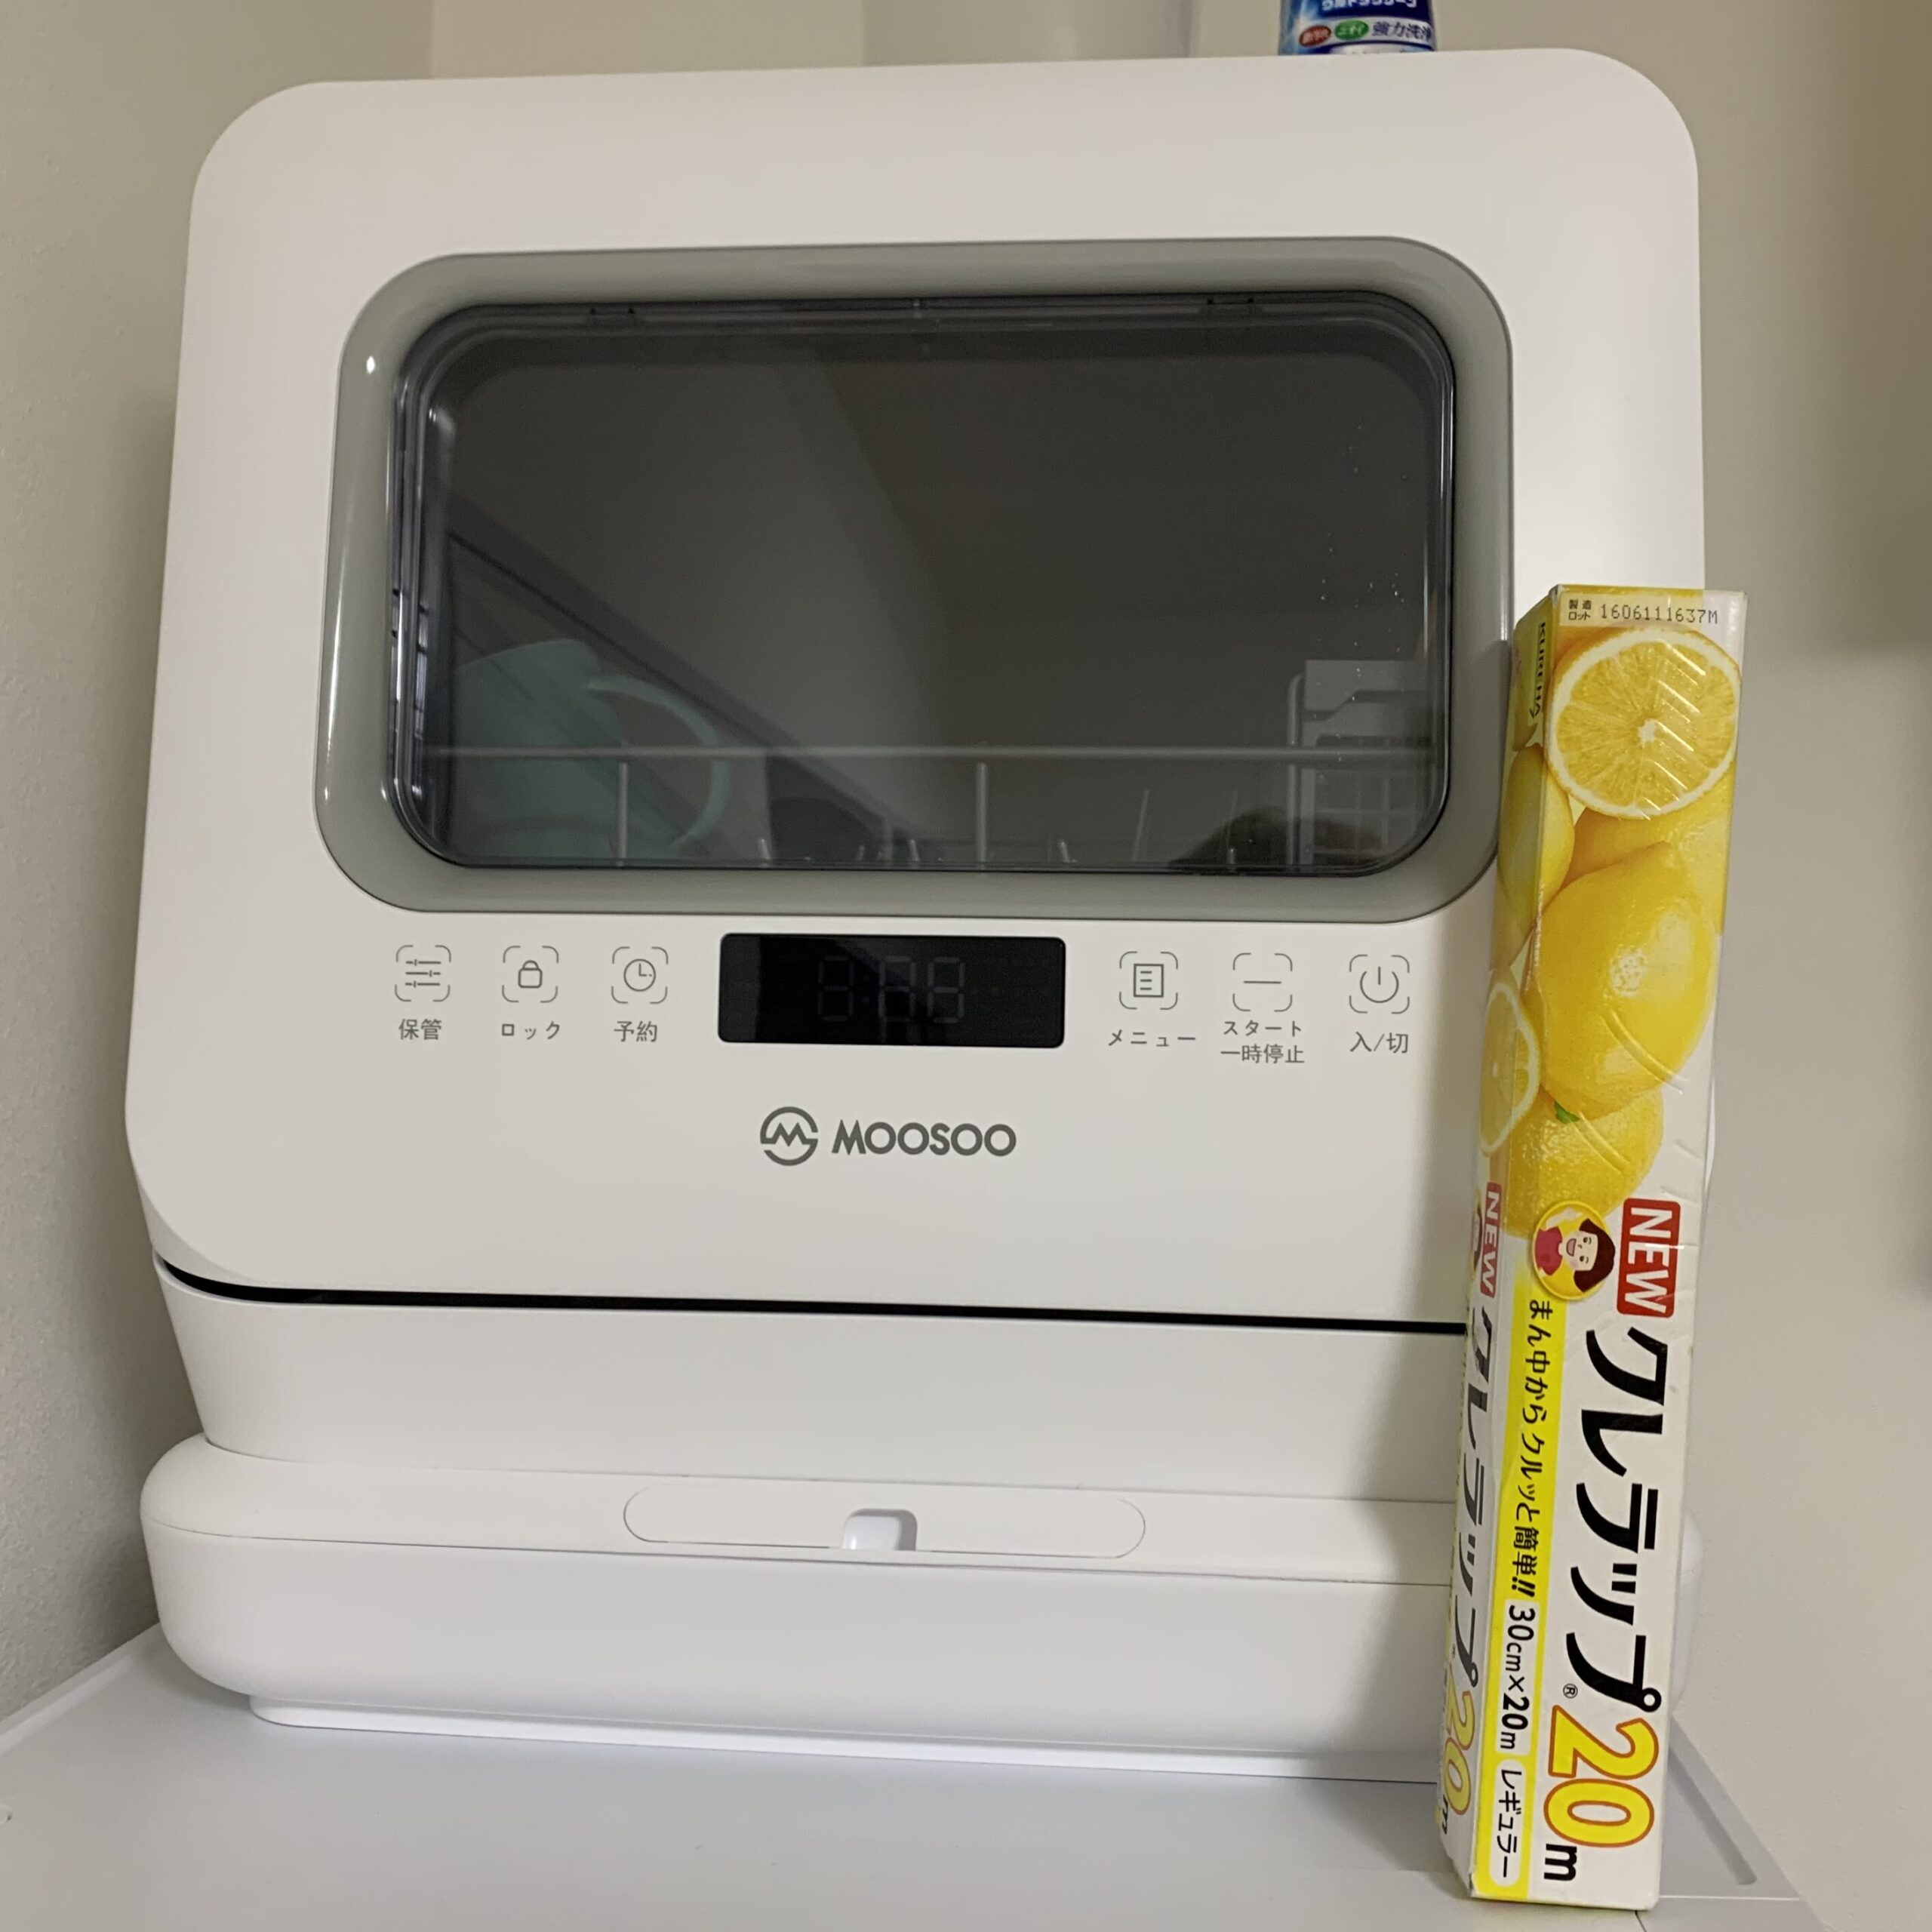
I stood a box of plastic wrap next to it in the photo so you can gauge the size. It’s bigger than you’d expect!!
When you think about filling the tank, you want the fill point to be low and easy to reach — so having the water inlet on the bottom is ideal.
The problem is that most tank-type dishwashers have the fill opening on top, which makes filling awkward if the unit is up high. As far as I could find, the tank-type dishwashers with the water inlet on the lower front are Panasonic’s NP-TSP1-W, MAXZEN’s JDW03BS01, and MOOSOO’s MX-10. Incidentally, judging from the reviews, cleaning performance is basically fine on all of them unless something is really off.
Of these three, I’d love to go with the Panasonic, but the price… So that left the latter two models. Both can be had for under about 30,000 yen, which seems pretty good. (Though I’m a bit worried about durability.)
What’s the difference between the MAXZEN and the MOOSOO?
The two models look very similar and have very similar wash modes, so you may well wonder what actually differs. The big difference is the drying function.
The MAXZEN uses fan drying, while the MOOSOO uses heated-air drying. With the MOOSOO, once the wash and dry cycle finishes you can put the dishes straight back in the cupboard. (I’ve never used the MAXZEN, so I don’t know how dry it gets things.)
You could just leave the dishwasher door open after the wash finishes, but since the MOOSOO has heated drying, things dry quickly and you can get by with relatively few dishes on hand.
The MAXZEN is a bit cheaper, so if you don’t really need the drying function, I think it’s plenty. (Washing performance seems to be about the same.)
MOOSOO frequently offers coupons on both Rakuten and Amazon, so you can often pick it up at a really good price — in which case the gap with the MAXZEN may not be that big after all.
How to set it up
First, attach the drain hose and the adapter (intake hose) that draws water up from the pump at the bottom to the back of the unit. I’d recommend attaching them before putting the unit in place.
The water supply hose is used if you connect to a faucet diverter. Doing so means you don’t have to fill the tank, but it leaves hoses everywhere, so I don’t recommend it.
Next, position the drain hose so it sits nicely in the sink. One suction-cup clip is included for holding the drain hose in place, so use that to secure it. One time my drain hose thrashed loose and made a real mess of the room.
After that, just plug it in and use it. For the first run, do an empty wash cycle to clean out the interior.
That’s all it takes to get going — very easy.
The drain hose is about 1.5 m long, so even from roughly fridge height with some distance to the sink, it reaches comfortably.
As for the results, even annoying messes like curry-stained plates come out beautifully clean with no slimy residue — I’m very satisfied.
Summary
Personally, if you’re going to make a real effort to cook for yourself, the very start of living alone is exactly when you should buy a dishwasher. There are plenty of cheap models, so with a little effort a much more convenient life awaits.
There’s a VIBMI dishwasher on Amazon that looks extremely similar to the MOOSOO MX-10, but there’s so little information about it that I won’t cover it here. The Amazon listing claims the features are literally identical, but it seems sketchy, and personally I wouldn’t recommend it…
When you turn on your computer and the fan starts spinning at full blast, you might worry that the machine has broken. When a computer suddenly starts behaving strangely, it’s easy to assume there’s nothing you can do, but you can often fix these problems yourself.
That said, you do this at your own risk, so be very careful, and if you know someone knowledgeable, it’s a good idea to work on it together. Computers are expensive, after all…
In this post, I’ll describe—based on my own experience—what to do when the fan spins at full speed at startup and doesn’t calm down even a while after Windows has booted.
Symptoms
I had left my desktop computer on overnight, and in the morning I noticed the fan was running at full speed.
I shut the computer down once, but the fan kept spinning, so I flipped the power supply switch off and unplugged the power cord. I pressed the power button a few times to discharge it and then booted up, but the fan was still running at full speed.
Other than booting somewhat slowly, though, there were no other apparent problems.
What I did
I checked the CPU temperature in the BIOS setup screen, but it only reached about 30 °C, so there was no problem there.
I set the PC to power-saving mode in the BIOS, but nothing changed. I also lowered the minimum fan speed, with no effect.
I unplugged every cable connected to the computer, including the power and USB cables, pressed the power button a few times to discharge it, and then opened up the case.
I removed the coin cell battery and pressed the power button several times (clearing the CMOS). [There are other ways to clear the CMOS. It’s also a good idea to disconnect the power supply cables to the motherboard at this point.]
Clearing the CMOS is a way of resetting the motherboard’s BIOS: after removing the coin cell battery, you drain the residual electricity from the motherboard.
I put the coin cell battery back in, reconnected the keyboard, power, and video cables, and turned the computer on. The fan then returned to its normal speed. Just to be safe, I also updated the BIOS.
For now, everything is running normally.
Cause
The direct cause seems to have been a BIOS error. Something apparently went wrong, resulting in the fan running at full speed.
BIOS errors can often be fixed by clearing the CMOS, so whenever you suspect a BIOS error is to blame, resetting the BIOS with a CMOS clear will frequently solve the problem.
BIOS errors can be caused by leaving the computer powered on for long periods, dust building up inside the case, shutting the computer down abruptly at an inopportune moment, or installing dubious software.
Dust buildup inside the case is especially common, so you can prevent it by cleaning the interior with compressed air about once a year.
I updated the BIOS at the end this time. The reset alone is probably enough, but updating may also clear latent errors. It’s the same idea as a camera that won’t power on starting up again after a firmware update.
Being able to fix computer errors yourself is a genuinely valuable skill, since it saves on repair costs. Also, when a computer won’t boot, there are surprisingly few things you can do besides replacing parts, so it’s worth looking into other options first.
Bonus
I’ve decided to offer consultations on computer problems through Coconala!
I’ve worked with all kinds of computers and seen all kinds of problems. My Coconala listing mentions computers that won’t turn on, but I’m happy to help with any trouble you run into while using a computer.
I’ve only just started using Coconala, so I may still be getting the hang of it, but please give it a try the next time you run into computer trouble.
I use both Mac and Windows, so I can help with problems on either platform.
Hello. I’m a cash-strapped biology major who kept saying “Once I get into university I’m definitely buying a 3D printer!!” and, now that I’m a senior, has finally managed to buy one.
Between classes and research I was too busy to work many part-time hours, so money was tight, but I made up my mind to buy the 3D printer I’d always dreamed of. Still, I didn’t want to waste money…. And if I compromised on my choice, I’d just end up wanting a better one later….
I wanted something I’d be truly happy with, so I searched the web endlessly, asked people at my university who know engineering, and bought one only after researching it thoroughly.
When you decide you want a 3D printer and actually start searching, you find a huge number of models, from ones in the ten-thousand-yen range to ones costing over a million yen. You’ll probably agonize over which one is best, and honestly it’s hard to tell what the differences even are.
This article is for people wondering, “I want a consumer 3D printer as a hobby, but I don’t know what to look out for when choosing one” “Which one should I actually buy?” I’ll walk through it, including the reasons behind my own choice.
What’s the difference?
With prices ranging from tens of thousands to millions of yen, you’re bound to wonder what actually differs.
First, as a premise: print accuracy and how clean the finished object looks don’t change much with the price of the 3D printer. Accuracy and finish vary a lot depending on the printing method, but within the same method there isn’t much extreme difference.
Basically there are two printing approaches: FDM (melting filament with heat and building up layers) and optical/resin curing (hardening with light). Generally, the optical method gives a cleaner finish (build marks are less visible) and better accuracy, while FDM has the advantage of being easy to work with. I’ll explain the differences between the two in my next blog post.
Print accuracy and finish are determined by the detailed settings that tell the 3D printer how to print. So even a cheap printer can print beautifully if you configure it properly, and it’s quite common for an expensive printer to fail to print at all if you set it up carelessly.
So what does change with the price? In a word, it’s the extra features on top of the basics.
To give a few examples:
Supports a wider variety of filaments
Larger printable size
Built-in Wi-Fi
Heated build plate
Two filament nozzles, so you can print with two materials — and so on
On top of the basic performance, the price changes depending on which options are included. If you think about which features you want, the list of candidate models will narrow down naturally.
Criteria for choosing
That said, you may not even know what features exist, or which ones are actually useful. So let me introduce a few points worth paying attention to.
Print size
The size you need depends on what you want to make and where you’ll put the printer. Roughly speaking, the 3D printer itself will be about 1.5 to 2 times the size you want to print.
If you’re making small containers or pen stands, a small printer is fine, but if you plan to make headphone stands or cases, you need to think about size.
What I realized after buying one is that very large prints are a hassle and take a long time, so I didn’t print big things very often. But when I made a headphone stand, I needed quite a bit of size, and I was glad I’d bought a large one.
A larger printer also has the advantage of letting you print multiple parts at once.
Number of usable materials
Different materials require different melting temperatures. Optical 3D printers can only use light-curing resin, but with FDM you have the commonly used PLA, ABS which is a bit harder than PLA, TPU with its slightly rubbery feel, and even printers that can handle carbon fiber.
The more material types supported, the higher the price. Most printers can handle PLA and ABS at a minimum.
I use almost nothing but PLA and have never found that inconvenient, so maybe you don’t really need support for many materials… perhaps?
Number of filament feed mechanisms
Some models have two or more nozzles for extruding filament. This lets you use multiple materials and, for example, color different parts of the object differently.
Another popular recent approach is water-soluble filament, which can be used as support material so you can print even complex geometries.
Supports are something you absolutely have to think about when making an object, but with water-soluble filament you can print without leaving support marks.
One caveat: with multiple nozzles, apparently the idle nozzle can sometimes collide with the object depending on what you’re printing.
Whether the build plate can be heated
This is a feature that budget 3D printers often lack.
The nozzle heats up and melts the filament to build the shape, and when the build plate is heated as well, the molten filament adheres to the plate more easily and the print is less likely to peel off during printing.
Also, once printing is finished the temperature drops, which makes it easier to remove the print from the plate.
Personally, I have benefited from this feature to a surprising degree. Because prints stick firmly to the plate, large objects don’t shift during printing, and tall objects can be printed as well.
The structure of the printer
Enclosed or open-frame? Aluminum frame or plastic?
An enclosed design keeps odors from printing (especially with ABS) contained, and it also keeps the interior somewhat warm, which prevents warping caused by prints cooling too quickly.
With an open design, you can check the print from every angle. Access is also better when the nozzle clogs, so maintenance is much easier.
As for the frame material, it affects how stable the printer’s motion is. A metal frame is rigid and very stable. The downside is the added weight, which makes the printer much harder to move around.
Ease of operation
One thing you really shouldn’t overlook is how easy the printer is to operate.
There’s a wide range, from models with nothing but buttons, to ones with an LCD plus buttons, to touchscreen models.
A common issue with cheap 3D printers is that they’re advertised as having a touchscreen, but when you actually try to use it the responsiveness is terrible. That in itself becomes a source of frustration. Check reviews for comments on touchscreen responsiveness, and be wary if the ratings are lukewarm.
Personally, I find touchscreens very pleasant to use and recommend them, since you can operate them intuitively without reading the manual.
Other features
As for other features, I’d like to mention Wi-Fi and camera functions.
With Wi-Fi, you can send print data to the printer over the network. Normally you put the file on a USB drive or SD card and plug it directly into the printer, but Wi-Fi saves you that trouble.
The camera function means a camera is installed inside the printer so you can check on the state of your print even when you’re away from home.
If you’re the kind of person who leaves the printer running for hours while you’re out, having a camera might be worthwhile.
Recommended models
Creality Sermoon D1
This is the model I actually use myself.
Although this model is enclosed, the panels are transparent, so you can check your print from every angle. The frame is aluminum, so it’s extremely rigid.
Because the build plate moves along the Z axis, prints don’t shift during printing, and the printer is also very quiet. I keep it next to my bed, and I can take a nap with no problem while it’s running.
The build volume is 280 × 260 × 310 mm, so you can print fairly large objects. It’s operated via touchscreen, which is very intuitive.
The supported materials are PLA, ABS, and TPU. There’s no Wi-Fi or similar extras, so my impression is that it’s simply a well-performing 3D printer.
One drawback is that loading filament into the nozzle takes a bit of a knack. The first time, you might struggle with it for about ten minutes.
Other than that, I’ve had no trouble using it and I’m very satisfied.
The price is just under 100,000 yen, which is a little steep for home use, but the performance is more than worth it.
This is probably the best-performing and most user-friendly model you can buy for under 50,000 yen.
The build volume is 220 × 220 × 250 mm, and the supported materials are PLA, TPU, and PETG.
It covers all the basics: the build plate is heated, and it’s operated via touchscreen.
The body is metal and nicely rigid. There’s a storage compartment under the build plate where you can stash various tools — a quietly welcome touch.
The printer costs under 50,000 yen, which puts it among the cheaper home 3D printers.
This is the kind of model that will leave you with no real complaints, so if you’re thinking of just giving 3D printing a try, why not start with this one?
The Prusa i3 is a 3D printer made by a Czech company.
What’s distinctive here is that they make their 3D printers using 3D printers — apparently their factory is filled with their own machines.
It’s a world-famous printer, and among machines in the 100,000 yen range it’s the most highly recommended and simply the best there is.
It comes in kit form and pre-assembled, and the kit version can be had for around 100,000 yen.
The basic specs are beyond reproach: a heated build plate and quiet operation while printing. The build volume is 250 × 210 × 210 mm, which is roughly enough for most needs.
What’s impressive about this model is that the nozzle reaches very high temperatures, so it supports a huge range of materials: PLA, PETG, ASA, ABS, PC (polycarbonate), CPE, PVA/BVOH, PVB, HIPS, PP (polypropylene), Flex, nGen, nylon, wood-fill, and more.
The only drawback for me personally is usability. I haven’t actually tried it, but instead of a touch panel, it uses a physical dial for control. The display shows text only.
It will probably take a little while to get used to operating it.
In terms of basic specs alone, it easily surpasses 3D printers costing over 200,000 yen. I agonized quite a bit over whether to get the Sermoon D1 or this model.
Incidentally, although it isn’t available on Amazon, Prusa’s website also offers the Original Prusa MINI+. Its print volume is smaller, but the price is kept to around 50,000 yen, making it an excellent product as well.
Flashforge is a fairly popular 3D printer company in Japan, and if you look around, you’ll find it featured in all sorts of places.
Among their lineup, the model I’d recommend here is the Creator Pro.
Because this model has two nozzles, you can print with the two types of material mentioned earlier at the same time. What’s more, the unit costs about 80,000 yen, which is by no means expensive for home use.
It supports materials such as ABS, PLA, and HIPS, and its print volume is W227 × D148 × H150 mm, which is a bit smaller than other models.
The filament holder is at the back, so it isn’t noticeable from the front. The downside is that swapping filament is a bit of a hassle.
Control is via physical buttons and a text-only LCD, so usability probably isn’t as good as a touch panel. Still, it’s perfectly workable once you get used to it, and with Japanese-language support and a large user base in Japan, a quick search will turn up instructions for just about anything, so you’re unlikely to run into much trouble.
Since the front is enclosed, temperature control is very easy, but you can only check the print from one direction, and maintenance is a little awkward.
That said, being able to use two materials at this price is very appealing.



![[商品価格に関しましては、リンクが作成された時点と現時点で情報が変更されている場合がございます。]](https://hbb.afl.rakuten.co.jp/hgb/257504f1.74308428.257504f2.4f37200f/?me_id=1365223&item_id=10000300&pc=https%3A%2F%2Fthumbnail.image.rakuten.co.jp%2F%400_mall%2Fmoosoo%2Fcabinet%2F17%2F07762552%2Fimgrc0162295961.jpg%3F_ex%3D240x240&s=240x240&t=picttext "[商品価格に関しましては、リンクが作成された時点と現時点で情報が変更されている場合がございます。]")