Month: March 2022

  • Creality 3D Sermoon D1: The Ultimate Home 3D Printer

    Creality 3D Sermoon D1: The Ultimate Home 3D Printer

    As a home 3D printer, this is a machine that personally makes me think there may be nothing better.

    It is an excellent machine in every respect: cost performance, practicality, and design.
    It does have some drawbacks, but even so, considering the price, you have to wonder whether anything could beat it.
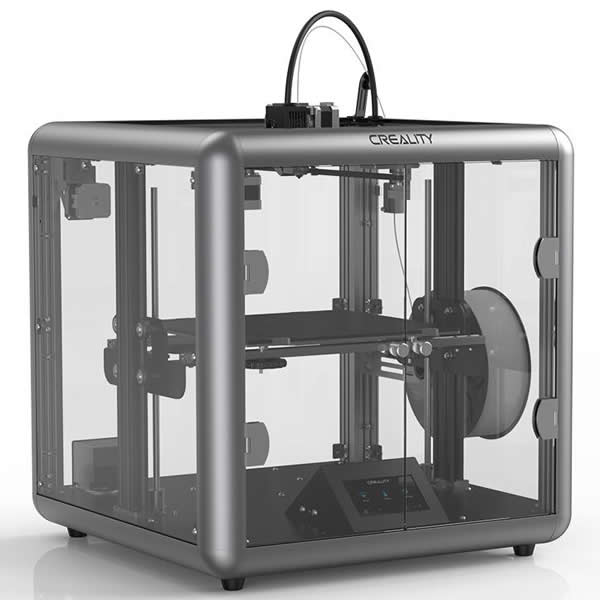
    Creality 3D Sermoon D1

    Features of the Sermoon D1

    Unusually for a low-priced home model, it is a fully enclosed 3D printer, so heat does not escape easily while printing, making it easier to get clean prints.

    And because it is built from an aluminum alloy frame with transparent side panels, you can watch the printing process from every direction.

    The build volume is a very generous 280 x 260 x 310 mm, which is extremely handy for printing large objects.

    It handles PLA and ABS without any problems, of course.

    Operation is via a touchscreen and is very easy.
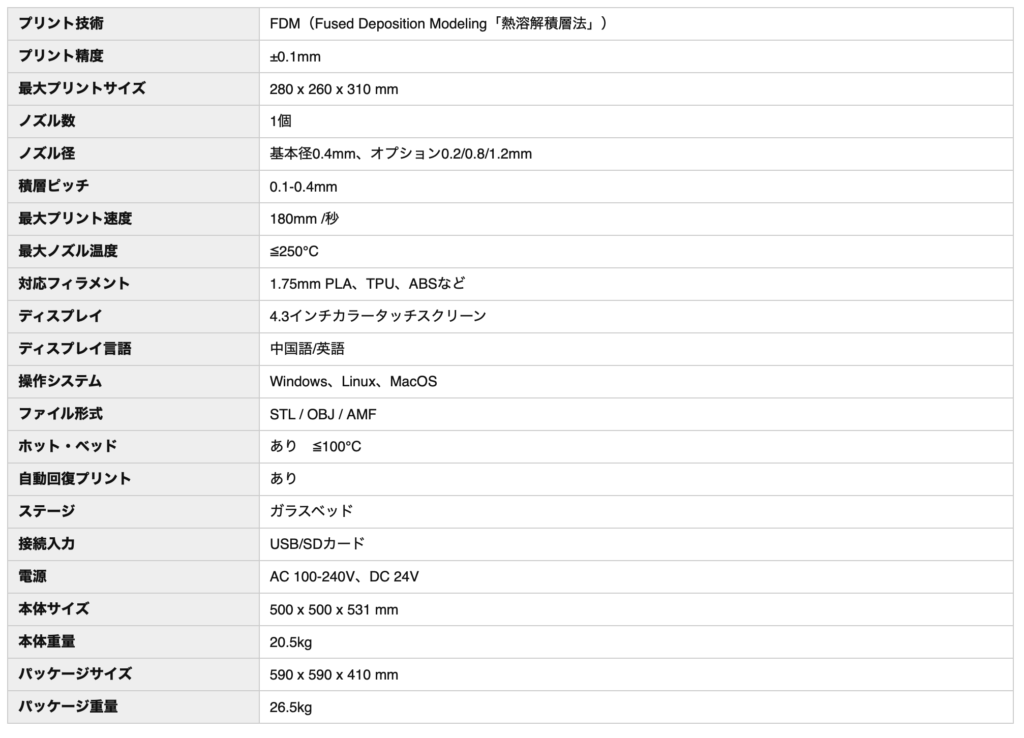
    Sermoon D1のスペック(販売ページより)

    Buying it and using it

    The first thing that surprises you after buying it is the size.
    When the box arrived and I tried to bring it into the room, it barely fit through the door.

    Apparently there are cases where the outer box will not fit through the front door when it arrives at your home.

    The printer itself is smaller than the outer box, so you can get it in by taking the contents out, but even so the size is overwhelming.

    The unit measures about 500 x 500 x 531 mm, so you need a fair amount of space to place it in a room.

    This too comes down to it being fully enclosed: the build volume is 280 x 260 x 310 mm, but the width is nearly twice that.

    Assembly after delivery was very easy—just attaching two parts.

    I think the greatest feature of this model is how quiet it is.
    Even with the fan running at 100%, it is remarkably quiet.

    Sleeping right next to it at night is admittedly not feasible, but taking a nap is no problem at all, and if you are on the phone beside it, the printer is barely audible.

    Even when you print with a raft, the raft comes off easily.

    And depending on the object, you can print beautifully without a raft at all.

    During printing the bed is warm so the print sticks to it, but once printing finishes the bed cools down, so the print is easy to remove.
    The bed is made of some curious material, and having prints come off it so easily after printing is genuinely fun.

    Recommended settings

    The default settings already print cleanly enough, but I tuned the settings myself to get even better prints, and here I share the configuration that worked well for me.

    https://drive.google.com/file/d/1ZBnrYzihwzA0iWwKvfA8w2feE9WD4-Wn/view?usp=sharing

    These are settings for Creality Slicer.
    Basically, you set the infill (how densely the interior is filled) however you like.
    I use 15%.

    I lowered the retraction speed—the speed at which the filament is pulled back—and slowed the print speed.
    I raised the head travel speed as high as I could while still getting properly formed prints.

    Once you understand what each parameter means and what values it takes, you can customize things yourself to a fair degree.

    Keep in mind that what I present here is just one example, and since other people’s recommended settings did not work all that well for me, please treat it as a reference for finding settings that suit your own setup.

    Drawbacks

    Being a home model, it does have a few drawbacks.

    – It has no auto-leveling, so getting a feel for leveling at first is difficult for beginners.

    – Changing the filament is difficult (is this true of all printers?).

    – There are few reviews, so there was not much to refer to when I wanted to tweak the settings.

    – You have to put your data on an SD card, so sending data over Wi-Fi and the like is not possible.

    Among home models it is very easy to use, and I can recommend it to beginners and advanced users alike.
    If you are thinking about getting a 3D printer, definitely give it a try.
  • Review of the MOOSOO MX-10: A Tank-Type Dishwasher That Needs No Plumbing Work

    Review of the MOOSOO MX-10: A Tank-Type Dishwasher That Needs No Plumbing Work

    When you live alone, dirty dishes pile up endlessly, and washing them is honestly a pain.
    Even when you plan to cook for yourself, the thought of the washing up kills your motivation and you never quite get around to it.

    When I started living alone I decided I’d really commit to cooking for myself, and I bought a dishwasher to keep myself motivated!!
    After a lot of deliberation, I went with the MOOSOO MX-10.

    In this post I want to explain why I chose this dishwasher, and why I didn’t go for the very similar MAXZEN JDW03BS01.

    Why MOOSOO?

    The first decision when buying a dishwasher for your home is whether to get an installation-free tank-type model or a conventional one.
    I’m in a rental, and installation work sounded like too much hassle, so I went with a tank-type model that requires no installation.

    With a tank-type unit, you just plug it in, fill the tank with water, add detergent, and it washes your dishes.
    You can use it the day it arrives, which is incredibly convenient, and it’s easy to move around too.

    There are plenty of tank-type models out there these days, from cheap ones to expensive ones.
    So the next thing to think about is where you’ll put it.

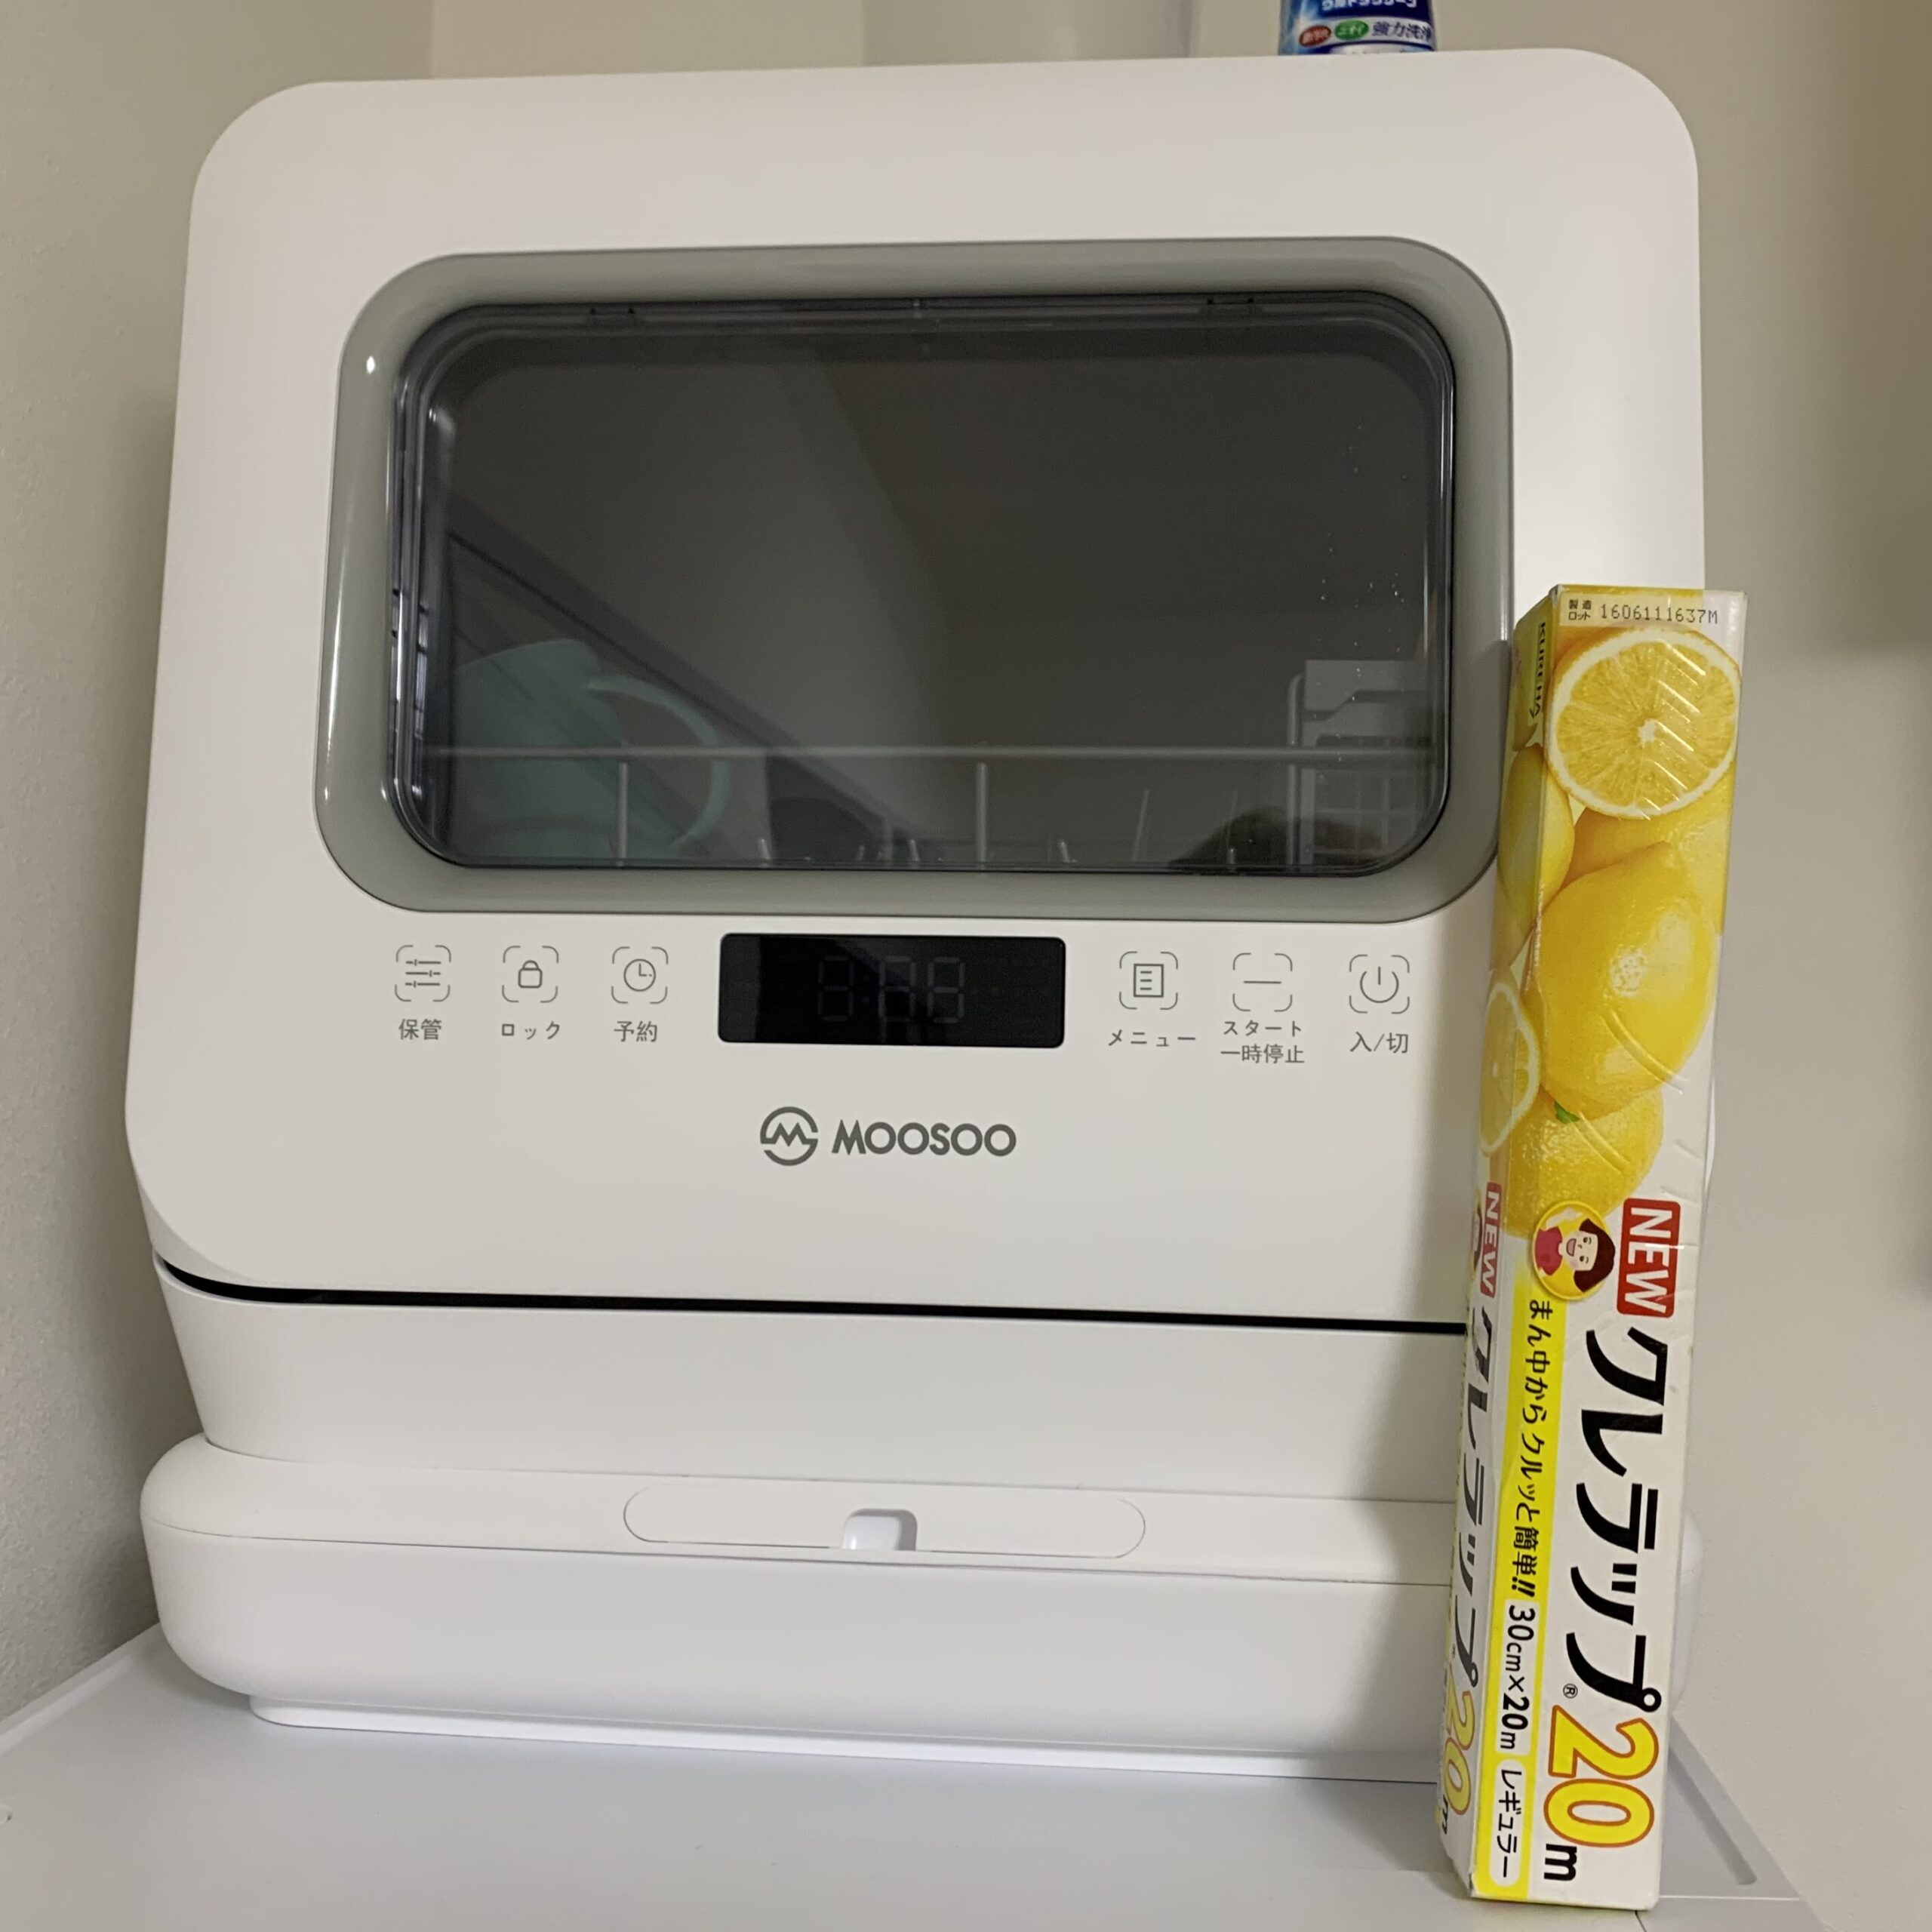
    In my case, the spot was on top of the fridge — fairly high up.
    If you live alone in a place with no spare space, isn’t the top of the fridge by far the most likely place you can actually fit a dishwasher (somewhere reasonably wide and close to the sink)?

    I stood a box of plastic wrap next to it in the photo so you can gauge the size.
    It’s bigger than you’d expect!!


    When you think about filling the tank, you want the fill point to be low and easy to reach — so having the water inlet on the bottom is ideal.

    The problem is that most tank-type dishwashers have the fill opening on top, which makes filling awkward if the unit is up high.
    As far as I could find, the tank-type dishwashers with the water inlet on the lower front are Panasonic’s NP-TSP1-W, MAXZEN’s JDW03BS01, and MOOSOO’s MX-10.
    Incidentally, judging from the reviews, cleaning performance is basically fine on all of them unless something is really off.

    Of these three, I’d love to go with the Panasonic, but the price…
    So that left the latter two models.
    Both can be had for under about 30,000 yen, which seems pretty good. (Though I’m a bit worried about durability.)

    What’s the difference between the MAXZEN and the MOOSOO?

    The two models look very similar and have very similar wash modes, so you may well wonder what actually differs.
    The big difference is the drying function.

    The MAXZEN uses fan drying, while the MOOSOO uses heated-air drying.
    With the MOOSOO, once the wash and dry cycle finishes you can put the dishes straight back in the cupboard. (I’ve never used the MAXZEN, so I don’t know how dry it gets things.)

    You could just leave the dishwasher door open after the wash finishes, but since the MOOSOO has heated drying, things dry quickly and you can get by with relatively few dishes on hand.

    The MAXZEN is a bit cheaper, so if you don’t really need the drying function, I think it’s plenty. (Washing performance seems to be about the same.)

    MOOSOO frequently offers coupons on both Rakuten and Amazon, so you can often pick it up at a really good price — in which case the gap with the MAXZEN may not be that big after all.

    How to set it up


    First, attach the drain hose and the adapter (intake hose) that draws water up from the pump at the bottom to the back of the unit.
    I’d recommend attaching them before putting the unit in place.

    The water supply hose is used if you connect to a faucet diverter.
    Doing so means you don’t have to fill the tank, but it leaves hoses everywhere, so I don’t recommend it.

    Next, position the drain hose so it sits nicely in the sink.
    One suction-cup clip is included for holding the drain hose in place, so use that to secure it.
    One time my drain hose thrashed loose and made a real mess of the room.

    After that, just plug it in and use it.
    For the first run, do an empty wash cycle to clean out the interior.

    That’s all it takes to get going — very easy.

    The drain hose is about 1.5 m long, so even from roughly fridge height with some distance to the sink, it reaches comfortably.

    As for the results, even annoying messes like curry-stained plates come out beautifully clean with no slimy residue — I’m very satisfied.

    Summary

    Personally, if you’re going to make a real effort to cook for yourself, the very start of living alone is exactly when you should buy a dishwasher.
    There are plenty of cheap models, so with a little effort a much more convenient life awaits.

    I’ll add notes on durability and so on later.

    Links


    There’s a VIBMI dishwasher on Amazon that looks extremely similar to the MOOSOO MX-10, but there’s so little information about it that I won’t cover it here.
    The Amazon listing claims the features are literally identical, but it seems sketchy, and personally I wouldn’t recommend it…

  • What to Do When Your PC’s Fans Spin Up at Full Blast the Moment You Turn It On

    What to Do When Your PC’s Fans Spin Up at Full Blast the Moment You Turn It On

    When you turn on your computer and the fan starts spinning at full blast, you might worry that the machine has broken.
    When a computer suddenly starts behaving strangely, it’s easy to assume there’s nothing you can do, but you can often fix these problems yourself.

    That said, you do this at your own risk, so be very careful, and if you know someone knowledgeable, it’s a good idea to work on it together.
    Computers are expensive, after all…

    In this post, I’ll describe—based on my own experience—what to do when the fan spins at full speed at startup and doesn’t calm down even a while after Windows has booted.

    Symptoms

    I had left my desktop computer on overnight, and in the morning I noticed the fan was running at full speed.

    I shut the computer down once, but the fan kept spinning, so I flipped the power supply switch off and unplugged the power cord.
    I pressed the power button a few times to discharge it and then booted up, but the fan was still running at full speed.

    Other than booting somewhat slowly, though, there were no other apparent problems.

    What I did

    I checked the CPU temperature in the BIOS setup screen, but it only reached about 30 °C, so there was no problem there.

    I set the PC to power-saving mode in the BIOS, but nothing changed.
    I also lowered the minimum fan speed, with no effect.

    I unplugged every cable connected to the computer, including the power and USB cables, pressed the power button a few times to discharge it, and then opened up the case.

    I removed the coin cell battery and pressed the power button several times (clearing the CMOS).
    [There are other ways to clear the CMOS. It’s also a good idea to disconnect the power supply cables to the motherboard at this point.]

    Clearing the CMOS is a way of resetting the motherboard’s BIOS: after removing the coin cell battery, you drain the residual electricity from the motherboard.

    I put the coin cell battery back in, reconnected the keyboard, power, and video cables, and turned the computer on.
    The fan then returned to its normal speed.
    Just to be safe, I also updated the BIOS.

    For now, everything is running normally.

    Cause

    The direct cause seems to have been a BIOS error.
    Something apparently went wrong, resulting in the fan running at full speed.

    BIOS errors can often be fixed by clearing the CMOS, so whenever you suspect a BIOS error is to blame, resetting the BIOS with a CMOS clear will frequently solve the problem.

    BIOS errors can be caused by leaving the computer powered on for long periods, dust building up inside the case, shutting the computer down abruptly at an inopportune moment, or installing dubious software.

    Dust buildup inside the case is especially common, so you can prevent it by cleaning the interior with compressed air about once a year.

    I updated the BIOS at the end this time. The reset alone is probably enough, but updating may also clear latent errors.
    It’s the same idea as a camera that won’t power on starting up again after a firmware update.

    Being able to fix computer errors yourself is a genuinely valuable skill, since it saves on repair costs.
    Also, when a computer won’t boot, there are surprisingly few things you can do besides replacing parts, so it’s worth looking into other options first.

    Bonus

    I’ve decided to offer consultations on computer problems through Coconala!

    パソコンが動かなくなった時の対処法を提案します パソコンが突然動かなくなった駆け込み寺として

    I’ve worked with all kinds of computers and seen all kinds of problems.
    My Coconala listing mentions computers that won’t turn on, but I’m happy to help with any trouble you run into while using a computer.

    I’ve only just started using Coconala, so I may still be getting the hang of it, but please give it a try the next time you run into computer trouble.

    I use both Mac and Windows, so I can help with problems on either platform.