Tag: パイソン

  • What Exactly Is YORU, a New Behavior Analysis Tool Powered by Object Detection?

    What Exactly Is YORU, a New Behavior Analysis Tool Powered by Object Detection?

    In November 2024, a preprint was posted on bioRxiv describing YORU, a behavior analysis tool that takes a different approach from existing behavior analysis tools.
    In this post, I’d like to explain what kind of tool it is.

    The YORU preprint

    The YORU documentation

    What is YORU?

    YORU is a deep learning-based tool for analyzing animal behavior.

    YORUのサイトより引用


    A number of deep learning-based tools, such as DeepLabCut and SLEAP, have already been released.
    These tools use deep learning to track body parts of animals and estimate their posture (here I’ll refer to them as tracking tools).

    By estimating posture, they reveal what posture an animal is in and use that for behavior analysis.

    YORU, by contrast, recognizes behavior using an object detection algorithm.
    In short, it does not track body parts; instead, it defines behavior directly from the appearance of the animal as it behaves.

    When people tell an apple from a mandarin orange, they rely on cues such as shape and color.
    Object detection excels at classifying objects, so it makes exactly this kind of appearance-based distinction.

    Applying this to animal behavior analysis means classifying animal behavior from its appearance.
    Within YORU, we call this a “behavior object.”
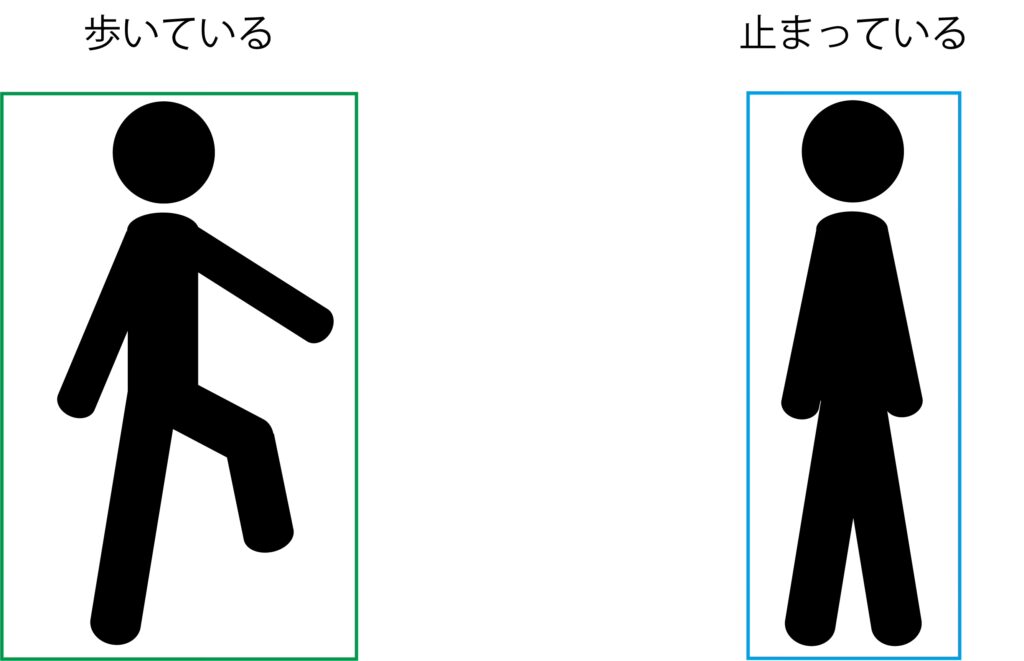
    Whereas tracking tools represent behavior as points and lines, YORU analyzes behavior by enclosing it in a bounding box.

    Advantages of defining behavior with object detection

    The advantages of object detection-based behavior analysis include:

    ・Errors are less likely as the number of individuals increases

    ・Less sensitive to the orientation of the animal

    ・Fast analysis speed

    ・Can capture behaviors that are hard to capture by tracking (such as a mouse crouching)

    and so on.

    It makes it easy to analyze the behavior of multiple individuals—a weak point of tracking tools—at a considerably lower computational cost.
    It can also easily analyze behaviors that are difficult to define from the positional information of body parts.

    Consider, for example, the act of opening and closing a hand.
    With a tracking tool, you would track the fingertips with a camera and define the hand as open or closed, but if the fingertips become hidden when the hand closes, tracking fails and the positional information can no longer be computed accurately.

    With object detection, however, the model looks at the overall shape of the open and closed hand, so it can capture the state accurately even when part of the hand is hidden.

    The same logic explains its robustness to larger numbers of individuals: with a tracking tool, as the number of individuals grows, you must assign each body part to the correct individual to capture each individual’s behavior accurately, whereas YORU analyzes only the shape of each individual and therefore requires no individual identification or assignment.

    Because analysis is fast, real-time analysis is possible, allowing you to control equipment when a particular behavior occurs and thus automate behavioral experiments.

    Disadvantages of defining behavior with object detection

    Of course, there are disadvantages as well:

    ・Cannot capture a sequence of behaviors

    ・Cannot identify individuals

    ・Cannot capture unknown behaviors

    ・Cannot capture behaviors that are hard to distinguish by appearance

    ・Provides no detailed information about the defined behavior

    These are precisely the strengths of tracking tools; rather than one approach being superior, the two complement each other’s advantages and disadvantages.

    Experimenters therefore need to choose the method appropriate to their situation.

    What makes YORU special?

    Having described the advantages and disadvantages of the object detection-based behavior analysis that underlies YORU, what exactly makes YORU special?

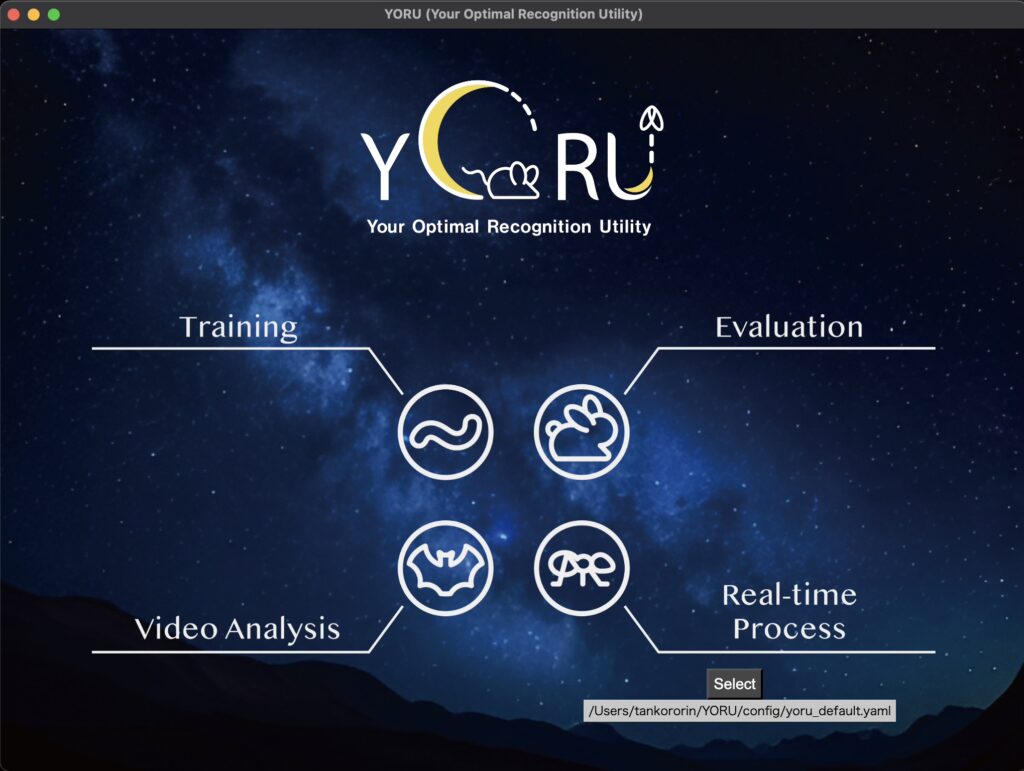
    Everything runs through a GUI

    YORU lets you perform behavior analysis without any programming.

    The same is true of tools like DeepLabCut and SLEAP, and it goes a long way toward making these analyses accessible to biologists.

    Design


    Unlike previous tools, YORU’s design doesn’t really feel like a research tool.
    Built-in real-time analysis

    Unusually for tools of this kind, YORU comes with a full GUI for real-time analysis.

    Building a real-time analysis system isn’t that difficult if you can program to some extent, but otherwise the barrier is quite high.

    With YORU, however, real-time analysis and even external triggering can all be done without any programming.

    Adaptable to a wide range of experimental setups

    The biggest hurdle in real-time analysis is figuring out how to combine the code that drives your own experimental apparatus with the analysis itself.

    YORU adopts a plugin system, letting you choose the program that controls your external device.

    In other words, you simply select the plugin that matches your own system.

    You can also write your own plugins: by wrapping the control program for your own apparatus in a plugin, you can easily link it to YORU’s real-time analysis.

    This makes for a remarkably easy-to-use system that no other tool offers.

    Closing remarks

    YORU has only just been released, and there are still rough edges in usability as well as gaps in the documentation.

    That said, as these are addressed over time, I am very much looking forward to seeing how it comes to be used.

  • How to Install SLEAP [Updated February 2024]

    How to Install SLEAP [Updated February 2024]

    Here I’d like to describe how to install SLEAP, a machine learning-based tool for tracking animal body parts.

    DeepLabCut is the most widely used tracking tool, and I have written about how to install it in the past, as have many other people.

    For SLEAP, however, there are currently few articles available in Japanese.
    SLEAP has many advantages over DeepLabCut, so I decided to write up the installation procedure to make it a viable option for more people.

    SLEAP’s documentation, from installation to usage, is extremely well organized and comes with videos, so anyone comfortable with English should find it easy to get started.

    The SLEAP paper is available here

    The official SLEAP website is here

    The SLEAP GitHub repository is here

    Introduction

    First of all, regarding the approach described in the official SLEAP installation guide,

    mamba create -y -n sleap -c conda-forge -c nvidia -c sleap -c anaconda sleap=1.3.3

    which sets up the environment, installs the packages, and handles everything else in a single command: I tried this on several computers, but in every case it stalled indefinitely during the environment setup and never completed successfully.

    So here I introduce an alternative installation method, also suggested by the developers.

    Installation

    We will basically follow the installation instructions on the official SLEAP website.

    Environment

    ・Windows 11 Pro
    ・Verified on an NVIDIA 3080
    ・SLEAP 1.3.3
    ・Python 3.7.12

    Downloading the files

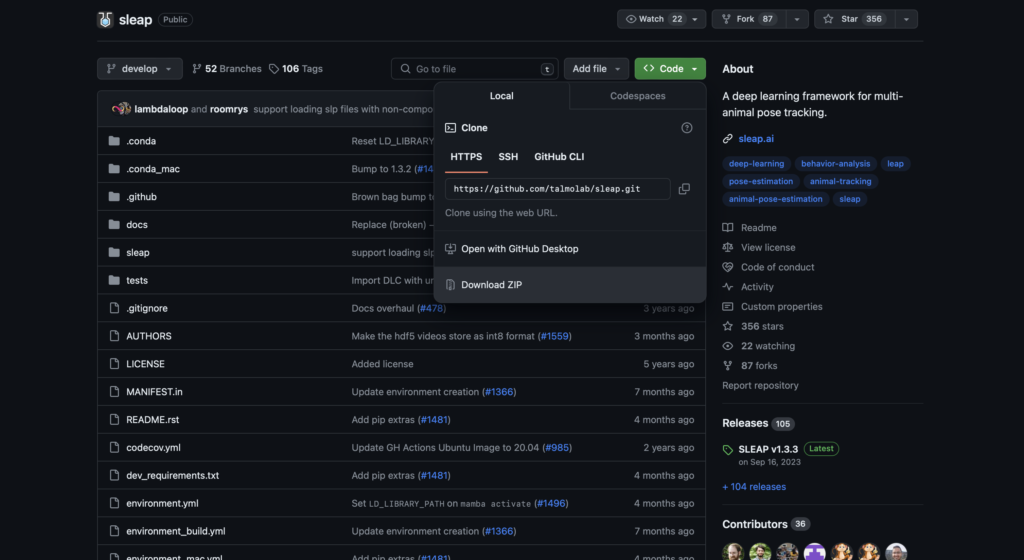
    First, download the files from the SLEAP GitHub repository to your computer.

    If you are using Git, run the following command.

    git clone https://github.com/talmolab/sleap

    If the git command is not available, either install git or download the files directly from GitHub.

    Installing the GPU driver

    Install the NVIDIA driver.
    (Skip this step if it is already installed.)

    Installing Anaconda

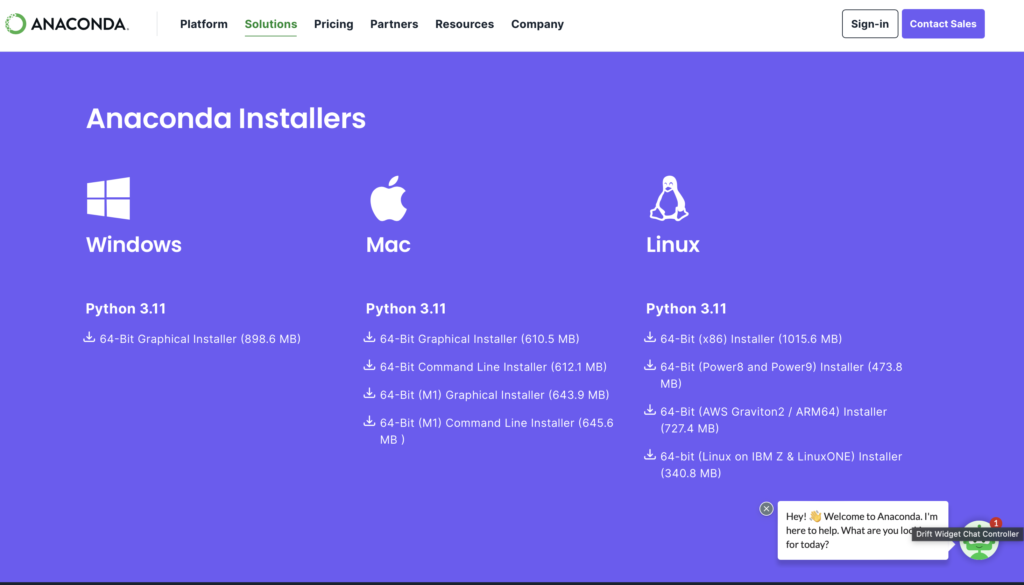
    Next, download and install the Windows 10 64-bit version from the Anaconda website.
    Click Free Download on the Anaconda site and scroll down; you should see a screen like the one below.
    Install the Windows installer on the far left.

    Once Anaconda is installed, you should find “Anaconda Prompt” in your Windows app list.
    We will use it to run the commands below to create the virtual environment, install SLEAP, and launch it.

    Creating the virtual environment and installing

    Next, run the following commands to create the virtual environment and install SLEAP.
    The environment will be named “sleap”.

    cd sleap
    conda env create -f environment.yml -n sleap

    Note that the commands above work on computers with a GPU;
    on computers without one, use the following commands instead.

    cd sleap
    conda env create -f environment_no_cuda.yml -n sleap

    That completes the installation.

    Verifying the installation

    Activate the virtual environment and launch SLEAP with sleap-label.

    conda activate sleap
    sleap-label

    You need to activate the virtual environment (the conda activate sleap command) every time you reopen Anaconda Prompt.

    After activation, the prompt should change from (base) to (sleap).

    If SLEAP launches, the installation was successful.

    Checking version information for reporting in a paper

    To check the version, activate the sleap environment and run the following command.

    python -c "import sleap; sleap.versions()"

    This will output

    SLEAP: 1.3.3
    TensorFlow: 2.7.0
    Numpy: 1.21.5
    Python: 3.7.12
    OS: Windows-10-10.0.22621-SP0

    showing the SLEAP version information and related details.

    You can also check whether SLEAP can use the GPU with

    python -c "import sleap; sleap.system_summary()"

    which should produce output like the following when the GPU is available.

    GPUs: 1/1 available
      Device: /physical_device:GPU:0
             Available: True
           Initialized: False
         Memory growth: None

    In future posts, I hope to walk through how to actually use SLEAP.

    Bonus

    For those unsure which computer to buy, I’ve started offering PC purchase consultations on Coconala!

    あなたの要望に合わせてパソコンを選び、提案します パソコン選びに困っている方々へ!様々な目的に対応できます!

    I often pick out computers and give advice on them, and many friends have told me I could make money doing PC consultations.
    That inspired me to give it a try!

    I’ll recommend a machine that fits both what you want to use it for and your budget.
    In particular, I’ve chosen and used many computers for machine learning.

    And if you’d like, I’m happy to advise you on what to look for the next time you buy a computer.

    Machines I’ve picked out so far include lab analysis computers, everyday-use computers, computers for game streaming, computers for incoming university students, computers that can run CAD for architecture students, and simple stopgap machines.

    I use both Mac and Windows, so I can talk about and recommend either one!

    Please feel free to make use of it.

  • How to Install Python Video Annotator

    How to Install Python Video Annotator

    What is Python Video Annotator?

    Python Video Annotator is an application that lets you analyze recorded videos and annotate events within them along a timeline.

    Researchers in neuroscience and ethology can use it to record videos of animals and then analyze and quantify their behavior.
    For example, suppose you are recording mouse behavior and want to score actions such as sticking out the tongue, wagging the tail, or moving the ears.
    When in the video does each action occur, and how long does it last?
    Watching the video and logging everything in Excel each time becomes overwhelming once you have defined many behaviors.
    With a tool like this, you can record annotations directly on the video and export the timing and event information.

    There used to be an open-source application called VCode for recording animal behavior.
    The problem, however, was that it no longer runs on current computer operating systems.

    Python Video Annotator works on modern PCs and retains the essential features, while also allowing you to combine it with external sensor data (such as pressure gauges) and behavior-quantification tools like DeepLabCut, making it an extremely useful tool for researchers.

    How to install

    The official website describes the installation procedure in detail, but I could not get it to install properly on my computer. (Installing it directly may have caused conflicts with packages that were already installed.)
    So instead I followed the approach described on the GitHub page, building a virtual environment with Anaconda and installing it there.

    It sounds complicated when described in words, but the steps are very simple.
    As of now (October 20, 2021) it does not appear to support the latest macOS (Big Sur 11.6), though this will probably be fixed soon.
    For that reason, I will use Windows as the example here.

    That said, on macOS the steps are basically the same once you have installed Anaconda and can use the conda command, so please refer to this guide once support is available. (For details, see my previous post.)

    Install Anaconda and open the Anaconda prompt.
    Then create a virtual environment and activate it.

    conda create -n videoannotator python=3.6
    conda activate videoannotator

    Next, install the required packages.

    pip install opencv-python-headless pyqt5==5.14.1 pyqtwebengine==5.14.0

    Then install Python Video Annotator.

    pip install python-video-annotator

    Once all the processing finishes, the installation is complete.

    To launch it, activate the virtual environment first and then run it.

    conda activate videoannotator
    start-video-annotator

    If the software starts up, you are all set.

  • Using Conda Commands on macOS

    Using Conda Commands on macOS

    Here I’ll walk through installing Anaconda on macOS and setting up the terminal environment.

    Installing Anaconda

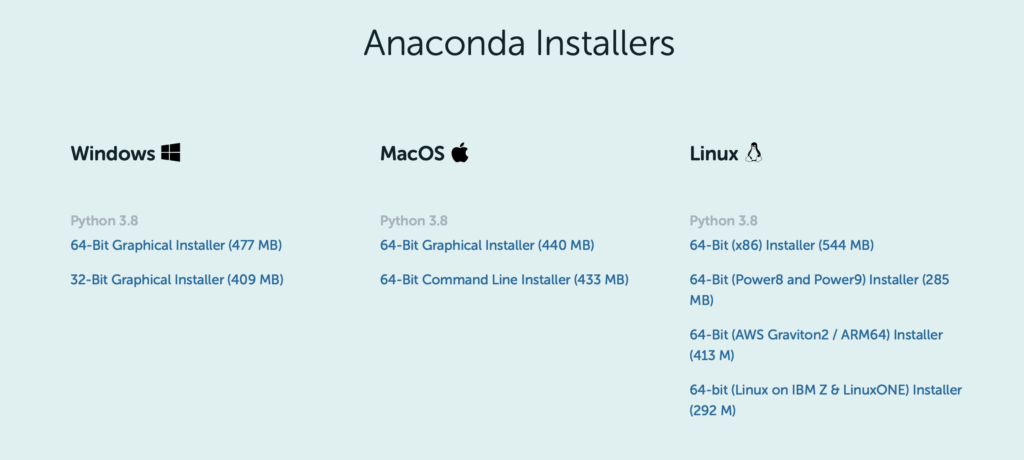
    Go to the Anaconda homepage and scroll down to find the downloads.

    Choose the installer that matches your environment.
    Since this guide covers macOS, select the 64-bit Graphical Installer.

    Launch the installer and follow the instructions to complete the installation.

    There are two installers for Mac. The 64-bit Graphical Installer installs Anaconda through a GUI, which is the more familiar approach, and unless you have a specific reason otherwise, this is the one to use.

    Downloading the 64-bit Command Line Installer gives you a *.sh file.
    This is a shell-script installation, used when you want to install from the terminal.

    Since installing software on Linux is normally done from the terminal, people used to Linux may find this option easier. (Probably.)

    Configuring the command line environment

    After installing on macOS, all you get is Anaconda-Navigator in your applications list — as is, you can’t use Anaconda or Python from the terminal.

    If you want to use the conda command to install packages and so on, you need to activate Anaconda.
    To activate Anaconda (i.e., to make the conda command available):

    conda activate

    Run the above.
    The conda command should now work.

    If activating the conda environment every time is a hassle, you can have it activate automatically.
    To do so, run the following in the terminal:

    ~/opt/anaconda3/bin/conda init シェル名

    Run the above.
    Use the name of the shell you actually use. If you have no idea what that means and have never changed it, you’re probably on the default shell (zsh on macOS), so substitute that for the shell name.

    ~/opt/anaconda3/bin/conda init zsh

    Now, when you restart the terminal, the conda environment will be activated automatically and you won’t need to type conda activate.

    To turn off automatic activation,

    conda config --set auto_activate_base false

    run the above in the terminal.

  • try and except: Exception Handling in Python

    try and except: Exception Handling in Python

    Errors sometimes come up when you are writing a program in Python.
    Errors are actually helpful, since they tell you that your program has not been put together correctly,
    but sometimes an error will stop your program from running altogether.

    Sometimes code that is syntactically correct still raises an error at runtime.
    An error raised when the syntax is grammatically incorrect is called a syntax error,
    while an error that is grammatically correct but logically wrong is called an exception.

    Some examples of exceptions:
    TypeError: the operands are of incompatible types
    EX. word/2 , 4*number

    ZeroDivisionError: division by zero
    EX. 3/0

    ValueError: the type is correct but the value is not appropriate
    EX. int(“string”)

    You can use conditional branching to head off errors before they happen and write a logically correct program, but you can also take the approach of handling the exception when an error does occur.

    That is where try, except comes in.

    try: 
        実行したい処理(例外を含むかもしれない)
    except エラー名:
        例外発生時に行う処理

    You use it like this.
    For example,

    try:
        print(10 / 0)
    except ZeroDivisionError:
        print('できませんでした')
    #出力
    できませんでした

    That is the result.
    Note, however, that except only catches the error you specify
    (in this program, only ZeroDivisionError), so if any other error occurs it will still be reported as an error when the program runs.

    When you expect more than one kind of error, add another “except ErrorName:” clause.

    try:
        print(10 / 0)
    except ZeroDivisionError:
        print('できませんでした')
    except ValueError:
        print('値がうまく合致しませんでした')

    You can specify multiple except clauses.

    If you leave out the exception name entirely in the except clause, you can catch every exception.

    try:
        print(10 / 0)
    except:
        print('できませんでした')

    Be very careful with this, though: because it catches every exception, it will also hide errors the programmer never anticipated.

    There are also keywords related to the try-except syntax that let you specify what happens after an exception occurs.
    I will list them briefly here.
    I plan to cover them in detail in another blog post.

    • raise: deliberately raise an exception
    • pass: do nothing after the exception occurs
    • else: run only if no exception occurred
    • finally: always run, whether or not an exception occurred

  • I Want to Control Arduino with Python!

    I Want to Control Arduino with Python!

    Arduino is controlled using the Arduino language.
    Sooner or later, however, you will want to do something more complex, or to control an Arduino together with another program.

    The module introduced here, pySerial, lets you carry out serial communication with a Raspberry Pi or an Arduino.
    Through serial communication, you can send commands from a Python program to an Arduino or Raspberry Pi and control them from Python.

    Here I introduce the basic program for doing this.
    Just being able to use it will greatly expand what you can do with your programs.

    Installation

    pip install pyserial

    You can install it by opening Python in a terminal or command prompt.
    Alternatively, you can install it from a terminal in an IDE such as PyCharm.

    Example program

    This example turns an LED on and off at one-second intervals.
    I will test it by driving pin 13, which is connected to the LED built into the Arduino.
    The Python program looks like this:

    import serial, time
    
    def main():
        #  COMポートを開く
        print("Open Port")
        ser = serial.Serial("COM3", 9600)
        while True:
            #  LED点灯
            ser.write(b"1")
            time.sleep(1)
            #  LED消灯
            ser.write(b"0")
            time.sleep(1)
    
        print("Close Port")
        ser.close()
    
    if __name__ == '__main__':
        main()

    Use serial.Serial to specify the port and the serial communication settings.
    For the Arduino UNO, specify 9600.
    This differs from board to board, so check it in the Arduino IDE.

    The b in b”1″ plays a crucial role.
    With the serial.write() function, numbers and strings must be converted to byte sequences before they can be sent over serial communication.
    The b prefix is needed to indicate that the value is a byte sequence.

    Since this program is an infinite loop, the LED keeps switching on and off every second until you stop the program.

    Next is the program on the Arduino side.

    void setup() {
      Serial.begin(9600);
      pinMode(13, OUTPUT);
      digitalWrite(13, LOW);  //  初期化
    }
    
    void loop() {
      byte var;
      var = Serial.read();
      switch(var){
        case '0':
          digitalWrite(13, LOW);
          break;
        case '1':
          digitalWrite(13, HIGH);
          break;
        default:
          break;
      }
    }

    Here I use a switch-case statement.
    It makes the program easier to follow.
    For details, take a look at my previous blog post.

    In this program, sending 0 sets the pin LOW and sending 1 sets it HIGH.
    Using this program as a base, you can control an Arduino from a Python program in all sorts of ways.

  • I Don’t Really Know What I’m Doing, But I Want to Program in Python! (Part 1)

    I Don’t Really Know What I’m Doing, But I Want to Program in Python! (Part 1)

    When you start learning programming, I think the first hurdle is figuring out where to begin.
    You search online, but then what? And what software are you supposed to use to write the code?

    I struggled with exactly that myself.

    There are broadly two kinds of tools for writing programs.
    One is interactive, and the other is script-based. (I’m putting it this way for clarity; I’m not entirely sure it’s the technically correct terminology…)

    With the interactive type, you type one line and get one response back
    —you write and run the program line by line, over and over.

    The script-based type is more like writing a whole essay and then getting feedback on it—you run the entire program at once.
    What most people picture when they think of a program is the script-based type, which looks like a long list of incomprehensible code.

    But when you decide to write a script-based program, the problem becomes: which software do you actually use?

    On top of that, beginner-level programming lessons often use the interactive style, and then at the intermediate level you’re suddenly writing scripts—yet what to write them in is often left unstated, or differs completely from book to book.

    For the interactive style, you use something already built into your computer, like Command Prompt or Terminal, and get started by typing “Python”.

    But what do you write script-based programs in?

    Most script-based programs are written in an IDE (integrated development environment). (When you’re stuck, searching for “Python IDE recommendations” turns up plenty of articles.)

    The ones I normally use for writing script-based programs are
    Jupyter Notebook and PyCharm.
    (Apparently some people pronounce “Jupyter” as “joo-pih-ter” and others as “joo-py-ter”.)

    I use Jupyter Notebook for statistical analysis and plotting graphs, and PyCharm for controlling hardware and for more complex programs.

    Let me explain what each one is like.

    First, Jupyter Notebook.
    It comes bundled when you download Anaconda.
    When you launch Jupyter Notebook, a browser such as Safari or Firefox opens first.

    Then a listing of the files on your computer appears.
    Open the folder you want, and click “New” in the upper right.
    Then click Python3, and a screen like the image below opens.
    Saving this file gives you a *.ipynb file.

    You write code into individual cells, and by clicking the RUN button at the top you can execute the program one cell at a time.

    Being able to run code cell by cell is a huge advantage when working with graphs and statistics.
    That’s why I use it so often.

    I use PyCharm for opening *.py files.
    Note that the two tools open different types of files.

    For PyCharm, please refer to other sites.
    (I haven’t used it much yet, so I’d like to cover how to use it in detail in a future post.)

    The Anaconda site is here

    The Jupyter Notebook site is here

    The PyCharm site is here
    For the download, choose the gray Community edition rather than Professional—that’s the free one.
    I’d recommend downloading that one to start with.

    Since I’ve been using Jupyter Notebook a lot lately, I plan to keep posting updates as notes on my own learning and for anyone who wants to learn programming.