Tag: 日本語

  • How to Install SLEAP [Updated February 2024]

    How to Install SLEAP [Updated February 2024]

    Here I’d like to describe how to install SLEAP, a machine learning-based tool for tracking animal body parts.

    DeepLabCut is the most widely used tracking tool, and I have written about how to install it in the past, as have many other people.

    For SLEAP, however, there are currently few articles available in Japanese.
    SLEAP has many advantages over DeepLabCut, so I decided to write up the installation procedure to make it a viable option for more people.

    SLEAP’s documentation, from installation to usage, is extremely well organized and comes with videos, so anyone comfortable with English should find it easy to get started.

    The SLEAP paper is available here

    The official SLEAP website is here

    The SLEAP GitHub repository is here

    Introduction

    First of all, regarding the approach described in the official SLEAP installation guide,

    mamba create -y -n sleap -c conda-forge -c nvidia -c sleap -c anaconda sleap=1.3.3

    which sets up the environment, installs the packages, and handles everything else in a single command: I tried this on several computers, but in every case it stalled indefinitely during the environment setup and never completed successfully.

    So here I introduce an alternative installation method, also suggested by the developers.

    Installation

    We will basically follow the installation instructions on the official SLEAP website.

    Environment

    ・Windows 11 Pro
    ・Verified on an NVIDIA 3080
    ・SLEAP 1.3.3
    ・Python 3.7.12

    Downloading the files

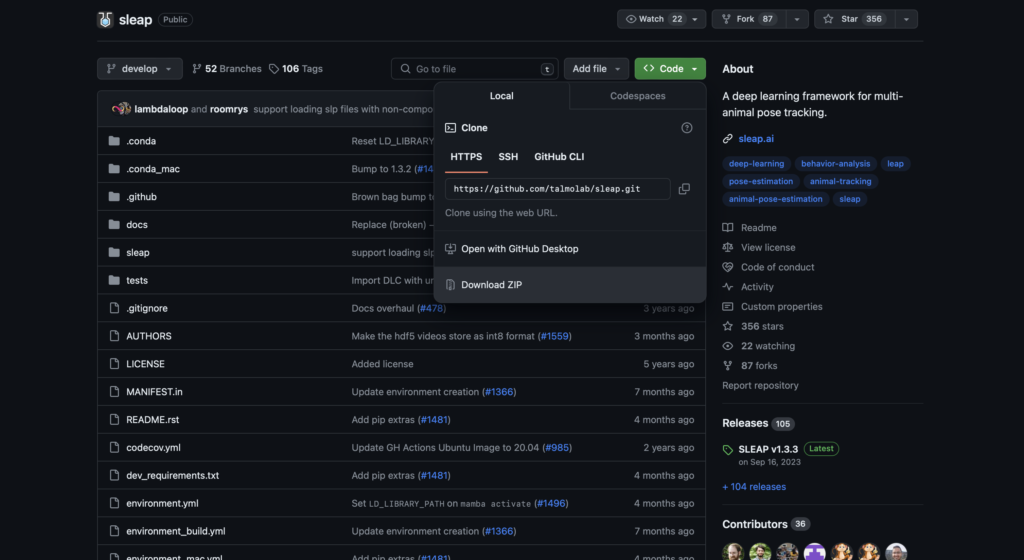
    First, download the files from the SLEAP GitHub repository to your computer.

    If you are using Git, run the following command.

    git clone https://github.com/talmolab/sleap

    If the git command is not available, either install git or download the files directly from GitHub.
    Installing the GPU driver

    Install the NVIDIA driver.
    (Skip this step if it is already installed.)

    Installing Anaconda

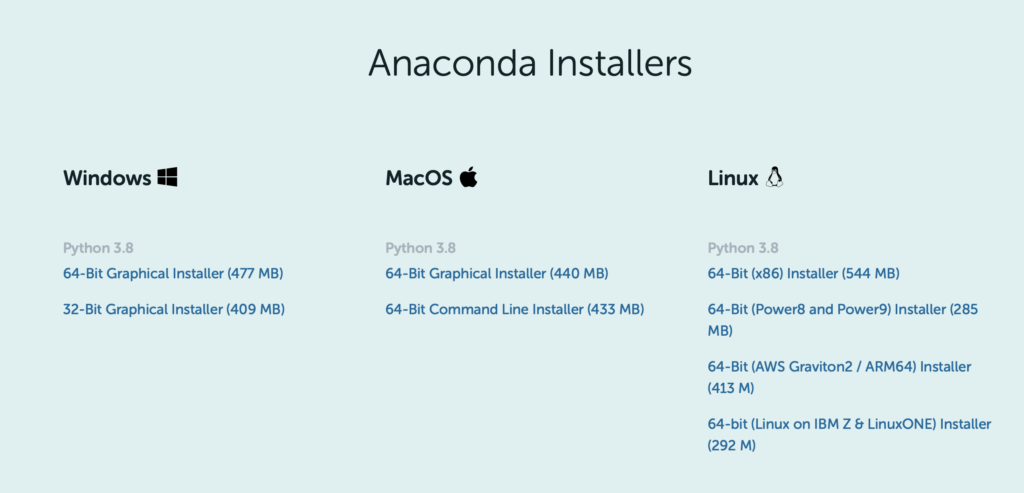
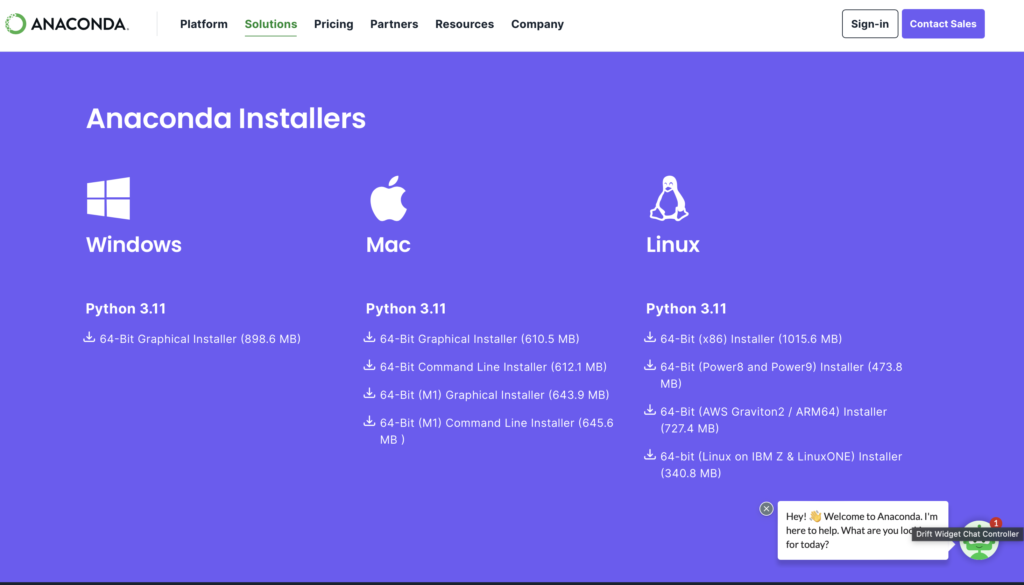
    Next, download and install the Windows 10 64-bit version from the Anaconda website.
    Click Free Download on the Anaconda site and scroll down; you should see a screen like the one below.
    Install the Windows installer on the far left.
    Once Anaconda is installed, you should find “Anaconda Prompt” in your Windows app list.
    We will use it to run the commands below to create the virtual environment, install SLEAP, and launch it.

    Creating the virtual environment and installing

    Next, run the following commands to create the virtual environment and install SLEAP.
    The environment will be named “sleap”.

    cd sleap
    conda env create -f environment.yml -n sleap

    Note that the commands above work on computers with a GPU;
    on computers without one, use the following commands instead.

    cd sleap
    conda env create -f environment_no_cuda.yml -n sleap

    That completes the installation.

    Verifying the installation

    Activate the virtual environment and launch SLEAP with sleap-label.

    conda activate sleap
    sleap-label

    You need to activate the virtual environment (the conda activate sleap command) every time you reopen Anaconda Prompt.

    After activation, the prompt should change from (base) to (sleap).

    If SLEAP launches, the installation was successful.

    Checking version information for reporting in a paper

    To check the version, activate the sleap environment and run the following command.

    python -c "import sleap; sleap.versions()"

    This will output

    SLEAP: 1.3.3
    TensorFlow: 2.7.0
    Numpy: 1.21.5
    Python: 3.7.12
    OS: Windows-10-10.0.22621-SP0

    showing the SLEAP version information and related details.

    You can also check whether SLEAP can use the GPU with

    python -c "import sleap; sleap.system_summary()"

    which should produce output like the following when the GPU is available.

    GPUs: 1/1 available
      Device: /physical_device:GPU:0
             Available: True
           Initialized: False
         Memory growth: None

    In future posts, I hope to walk through how to actually use SLEAP.

    Bonus

    For those unsure which computer to buy, I’ve started offering PC purchase consultations on Coconala!

    あなたの要望に合わせてパソコンを選び、提案します パソコン選びに困っている方々へ!様々な目的に対応できます!

    I often pick out computers and give advice on them, and many friends have told me I could make money doing PC consultations.
    That inspired me to give it a try!

    I’ll recommend a machine that fits both what you want to use it for and your budget.
    In particular, I’ve chosen and used many computers for machine learning.

    And if you’d like, I’m happy to advise you on what to look for the next time you buy a computer.

    Machines I’ve picked out so far include lab analysis computers, everyday-use computers, computers for game streaming, computers for incoming university students, computers that can run CAD for architecture students, and simple stopgap machines.

    I use both Mac and Windows, so I can talk about and recommend either one!

    Please feel free to make use of it.
  • How to Install Python Video Annotator

    How to Install Python Video Annotator

    What is Python Video Annotator?

    Python Video Annotator is an application that lets you analyze recorded videos and annotate events within them along a timeline.

    Researchers in neuroscience and ethology can use it to record videos of animals and then analyze and quantify their behavior.
    For example, suppose you are recording mouse behavior and want to score actions such as sticking out the tongue, wagging the tail, or moving the ears.
    When in the video does each action occur, and how long does it last?
    Watching the video and logging everything in Excel each time becomes overwhelming once you have defined many behaviors.
    With a tool like this, you can record annotations directly on the video and export the timing and event information.

    There used to be an open-source application called VCode for recording animal behavior.
    The problem, however, was that it no longer runs on current computer operating systems.

    Python Video Annotator works on modern PCs and retains the essential features, while also allowing you to combine it with external sensor data (such as pressure gauges) and behavior-quantification tools like DeepLabCut, making it an extremely useful tool for researchers.

    How to install

    The official website describes the installation procedure in detail, but I could not get it to install properly on my computer. (Installing it directly may have caused conflicts with packages that were already installed.)
    So instead I followed the approach described on the GitHub page, building a virtual environment with Anaconda and installing it there.

    It sounds complicated when described in words, but the steps are very simple.
    As of now (October 20, 2021) it does not appear to support the latest macOS (Big Sur 11.6), though this will probably be fixed soon.
    For that reason, I will use Windows as the example here.

    That said, on macOS the steps are basically the same once you have installed Anaconda and can use the conda command, so please refer to this guide once support is available. (For details, see my previous post.)

    Install Anaconda and open the Anaconda prompt.
    Then create a virtual environment and activate it.

    conda create -n videoannotator python=3.6
    conda activate videoannotator

    Next, install the required packages.

    pip install opencv-python-headless pyqt5==5.14.1 pyqtwebengine==5.14.0

    Then install Python Video Annotator.

    pip install python-video-annotator

    Once all the processing finishes, the installation is complete.

    To launch it, activate the virtual environment first and then run it.

    conda activate videoannotator
    start-video-annotator

    If the software starts up, you are all set.

  • How to Install DeepLabCut 2.3 [Updated December 2023]

    How to Install DeepLabCut 2.3 [Updated December 2023]

    In this post, I’ll walk through how to install DeepLabCut.

    Reference sites
    ・Japanese-language pages
    https://qiita.com/auditorycortex/items/1b3a55101cddf09553b2
    ↑Very clear. Following this alone should get you there.

    https://note.com/sakulab/n/n9caeb32d74d6
    ↑Includes screenshots

    DeepLabCut homepage
    GitHub

    How to install

    Environment
    ・Windows 10
    ・Confirmed working on NVIDIA 2060 SUPER, NVIDIA 1080 Ti, and NVIDIA 3080
    (did not work on NVIDIA 1060 SUPER)
    ・DeepLabCut 2.1
    ・Latest NVIDIA driver
    ・Anaconda3
    ・Python 3.8
    ・CUDA 11.8
    ・tensorflow-gpu 2.5

    Steps
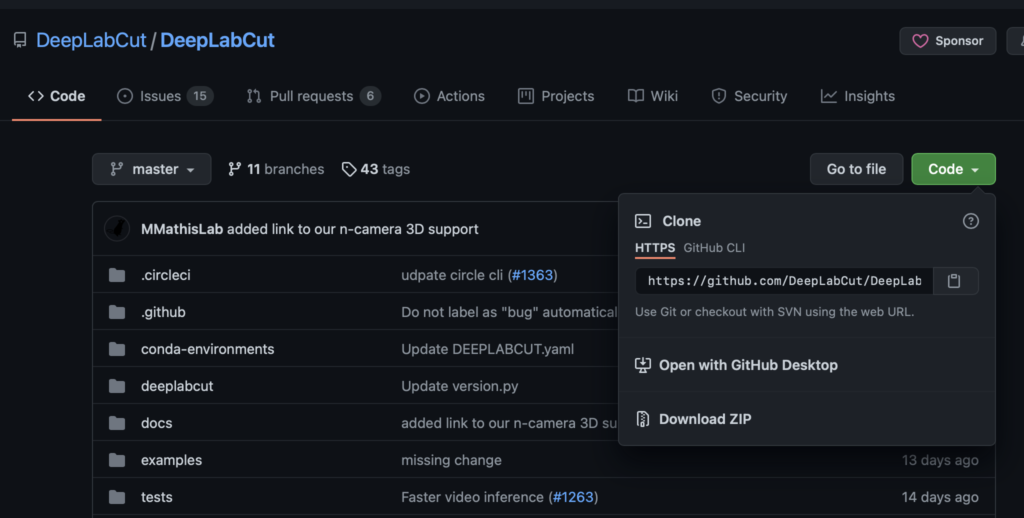
    First, download the master files from the GitHub page.

    You can download it via “Download ZIP” under Code.

    Next, download and install the Windows 10 64-bit version from the Anaconda site.

    Install the NVIDIA driver. (Skip this if it is already installed.)

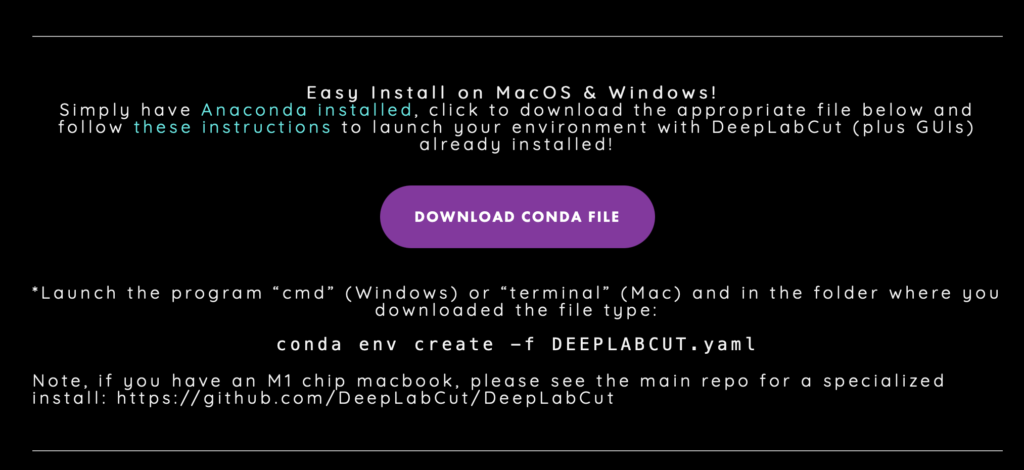
    Scroll down on the DeepLabCut site, click “DOWNLOAS CONDA FILE” on the right, and
    download DEEPLABCUT.yaml.

    Create a DeepLabCut folder somewhere on your PC (the Desktop or a directory on the C drive is recommended), and create an environment folder inside it.
    Then place the DEEPLABCUT.yaml file you just downloaded into that folder.
    This is a matter of personal preference, but I like to keep environment files in one fixed place, so this is how I do it.

    Launch Anaconda Prompt as administrator. (A terminal-like window full of white text on black, similar to the command prompt, will appear.)
    Anaconda Prompt is installed together with Anaconda, so you should be able to find it in your list of installed applications.

    Now build a virtual environment using the DEEPLABCUT.yaml file you downloaded.
    In Anaconda Prompt, type

    conda env create -f C:(DLC-GPU.yamlファイルの場所)DEEPLABCUT.yaml

    and run it.
    You can check the location of the DEEPLABCUT.yaml file in the file’s properties, so look it up there and enter it.

    When you run this command, it will download various packages.
    After that, activate the virtual environment you created.

    conda activate DEEPLABCUT

    The prompt should change from (base) to (DEEPLABCUT).
    If you get that far, you’re good for now.

    Next, install CUDA and cuDNN.

    conda install -c conda-forge cudnn

    This will download suitable versions of the CUDA toolkit and cuDNN for you.

    Then enter the following four commands to complete the installation.

    pip install numpy
    pip install deeplabcut
    pip install imgaug
    pip install torch

    Update DeepLabCut, and the installation is complete.

    pip install --upgrade deeplabcut

    Once you’ve made it this far, try launching it.

    conda activate DEEPLABCUT
    python -m deeplabcut

    Entering this will launch the DeepLabCut GUI.

    What to do when DeepLabCut won’t run on the GPU

    Sometimes you start training and think, “Huh? Isn’t this slow?”
    That’s because DeepLabCut is running on the CPU when you meant to run it on the GPU.

    A common cause is a version mismatch among CUDA, cuDNN, and tensorflow.

    Packages like tensorflow keep getting updated to newer versions,
    so things occasionally stop working.

    For the latest version information, please check DeepLabCut’s GitHub page.

    That covers the installation process.
    In upcoming posts, I’ll explain how to actually use it.

    Bonus

    For those who aren’t sure which computer to buy, I’ve started offering PC purchase consultations on Coconala!

    あなたの要望に合わせてパソコンを選び、提案します パソコン選びに困っている方々へ!様々な目的に対応できます!

    I’ve picked out and advised on computers so often that many friends told me I should charge for it.
    That inspired me to give it a try!

    I’ll recommend a machine that fits both your intended use and your budget.
    I have particular experience choosing and working with computers for machine learning.

    And if you’d like, I can also advise you on what to look for when buying a computer in the future.

    Machines I’ve helped choose so far include lab analysis workstations, everyday work computers, game-streaming rigs, laptops for incoming university students, CAD-capable machines for architecture students, and simple all-purpose computers.

    I use both Mac and Windows, so I can discuss and recommend either!

    Please feel free to make use of it.

    Addendum 1

    I’ve also written an article on how to install “SLEAP,” another behavior-tracking tool like DeepLabCut.

    SLEAP is every bit as capable as DeepLabCut, so do give it a try.

  • Bonsai as a Visual Programming Language

    Bonsai as a Visual Programming Language

    Bonsai is a visual programming language introduced in a 2015 paper.
    It lets you acquire data from sensors and process it at the same time.

    One of Bonsai’s strengths is that you can build complex processing pipelines much like assembling a puzzle, and then check the results of that processing in real time.

    Bonsai can also be combined with other analysis software (DeepLabCut, Open Ephys, BonVision, and so on) and with hardware (cameras, controllers, microcontrollers, etc.), which makes it highly extensible.

    Because you can perform complex analysis and processing intuitively without having to learn a seemingly daunting programming language, anyone can use it easily, and it broadens the range of experiments you can run.

    The paper on Bonsai is available here.
    You can install Bonsai from here.

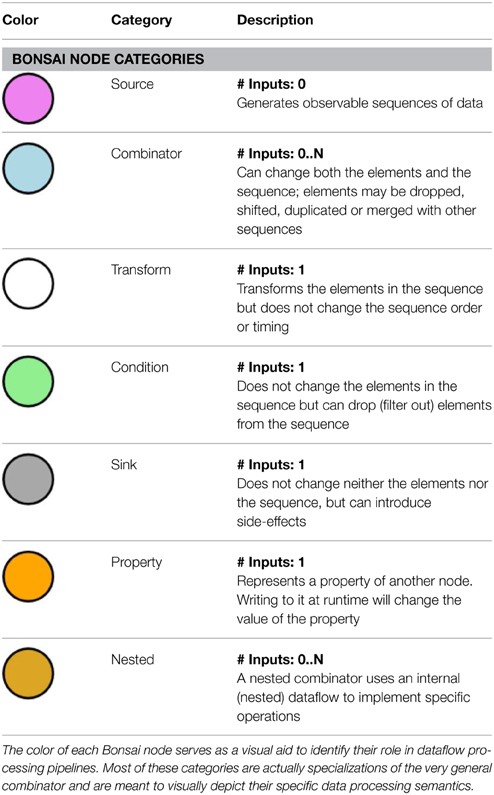
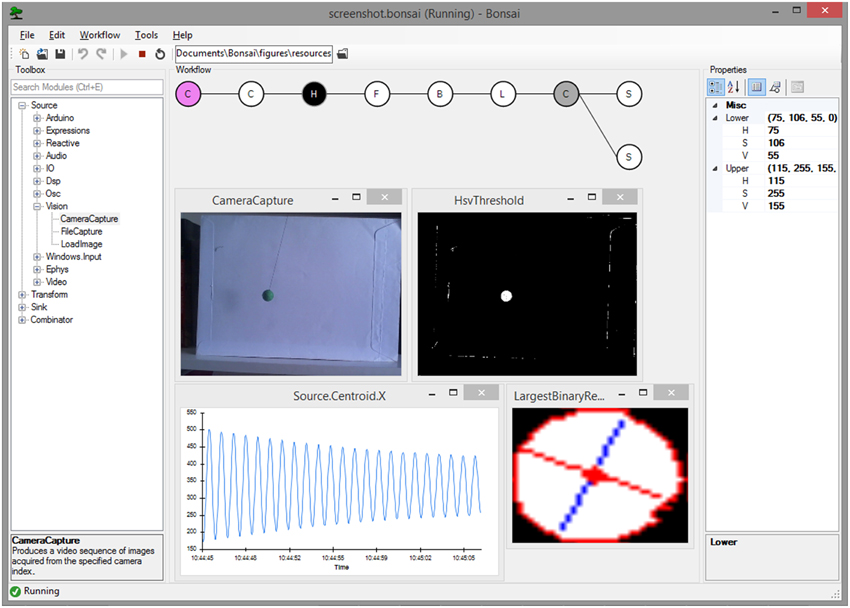
    Image taken from the paper.
    Each circle is called a node and represents an individual processing step.

    This is what the screen looks like when Bonsai is actually running (taken from the paper).
    On the left you can search for nodes and add the one you want; in the center you arrange nodes to build your pipeline while visualizing how it works; and on the right are the detailed settings for each node.

    The pop-up windows on the main screen show the execution status of each node — for a camera capture node, for example, it can display the live camera image.

    It may look difficult at first glance, but seen this way it turns out to be surprisingly simple.

    Now let’s actually install it.
    That said, all you have to do is download it from this site.
    Just open the downloaded “Bonsai-*.*.*.exe” file and run the installer.
    Note that security software such as Virus Buster may sometimes prevent the installation.

    Once Bonsai is installed, both Bonsai and Bonsai (x86) will appear in your list of applications.
    Either one is fine for normal use, but occasionally one of them will not run; when that happens, trying the other one often works.

    One drawback is that Bonsai currently runs only on Windows and does not support Linux or macOS.
    Support may come in the future, but this is something to keep in mind.

    From next time, I’ll start actually using Bonsai.