Tag: neuroscience

  • What Exactly Is YORU, a New Behavior Analysis Tool Powered by Object Detection?

    What Exactly Is YORU, a New Behavior Analysis Tool Powered by Object Detection?

    In November 2024, a preprint was posted on bioRxiv describing YORU, a behavior analysis tool that takes a different approach from existing behavior analysis tools.
    In this post, I’d like to explain what kind of tool it is.

    The YORU preprint

    The YORU documentation

    What is YORU?

    YORU is a deep learning-based tool for analyzing animal behavior.
    YORUのサイトより引用


    A number of deep learning-based tools, such as DeepLabCut and SLEAP, have already been released.
    These tools use deep learning to track body parts of animals and estimate their posture (here I’ll refer to them as tracking tools).
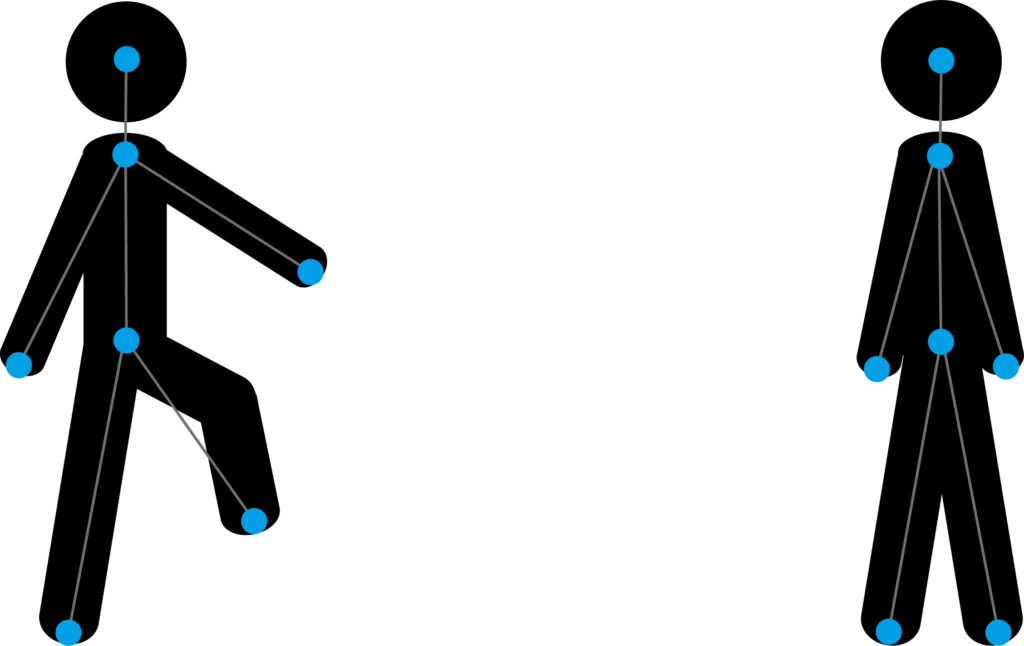
    By estimating posture, they reveal what posture an animal is in and use that for behavior analysis.

    YORU, by contrast, recognizes behavior using an object detection algorithm.
    In short, it does not track body parts; instead, it defines behavior directly from the appearance of the animal as it behaves.

    When people tell an apple from a mandarin orange, they rely on cues such as shape and color.
    Object detection excels at classifying objects, so it makes exactly this kind of appearance-based distinction.

    Applying this to animal behavior analysis means classifying animal behavior from its appearance.
    Within YORU, we call this a “behavior object.”
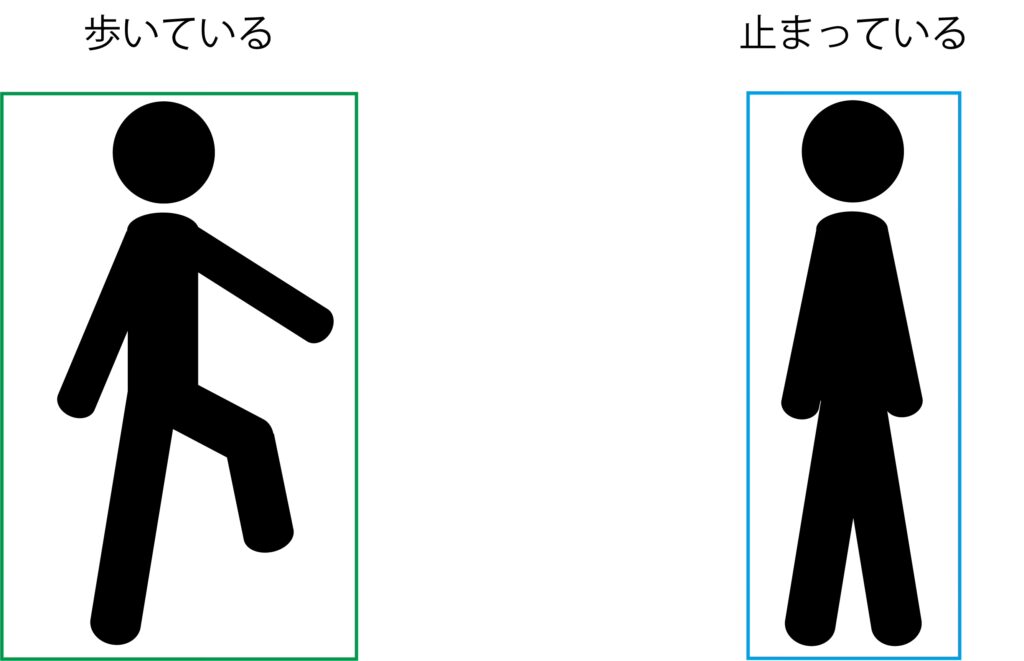
    Whereas tracking tools represent behavior as points and lines, YORU analyzes behavior by enclosing it in a bounding box.

    Advantages of defining behavior with object detection

    The advantages of object detection-based behavior analysis include:

    ・Errors are less likely as the number of individuals increases

    ・Less sensitive to the orientation of the animal

    ・Fast analysis speed

    ・Can capture behaviors that are hard to capture by tracking (such as a mouse crouching)

    and so on.

    It makes it easy to analyze the behavior of multiple individuals—a weak point of tracking tools—at a considerably lower computational cost.
    It can also easily analyze behaviors that are difficult to define from the positional information of body parts.

    Consider, for example, the act of opening and closing a hand.
    With a tracking tool, you would track the fingertips with a camera and define the hand as open or closed, but if the fingertips become hidden when the hand closes, tracking fails and the positional information can no longer be computed accurately.

    With object detection, however, the model looks at the overall shape of the open and closed hand, so it can capture the state accurately even when part of the hand is hidden.

    The same logic explains its robustness to larger numbers of individuals: with a tracking tool, as the number of individuals grows, you must assign each body part to the correct individual to capture each individual’s behavior accurately, whereas YORU analyzes only the shape of each individual and therefore requires no individual identification or assignment.

    Because analysis is fast, real-time analysis is possible, allowing you to control equipment when a particular behavior occurs and thus automate behavioral experiments.

    Disadvantages of defining behavior with object detection

    Of course, there are disadvantages as well:

    ・Cannot capture a sequence of behaviors

    ・Cannot identify individuals

    ・Cannot capture unknown behaviors

    ・Cannot capture behaviors that are hard to distinguish by appearance

    ・Provides no detailed information about the defined behavior

    These are precisely the strengths of tracking tools; rather than one approach being superior, the two complement each other’s advantages and disadvantages.

    Experimenters therefore need to choose the method appropriate to their situation.

    What makes YORU special?

    Having described the advantages and disadvantages of the object detection-based behavior analysis that underlies YORU, what exactly makes YORU special?

    Everything runs through a GUI

    YORU lets you perform behavior analysis without any programming.

    The same is true of tools like DeepLabCut and SLEAP, and it goes a long way toward making these analyses accessible to biologists.

    Design


    Unlike previous tools, YORU’s design doesn’t really feel like a research tool.
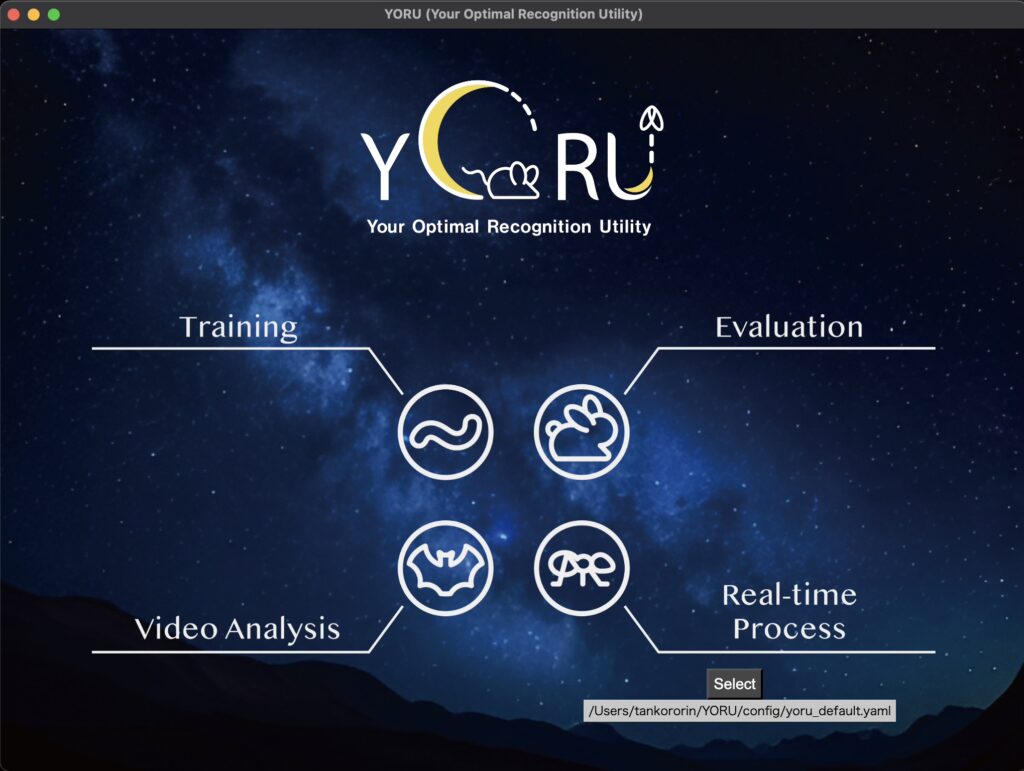
    Built-in real-time analysis

    Unusually for tools of this kind, YORU comes with a full GUI for real-time analysis.

    Building a real-time analysis system isn’t that difficult if you can program to some extent, but otherwise the barrier is quite high.

    With YORU, however, real-time analysis and even external triggering can all be done without any programming.

    Adaptable to a wide range of experimental setups

    The biggest hurdle in real-time analysis is figuring out how to combine the code that drives your own experimental apparatus with the analysis itself.

    YORU adopts a plugin system, letting you choose the program that controls your external device.

    In other words, you simply select the plugin that matches your own system.

    You can also write your own plugins: by wrapping the control program for your own apparatus in a plugin, you can easily link it to YORU’s real-time analysis.

    This makes for a remarkably easy-to-use system that no other tool offers.

    Closing remarks

    YORU has only just been released, and there are still rough edges in usability as well as gaps in the documentation.

    That said, as these are addressed over time, I am very much looking forward to seeing how it comes to be used.

  • From GitHub Basics to Publishing Your Code Alongside a Paper

    Here are the slides from a talk I gave on how to use Git and GitHub.

    The slides cover everything from hands-on operations in GitHub to the steps needed to make your program code available alongside a published paper.

    Sharing paper data and analysis code is increasingly expected these days.
    Beyond that, managing code with GitHub has become an essential part of working on collaborative research.

    [Updated January 15, 2024] https://www.slideshare.net/slideshow/embed_code/key/vzfmHD9i6I15wI

    From GitHub basics and code management to publishing your program code with a paper from Hayato Yamanouchi

    The same material is also posted on my personal site.

    Hayato M. Yamanouchi’s personal site

  • How to Install SLEAP [Updated February 2024]

    How to Install SLEAP [Updated February 2024]

    Here I’d like to describe how to install SLEAP, a machine learning-based tool for tracking animal body parts.

    DeepLabCut is the most widely used tracking tool, and I have written about how to install it in the past, as have many other people.

    For SLEAP, however, there are currently few articles available in Japanese.
    SLEAP has many advantages over DeepLabCut, so I decided to write up the installation procedure to make it a viable option for more people.

    SLEAP’s documentation, from installation to usage, is extremely well organized and comes with videos, so anyone comfortable with English should find it easy to get started.

    The SLEAP paper is available here

    The official SLEAP website is here

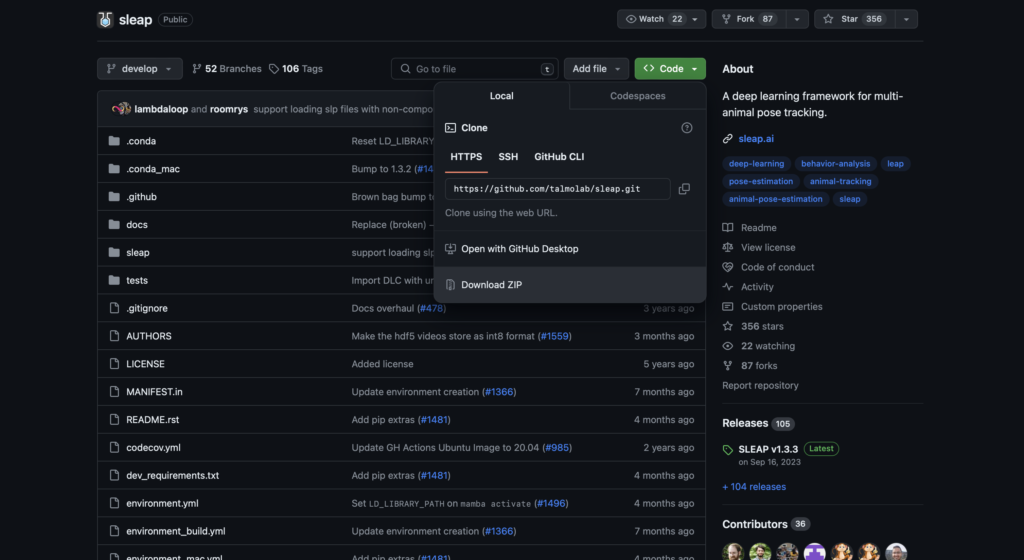
    The SLEAP GitHub repository is here

    Introduction

    First of all, regarding the approach described in the official SLEAP installation guide,

    mamba create -y -n sleap -c conda-forge -c nvidia -c sleap -c anaconda sleap=1.3.3

    which sets up the environment, installs the packages, and handles everything else in a single command: I tried this on several computers, but in every case it stalled indefinitely during the environment setup and never completed successfully.

    So here I introduce an alternative installation method, also suggested by the developers.

    Installation

    We will basically follow the installation instructions on the official SLEAP website.

    Environment

    ・Windows 11 Pro
    ・Verified on an NVIDIA 3080
    ・SLEAP 1.3.3
    ・Python 3.7.12

    Downloading the files

    First, download the files from the SLEAP GitHub repository to your computer.

    If you are using Git, run the following command.

    git clone https://github.com/talmolab/sleap

    If the git command is not available, either install git or download the files directly from GitHub.

    Installing the GPU driver

    Install the NVIDIA driver.
    (Skip this step if it is already installed.)

    Installing Anaconda

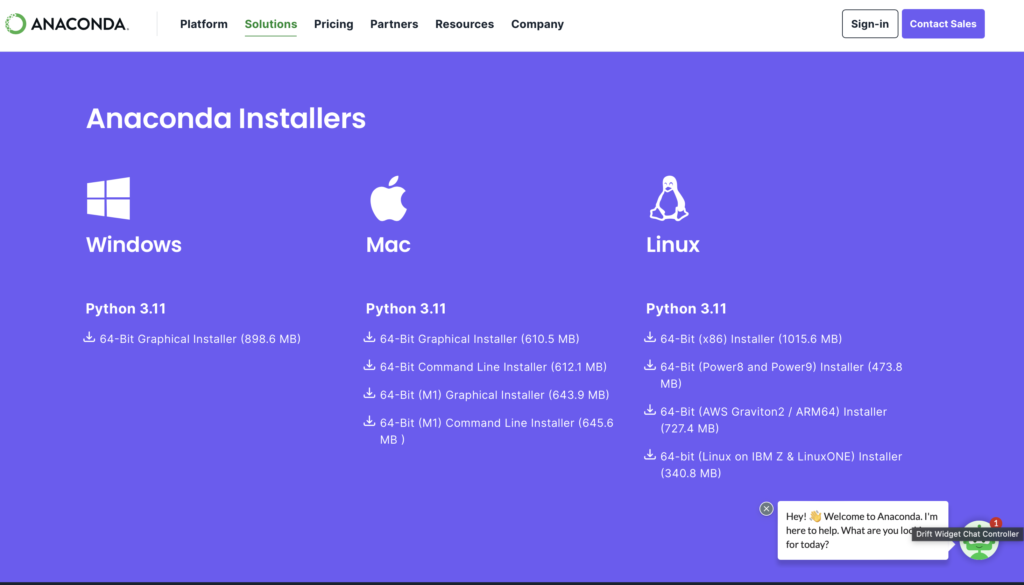
    Next, download and install the Windows 10 64-bit version from the Anaconda website.
    Click Free Download on the Anaconda site and scroll down; you should see a screen like the one below.
    Install the Windows installer on the far left.

    Once Anaconda is installed, you should find “Anaconda Prompt” in your Windows app list.
    We will use it to run the commands below to create the virtual environment, install SLEAP, and launch it.

    Creating the virtual environment and installing

    Next, run the following commands to create the virtual environment and install SLEAP.
    The environment will be named “sleap”.

    cd sleap
    conda env create -f environment.yml -n sleap

    Note that the commands above work on computers with a GPU;
    on computers without one, use the following commands instead.

    cd sleap
    conda env create -f environment_no_cuda.yml -n sleap

    That completes the installation.

    Verifying the installation

    Activate the virtual environment and launch SLEAP with sleap-label.

    conda activate sleap
    sleap-label

    You need to activate the virtual environment (the conda activate sleap command) every time you reopen Anaconda Prompt.

    After activation, the prompt should change from (base) to (sleap).

    If SLEAP launches, the installation was successful.

    Checking version information for reporting in a paper

    To check the version, activate the sleap environment and run the following command.

    python -c "import sleap; sleap.versions()"

    This will output

    SLEAP: 1.3.3
    TensorFlow: 2.7.0
    Numpy: 1.21.5
    Python: 3.7.12
    OS: Windows-10-10.0.22621-SP0

    showing the SLEAP version information and related details.

    You can also check whether SLEAP can use the GPU with

    python -c "import sleap; sleap.system_summary()"

    which should produce output like the following when the GPU is available.

    GPUs: 1/1 available
      Device: /physical_device:GPU:0
             Available: True
           Initialized: False
         Memory growth: None

    In future posts, I hope to walk through how to actually use SLEAP.

    Bonus

    For those unsure which computer to buy, I’ve started offering PC purchase consultations on Coconala!

    あなたの要望に合わせてパソコンを選び、提案します パソコン選びに困っている方々へ!様々な目的に対応できます!

    I often pick out computers and give advice on them, and many friends have told me I could make money doing PC consultations.
    That inspired me to give it a try!

    I’ll recommend a machine that fits both what you want to use it for and your budget.
    In particular, I’ve chosen and used many computers for machine learning.

    And if you’d like, I’m happy to advise you on what to look for the next time you buy a computer.

    Machines I’ve picked out so far include lab analysis computers, everyday-use computers, computers for game streaming, computers for incoming university students, computers that can run CAD for architecture students, and simple stopgap machines.

    I use both Mac and Windows, so I can talk about and recommend either one!

    Please feel free to make use of it.

  • How to Install Python Video Annotator

    How to Install Python Video Annotator

    What is Python Video Annotator?

    Python Video Annotator is an application that lets you analyze recorded videos and annotate events within them along a timeline.

    Researchers in neuroscience and ethology can use it to record videos of animals and then analyze and quantify their behavior.
    For example, suppose you are recording mouse behavior and want to score actions such as sticking out the tongue, wagging the tail, or moving the ears.
    When in the video does each action occur, and how long does it last?
    Watching the video and logging everything in Excel each time becomes overwhelming once you have defined many behaviors.
    With a tool like this, you can record annotations directly on the video and export the timing and event information.

    There used to be an open-source application called VCode for recording animal behavior.
    The problem, however, was that it no longer runs on current computer operating systems.

    Python Video Annotator works on modern PCs and retains the essential features, while also allowing you to combine it with external sensor data (such as pressure gauges) and behavior-quantification tools like DeepLabCut, making it an extremely useful tool for researchers.

    How to install

    The official website describes the installation procedure in detail, but I could not get it to install properly on my computer. (Installing it directly may have caused conflicts with packages that were already installed.)
    So instead I followed the approach described on the GitHub page, building a virtual environment with Anaconda and installing it there.

    It sounds complicated when described in words, but the steps are very simple.
    As of now (October 20, 2021) it does not appear to support the latest macOS (Big Sur 11.6), though this will probably be fixed soon.
    For that reason, I will use Windows as the example here.

    That said, on macOS the steps are basically the same once you have installed Anaconda and can use the conda command, so please refer to this guide once support is available. (For details, see my previous post.)

    Install Anaconda and open the Anaconda prompt.
    Then create a virtual environment and activate it.

    conda create -n videoannotator python=3.6
    conda activate videoannotator

    Next, install the required packages.

    pip install opencv-python-headless pyqt5==5.14.1 pyqtwebengine==5.14.0

    Then install Python Video Annotator.

    pip install python-video-annotator

    Once all the processing finishes, the installation is complete.

    To launch it, activate the virtual environment first and then run it.

    conda activate videoannotator
    start-video-annotator

    If the software starts up, you are all set.

  • Arithmetic Operations in Bonsai

    Arithmetic Operations in Bonsai

    Bonsai is widely used for designing experiments in neuroscience and beyond.
    With Bonsai you can build sophisticated programs without writing code, and run them with precise synchronization.

    Because it is so simple, however, operations that would be trivial in ordinary programming—such as basic arithmetic—have to be done in a somewhat unintuitive way.
    Here I explain how to perform arithmetic operations, using MouseMove as an example.

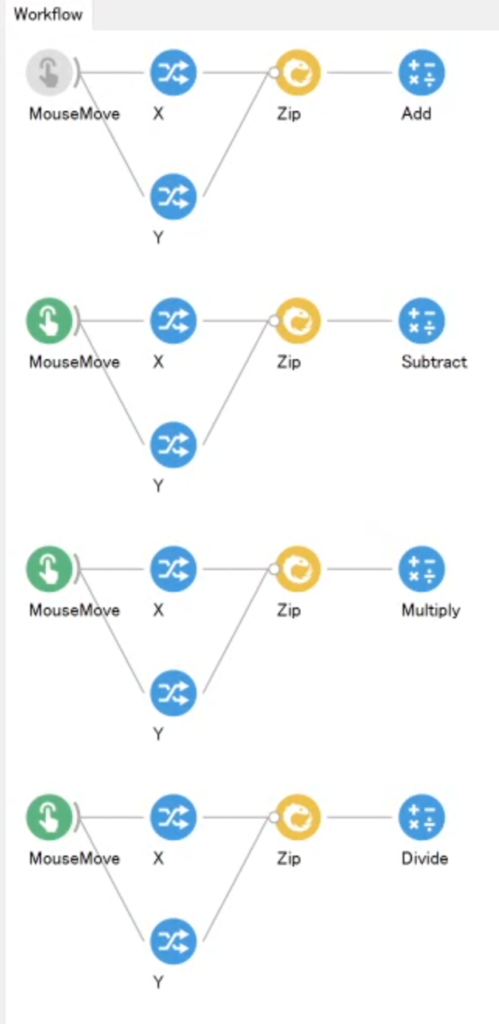
    Below are the arithmetic operations in action: from top to bottom, addition, subtraction, multiplication, and division.

    For clarity, I used the X and Y values from MouseMove as an example here.
    In practice, though, you can perform calculations on values obtained from other sensors and the like.

    The key point in Bonsai is that you need to combine the two values with “Zip” before performing the operation.

    The contents of “Zip” take the form (value 1, value 2); its role is to bundle the two values at that moment into one.
    Each operation then computes value 1 and value 2 together.

    It is hard to explain in words, so try to get a rough intuition for it.
    Without “Zip”, the program would not know which value to multiply with which, so the calculation could not be performed. That is why the X and Y values must first be combined so that they correspond to each other.

    The names of the operators for each arithmetic operation are listed below.

    • Addition => Add
    • Subtraction => Subtract
    • Multiplication => Multiply
    • Division => Divide

    I have included a demonstration below for your reference.

    <Example in action>

  • DeepLabCut: A Deep Learning-Based Behavior Analysis Tool

    DeepLabCut: A Deep Learning-Based Behavior Analysis Tool

    (The image above links to the paper.)

    Behavioral analysis is a crucial experimental approach in biology, and accurate quantification of behavior is especially indispensable for understanding the brain.

    Traditionally, high-accuracy pose estimation has been achieved by attaching markers (such as sensors) to the subject (a person or a laboratory animal).
    However, sensors get in the subject’s way, which can alter its behavior or restrict its movements.

    One marker-free alternative is to fit a skeleton model, but developing such models is time-consuming and has to be done on a large scale.
    There are also image-based pose estimation systems, but these generate enormous amounts of data, which again makes them very difficult for a single laboratory to run given the equipment required.

    With DeepLabCut, anyone with a single computer can perform pose estimation very easily.
    Using deep learning-based image recognition, you can track any body parts you choose without markers.

    Because the labeling is learned by a deep network, you can analyze recorded videos without correcting them beforehand.
    In other words, tracking works even if the lighting across the field of view is uneven or the image is somewhat distorted depending on the camera angle.

    The page of the laboratory that developed DeepLabCut is here.
    The GitHub repository is here.

    From actually using DeepLabCut, I found that the computer used for analysis needs a GPU (graphics card) with at least 8 GB of memory.
    In gaming PC terms, that means a mid- to high-end GPU, so comfortable analysis is not possible on an everyday laptop.

    That said, even without such a high-spec machine, you can run the analysis on a virtual GPU using Google Colab.
    I haven’t tried it yet, though…

    In practice, I found the plotting accuracy to be very high.
    However, analysis often fails when the background differs from that of the training data, so it is best to assume the exact setting you want to analyze and use training data recorded under conditions as close to it as possible.

    The paper shows that plotting accuracy improves further when you label not only the few points you are interested in but the whole subject, including a rough skeleton, even for parts you will not use in the analysis.
    In addition, if the results are unsatisfactory after training and analysis, you can remove the problematic frames or add new training data, allowing you to actively refine the model.

    DeepLabCut itself is very user-friendly, and anyone can use it easily.
    Why not give it a try in your own analyses?

    I’d like to write about how to install and use DeepLabCut in future posts.


  • Bonsai as a Visual Programming Language

    Bonsai as a Visual Programming Language

    Bonsai is a visual programming language introduced in a 2015 paper.
    It lets you acquire data from sensors and process it at the same time.

    One of Bonsai’s strengths is that you can build complex processing pipelines much like assembling a puzzle, and then check the results of that processing in real time.

    Bonsai can also be combined with other analysis software (DeepLabCut, Open Ephys, BonVision, and so on) and with hardware (cameras, controllers, microcontrollers, etc.), which makes it highly extensible.

    Because you can perform complex analysis and processing intuitively without having to learn a seemingly daunting programming language, anyone can use it easily, and it broadens the range of experiments you can run.

    The paper on Bonsai is available here.
    You can install Bonsai from here.

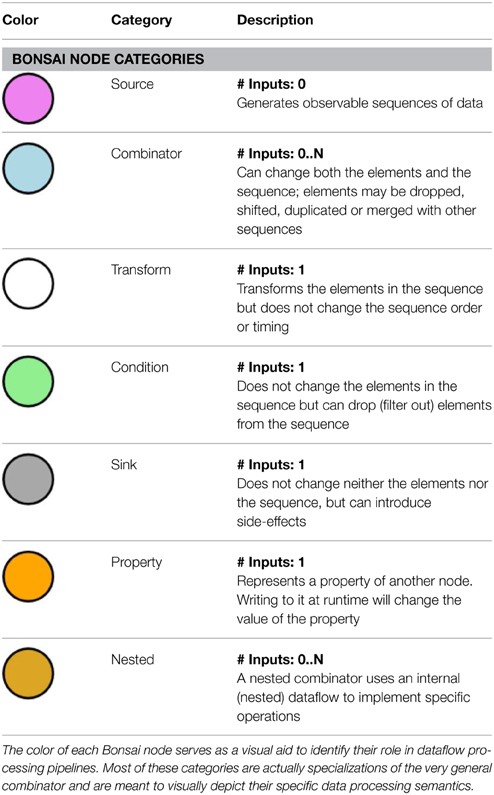
    Image taken from the paper.
    Each circle is called a node and represents an individual processing step.

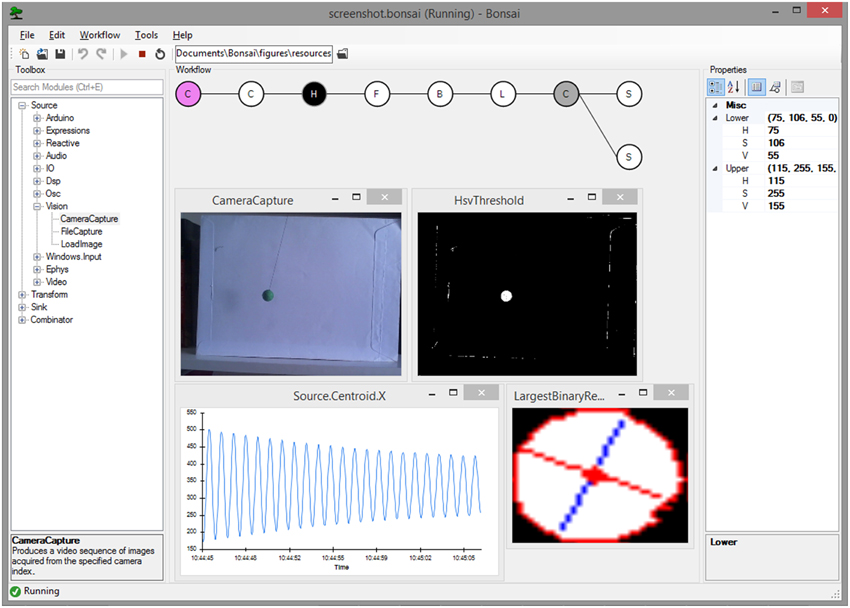
    This is what the screen looks like when Bonsai is actually running (taken from the paper).
    On the left you can search for nodes and add the one you want; in the center you arrange nodes to build your pipeline while visualizing how it works; and on the right are the detailed settings for each node.

    The pop-up windows on the main screen show the execution status of each node — for a camera capture node, for example, it can display the live camera image.

    It may look difficult at first glance, but seen this way it turns out to be surprisingly simple.

    Now let’s actually install it.
    That said, all you have to do is download it from this site.
    Just open the downloaded “Bonsai-*.*.*.exe” file and run the installer.
    Note that security software such as Virus Buster may sometimes prevent the installation.

    Once Bonsai is installed, both Bonsai and Bonsai (x86) will appear in your list of applications.
    Either one is fine for normal use, but occasionally one of them will not run; when that happens, trying the other one often works.

    One drawback is that Bonsai currently runs only on Windows and does not support Linux or macOS.
    Support may come in the future, but this is something to keep in mind.

    From next time, I’ll start actually using Bonsai.