Once you join a lab, chances are you’ll be asked to present a paper at a journal club sooner or later.
The format of journal clubs varies from lab to lab, but in many cases you’re expected to find a paper yourself, read it yourself, and present it. Even outside of journal clubs, doing research means getting to know the prior literature, so you’ll be searching for papers a lot.
Here I’d like to introduce some tools that come in handy for that.
It’s so well known that there’s probably not a single researcher who hasn’t heard of it.
Basically you search just as you would on Google, but everything that comes up is literature—papers, books, and so on.
Since it’s the tool you reach for when you just want a rough look at the literature, I suspect it’s the most widely used search tool of all. I use Google Scholar too: I throw in some rough keywords and use the results as a first screening pass.
The flip side of being good for broad searches is that there aren’t many options for narrowing things down.
Still, the main filters are there—publication date range, relevance, and so on—so it covers most needs. And when you want to restrict the search to a particular journal, you can just put the journal name in the keywords; it really works the same way as a Google search.
PubMed is probably the best-known literature search tool in the life sciences.
What’s impressive about it is the sheer number of ways you can search.
Author, journal, editor—you can search by just about any field you can think of.
It’s an extremely useful tool when you already know the journal, the author, or whatever other details you want to search by.
Web of Science
The last one I’ll introduce is Web of Science.
It’s a paid service in principle, but if you’re affiliated with a university you can generally access it through the campus wifi, so students can use it for free.
Where this tool really shines is that it lets you look up what’s known as the impact factor (IF).
The IF is a kind of journal ranking—a number that indicates how strong a given journal is.
You can find impact factors by googling “journal name IF” as well, but the numbers you get are often not the official ones.
Web of Science is the source that officially issues IFs, so you can find the correct value there.
I use Web of Science as my IF lookup tool when deciding which journal to submit to, or when I want to gauge how impressive one of my advisor’s papers is.
Closing thoughts
Google Scholar is what I use most of the time, but knowing about the other tools comes in handy when you need to look something up in a specific way.
Getting beard hair removal in Japan is, I think, extremely expensive. And the fact that you have to go back again and again is another pain point.
In Korea, a country famous for its beauty industry, hair removal is apparently much cheaper than in Japan. I had never had it done before, but on my first trip to Korea I decided to try hair removal for the first time!!
The Process and the Price
I had the treatment done at Personal Beauty GU Clinic in Gangnam-gu. I made the reservation through the smartphone app Gangnam Unni.
I used Gangnam Unni to search for men’s beard hair removal in Seoul, but there were only one or two other places offering it, so choosing wasn’t hard at all.
At the time of booking, the price was 500,000 won for five full-face sessions (about 50,000 yen). So cheap!!!
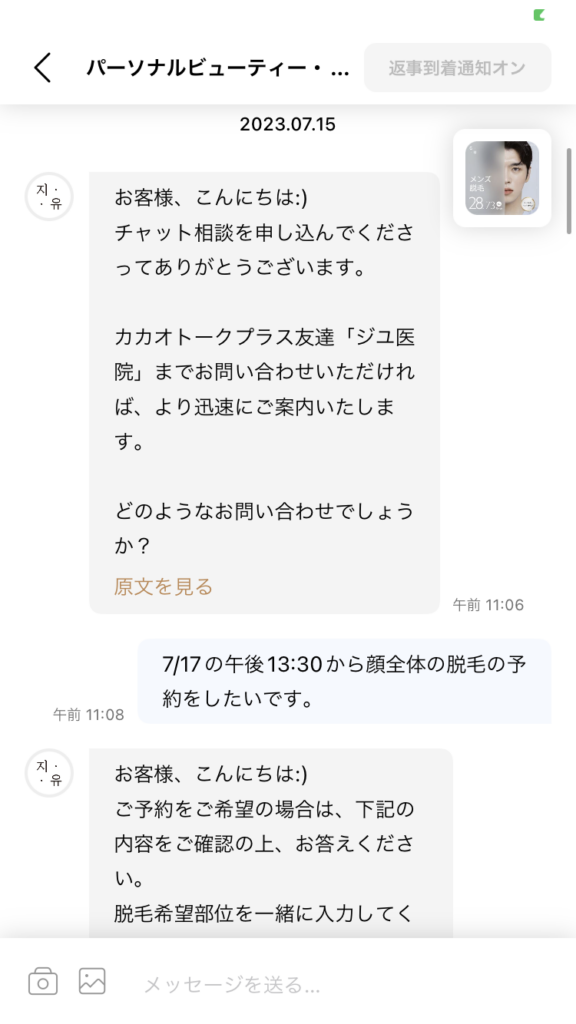
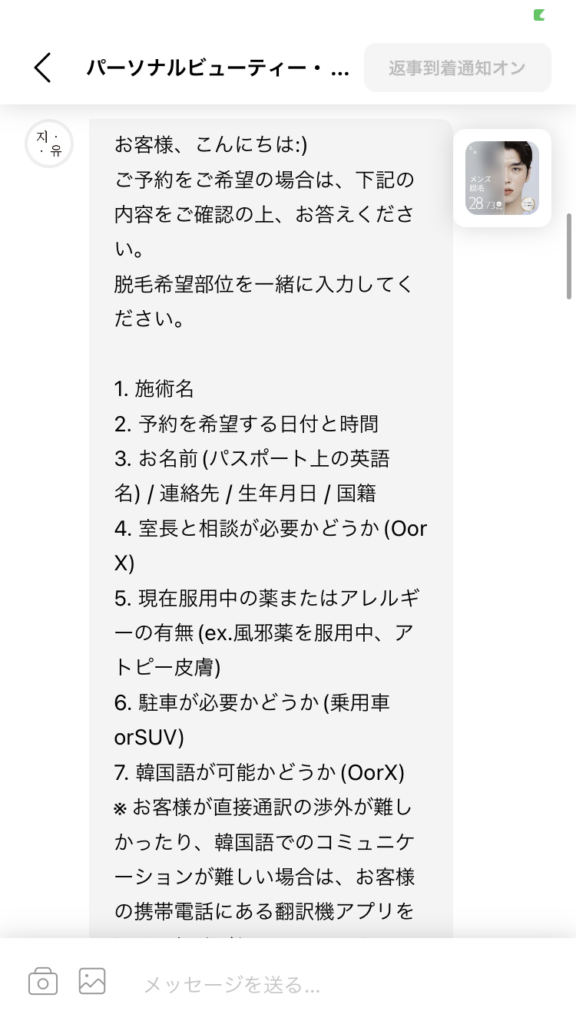
Two days before, I applied for an online consultation through the app to make my reservation.
The moment I tapped “online reservation,” a message came back in Japanese.
The app seems to translate the Korean automatically, so I felt no language barrier at all in booking. The message also said that if communication proved difficult they would use a translation device, which gave me the impression that they’d be accommodating to foreign patients.
So with that, I had my reservation, and on the day itself I headed to the clinic.
When I got there, there were several other Japanese people around, which was a bit of a relief. Worst case, if something happened, maybe someone would help me out… right? lol
I told the receptionist I had a reservation, was asked to wait, and sat down in a chair.
But even though I arrived at my reserved time, I was kept waiting for about two hours before finally being called and taken to some mysterious private room.
There, someone who seemed to be the doctor explained things to me using a translation device, and I paid.
After that, I waited about ten minutes and was then taken further inside.
A nurse told me she was going to apply anesthetic to my face, and she sprayed some liquid from what looked like an alcohol spray bottle onto my face. (It had a slightly sweet smell, so it probably really was anesthetic, lol)
After a while my whole face felt a bit tight, and just as I was thinking the anesthetic must be kicking in, a fairly young male doctor called me into the treatment room.
And then came the laser. Maybe because of the anesthetic, it barely hurt except where my beard is thick, and even there it only stung a little. It was different from the reputation hair removal has in Japan, so maybe the use of anesthetic is what sets Korea apart.
That said, there was a strong burnt smell, and they kept blowing air on me the whole time. Just as I was starting to muse about whether the lasers are stronger here than in Japan, I heard “All done!”
It honestly felt like about 30 seconds. I thought, wow, that was fast.
After that I washed my face, headed out, and enjoyed the rest of my trip to Korea.
The Results, Some Days Later
For about a week, almost nothing happened, but by the second week I started noticing spots where my beard looked thinner. Actually, “not growing at all in places” is probably the more accurate description. I was genuinely surprised!
The treatment really does seem to work!
I can go back to that clinic four more times, and they told me to come at intervals of about a month and a half to two months.
I figure I’ll just go whenever I can, tacking it onto future trips to Korea.
Overall Verdict
Apart from the absurdly long wait, I had no complaints at all. Communication was a bit halting, but with the ultimate weapon that is a translation device, every problem got sorted out.
When I mentioned the long wait in a review, the clinic replied with an apology and said that it doesn’t usually happen on weekdays, so I should come on a weekday next time!
Maybe I’ll go on a weekday from now on.
It was a pretty interesting experience overall, so definitely give Korean hair removal a try.
Writing papers is one of the most important things a researcher does—it is how research gets reported to the world.
Writing a paper takes far more time than you would imagine; it is unglamorous work that demands real persistence. That is exactly why the first paper you write yourself leaves such a strong impression.
I myself had the experience of writing a paper from scratch in my first year of the master’s program, under my supervisor’s guidance. It varies by field, but in biology it is quite rare for a master’s student to write the text of a paper themselves. After all, most students never publish a paper at all at that stage.
I am grateful to have been given such a rare opportunity, and I want to write down that experience here so I don’t forget how it felt.
The Time Scale of Writing a Paper
In biology, it generally takes about a year from deciding to write a paper to actually seeing it published. It depends on the format and scale of the paper, but from my own experience, the big difference from fields like chemistry and engineering is the sheer volume of content a paper must contain.
Unlike reporting the discovery of a compound or a protein, neuroethology—the field I work in—requires demonstrating something like “this neuron contributes to this behavior in this way,” so it is not at all unusual for a paper to have more than five figures (each containing multiple graphs).
For that reason, gathering all that data, writing the paper, and getting it published is said to take longer than in other fields.
Below is a rough outline of the steps leading up to submission.
Write the manuscript (1 month to over a year). All sorts of things can happen while writing, so it often doesn’t go smoothly.
Have others read the manuscript (1–3 months). This step happens sometimes and not others: you ask a colleague who isn’t involved in the project to read it and see whether the content makes sense.
English proofreading (about 1 month)
Submission!!! (2 days to over 4 months). A rejection can come back in two days, whereas if it goes out for review you may hear nothing for months.
Revision (1–6 months). You receive reviewer comments, add missing data, revise the content, and resubmit to the journal. Revisions come as major or minor, and you are often asked to make changes that alter the overall structure of the paper.
Acceptance!!! Once you have handled the revisions and the journal gives the green light, the paper is accepted. Only at this point does the work finally count as an achievement.
Formatting for publication (1 week to 1 month). This is the final round of work, getting the paper formatted for posting online or printing in the journal.
Publication, writing a press release, and so on. After acceptance, all kinds of things happen in quick succession and life gets busy.
You don’t just write a paper and press a button to publish it. A paper is evaluated by many people, examined by third parties for logical soundness, and only then accepted and released to the world.
After giving my undergraduate thesis presentation in my fourth year, my supervisor suggested at the end of February that we write a paper.
I started writing in March, submitted to the journal iScience in December, and the paper was formally accepted in April. It was published almost exactly a year after we decided to write it—an unusually smooth submission process.
That March, I was thrilled to be told we would write a paper, and I was determined to finish it as fast as I could. But even though I was told to go write it, I had no idea how, so I looked up published papers and imitated them as best I could while writing up my own results.
My English was weak, which didn’t help, and I kept getting sent back with “I don’t understand this—please fix it.” Rather than being handed a corrected version, I was told which parts were unclear and asked to rewrite them myself. At the time it was genuinely painful and I kept thinking, just teach me! But looking back, having to research and think through how to write on my own is exactly what serves me today.
What my supervisor told me was this: if you intend to become a researcher, you will have many chances to write papers in the future, and if I write it for you, you’ll never be able to write one yourself—so write it yourself.
Still, hard is hard. Around that summer I couldn’t eat, and my stomach was completely worn down. (Personally I found it puzzling—why would just writing text be so stressful?—but apparently my body felt it.)
Why was it so tough? Because while you’re writing a paper, you basically stop doing experiments and focus entirely on writing. Meanwhile, conferences, classes, and personal life all keep coming at you.
The paper isn’t going well and the experiments aren’t moving either, so you start to feel like you’re accomplishing nothing—especially when everyone around you is making progress. At the lab’s biannual progress meetings, I was the only one with nothing to report, which was nerve-wracking.
And the final blow was having no one to talk to about it. Writing a paper as a first-year master’s student is unusual, and from the outside it looks enviable. Because of that, there was no one in the lab I could discuss the paper with, and people outside research just think “it’s only writing.” I felt misunderstood, as if I had to do it all alone.
Around September, when things got especially hard, I turned to a programming-based project as a distraction and wrote a short paper for an international conference. That turned out to be a great change of pace: it eased my anxiety about research not moving forward, and because it was a short paper it was easier to write. I could feel myself improving, and the success gave me real confidence.
With all that, I had finished a rough draft of the manuscript by around October. I thought we were ready to submit, but then my advisor said, “Shall we have some other faculty members read it too?” “Whaaat?!?! We’re not done yet??” — I still remember thinking exactly that.
The faculty members who read it gave me very sharp advice, and the paper improved enormously. I learned firsthand that having other people read your manuscript is a crucial part of the process, and that this applies not only to papers but to research in general.
In December, I made the initial submission to iScience.
iScience is not an extremely high-ranking journal, but it is by no means a low-ranking one either — it is a solid journal, good enough that doctoral work gets published there.
For me, choosing iScience was a stretch goal; I figured the odds were 7:3 against acceptance. So I was waiting for the rejection notice, but nothing came, and about a week later I was told the manuscript had been sent out for review. I was thrilled and surprised at the same time. My advisor seemed surprised too.
After responding to the reviewers’ comments, I resubmitted, and following some minor revisions the paper was formally accepted. After submission, things went fairly smoothly and simply followed the flow.
Personally, the initial submission was the most exciting moment and the one that gave me the greatest sense of accomplishment.
I realized how naive my thinking about the process of writing a paper had been, and I also came to feel that writing a paper is an extremely valuable experience for the research that follows.
People say that if you want to become a researcher, the first thing you should do is write a paper — and now I understand why. It’s not about the results themselves. The process of writing taught me the importance of building the logic of my own research, thinking ahead, and moving forward with the perspective of someone who is going to write a paper.
It was an experience from which I learned a great deal, and I think it was a wonderful way to begin my life as a researcher.
I’m also hoping to post something more practical later on about how I actually went about writing the paper, so please look forward to it.
When you think of animals used in research, mice and guinea pigs probably come to mind. The usual picture is that a drug’s efficacy or structure is tested in these animals first, and only then does the work move on to clinical trials.
That picture isn’t wrong, but there are many other organisms used in research. Medaka, zebrafish, nematodes, E. coli, yeast, Drosophila melanogaster, Xenopus laevis, Arabidopsis thaliana, silkworms, and so on… These organisms are called model organisms, and a huge variety of research is carried out with them.
A model organism is one that the research community studies exhaustively, so that by coming to know that single organism inside and out, we can understand features and principles shared with other organisms.
What is Drosophila melanogaster?
Some of the organisms on that list may come as a surprise, but Drosophila melanogaster is probably the most unexpected of all. Wait, a fly? The kind that shows up in your kitchen?
Exactly! The scientific name of the fruit fly is Drosophila melanogaster. It has been central to research recognized by several Nobel Prizes and is used widely across biology.
Fly researchers gather at meetings such as the Japanese Drosophila Research Conference (JDRC), and there are also fly conferences in the Americas, Europe, and Asia. On top of that, meetings focused specifically on the fly nervous system, such as NeuroFly and Neurobiology of Drosophila, show just how global this research community is.
The advantages of working with flies include: ・They have a central nervous system ・A rich toolkit of genetic techniques ・The existence of balancer chromosomes ・A short generation time ・They are easy to rear ・They show stereotyped behavioral patterns
and many more. Because researchers around the world have converged on Drosophila melanogaster, enormous databases have been built, and in the brain nearly the entire network of connections between neurons is now known.
At this point you might wonder whether there is anything left to study. It’s true that we know the wiring, but in many cases we still don’t know what functions that wiring serves.
Beyond that, in areas such as immunity and developmental patterning, there remain a great many open questions, including which molecules are involved.
You might ask what all this effort is for. The answer is that it is precisely by going this far that we can uncover principles universal to living things! That is what a model organism is for.
And these mechanisms can be applied to drug development, safe genetic engineering, and more.
A brief history of Drosophila research
The story goes that it all began in 1901, when a well-known figure (Charles W. Woodworth) suggested the fly to another researcher (William Ernest Castle) as material for genetics. The reason: it is easy to rear in large numbers.
Thomas Hunt Morgan later became famous for his genetic studies using Drosophila. His discovery of mutants and his demonstration that genes reside on chromosomes had an enormous impact on genetics.
Another landmark was the discovery of homeotic genes, which have a profound influence on development. Fly work also played a major role in the discovery of clock genes.
Being rearable in large numbers, being an insect, and allowing mutants to be generated easily are advantages no other organism offered, which is exactly why the fly was such an outstanding material for genetics research.
Today, applications of the GAL4/UAS system, balancer chromosomes, and a wide array of other tools have all been developed and refined.
A few extra notes
Labs that study Drosophila rear the flies in cylindrical containers called vials, about 3 cm in diameter and 10 cm tall. Most labs also have a dedicated rearing room where large numbers of these vials are kept.
You might imagine flies to be dirty, but their food is a jelly-like medium containing yeast, not raw meat, so bacteria don’t proliferate.
Flies are fairly hardy and relatively easy to keep. That is surely part of why they have been studied for so long.
Dissections are done by hand with forceps under a stereomicroscope. You are dissecting a fly roughly 2.5 mm long with forceps.
Behavioral experiments are possible too, and researchers have devised all sorts of ingenious apparatus for them.
Another wonderful thing about flies is that stock centers exist in several places around the world. They maintain large numbers of fly lines carrying specific genetic manipulations made in labs everywhere, and you can order whatever line you need from them.
That means you don’t have to build the line yourself and can start experiments right away. (Doing the genetic manipulation yourself would take at least three months.) Truly standing on the shoulders of giants.
Biologists often say that once you start working on Drosophila, you can’t go back to any other organism, which says a great deal about how well suited the fly is to research.
One task that follows researchers everywhere is the grant application. For anyone aiming at a research career, applications are unavoidable—and yet they are often overlooked.
I suspect many people struggle with them. I certainly do. I went into the School of Science precisely because I was bad at Japanese language arts, and now, of all things, the very career I am pursuing confronts me with a language problem….
In recent years, support for doctoral students has become substantial. Beyond the JSPS Research Fellowship (DC), there are university-internal grants funded by JST programs, WISE Programs (Doctoral Program for World-leading Innovative & Smart Education), JASSO, and others—existing schemes have been strengthened and new ones keep appearing. If you can secure this kind of support, you can cover nearly all of your living expenses during the doctoral program and receive tuition assistance as well.
I myself have faced and submitted several university-internal applications.
How they differ from the JSPS application
Basically, university-internal applications tend to closely resemble the JSPS one. The reason is simple: passing the JSPS review is the ultimate goal. Also, writing in a different format would only add to the students’ burden, so most programs match the JSPS format and build in a process that lets you refine the same document.
Selection is based mainly on the research content and on the applicant’s ability and future promise. What matters is presenting these clearly so that they get through to the reader. There is absolutely no need to write elegant, literary prose.
Although the JSPS and university-internal applications have much in common, there are differences. The kind of person each is looking for is somewhat different.
The application materials state what kind of candidate the program is seeking, so you need to write in a way that matches that.
The biggest difference from the JSPS application, though, is who reads it. The JSPS application is assigned to a field, and reviewers with some degree of relevant expertise read it. With university-internal applications, however, the readers are basically people from within the university, so even within the life sciences, someone working on plants may end up reading your animal research proposal. On top of that, each reviewer often has to handle more applications than in the JSPS review.
In other words, keep the content more general so that its appeal comes across even to someone in a different field—and make sure the content and its appeal register at a glance.
As a rule, assume the reviewers have no desire to read your application, and write something that catches their interest and makes them read it. Use figures and highlighting appropriately so that the important points are obvious at a glance.
Tips for writing
The keys to a good application are logical flow and specificity.
Logical flow means giving readers the information they want, at the moment they want it, in the order they want it. In other words, you create logical flow by connecting each sentence to the next and writing what the reader has vaguely started to anticipate.
For example: “During my undergraduate years I belonged to several student organizations and took part in running each of them. Through this, I developed leadership and the ability to work smoothly with others.”
Running an organization → leadership and the ability to work smoothly with others
When sentences connect like this, with no jarring gaps between them, we can say the writing has logical flow.
Next, specificity. Adding specificity to the example above: “During my undergraduate years I belonged to several student organizations that planned events and social gatherings for students, and in each one I took the lead in running those events. Through this, I developed leadership and the ability to work smoothly with others.”
Adding specifics strengthens the logic of how you were involved in the organization and what exactly you did, and therefore what abilities you gained from it.
The catch, however, is the character limit. Limits are set quite tightly, and the moment you try to describe something concretely you run out of room.
That is exactly why, in the rush to cram in content, these two elements tend to get neglected.
Summarize the content concisely and clearly—yet also be logical and specific. This tension is a central problem when writing an application.
The key to striking this balance is asking what kind of person the program wants to select. Most applications specify which items they want you to address and what sort of content they expect.
The reviewer must be able to see clearly where in your text each of those items is addressed. Don’t leave it to be inferred or read between the lines—make it unmistakable.
If you keep this front and center, it becomes clear which sentences you need and which you can cut.
A writing strategy
When writing an application, start by listing the points you want to make as bullet points, then write out the text without worrying about length. Then fill in the content with logical flow and specificity in mind.
At this stage you will usually be well over the limit, so the next job is trimming. Rephrase and reword until you are only slightly over the character count.
At that point, have someone else look at your application. This step is extremely important. Getting feedback early and often keeps you from drifting far off course and helps you learn your own way of writing applications.
Showing your work to others is daunting, and pride often gets in the way, but take the plunge, set your pride aside, and show it. In my experience, the more academically accomplished someone is, the more they tend to keep working alone and delay showing it to anyone.
Once you get feedback, reread your own draft with it in mind, identify what needed improvement, and rewrite.
Having others read your draft is the single most important step. Nobody writes a perfect application on the first try, and criticism is not a rejection of you—take it as advice that you are capable of more.
Summary
An application exists to be read by someone else. Never fall into the complacency of assuming the reviewers will read it, or of thinking it outrageous that they might not.
If people won’t read it, then write something that makes them want to read. No matter how good the content is, it means nothing unless people actually read it and the message gets across.
A common piece of advice is to take the total amount of funding a grant application could bring in, divide it by the number of lines in the proposal, and work out how much each single line is worth.
This gives you a clear yardstick for judging whether what you have written is worth that much to the reader. If you don’t think a sentence carries that much value, it may need to be rewritten.
I often help people choose computers and give advice, and many friends told me I could make money doing PC consultations.
Inspired by that, I figured I’d give it a try!
I’ll recommend a purchase that fits how you plan to use the computer and your budget.
And if you’d like, I can also advise you on what to look for the next time you buy a computer.
Computers I’ve helped pick out so far include:
analysis machines for the lab, everyday-use PCs, PCs for game streaming, PCs for incoming university students, PCs that can run CAD for architecture students, and just-something-that-works PCs.
I use both Mac and Windows, so I can talk about and recommend either one!
These days, with more apps using location services and more time spent on social media, smartphone batteries often fail to last a full day even as their capacities keep growing.
At the same time, with things like mobile payments, running out of battery has become a serious inconvenience in daily life — which is exactly why demand for power banks is greater now than ever.
What is MagSafe?
With an ordinary power bank, you also need a cable to connect it to your phone, so you end up carrying more stuff, and the power bank itself is fairly heavy — all rather annoying.
Some batteries come with an attached cable, but the cable is so short that it isn’t well suited to using your phone while charging.
Recently, Apple introduced MagSafe — magnet-based wireless charging — starting with the iPhone 12 series. Magnets are embedded in the back of the phone, so the wireless charger snaps into place magnetically and there’s no worry about it slipping out of alignment.
MagSafe has been included since the iPhone 12, and some models don’t support it (such as the iPhone SE), but as long as your phone supports wireless charging, you can buy a MagSafe-compatible case and use MagSafe accessories with it.
The magnetic hold isn’t noticeably weaker either — it’s very strong. (I’m actually using this setup with an iPhone SE 3.)
The Anker 622 Magnetic Battery is just too good
You can attach chargers or phone grips as MagSafe accessories, but personally I think a power bank is the best choice.
There are several MagSafe power banks out there, and the most impressive of them all was the Anker 622.
Some models are just plain batteries, but this one also works as a stand.
You can also toggle charging on and off with the button on the battery, so you can leave it attached and charge only when you need to — meaning it doubles as a simple stand. And because the magnet is circular, you can use your phone in landscape orientation too.
The magnet is strong enough that the battery won’t fall off if you shake the phone, yet it detaches easily when you want it to — just the right amount of holding force.
It comes in plenty of colors, and the size and weight are modest enough not to get in the way. Excellent all around.
As for the all-important charging speed: it isn’t as fast as a wired connection, but it’s fast enough that your battery percentage still climbs even while you’re watching YouTube.
What’s more, you can charge the battery itself while it’s attached to and charging your phone (pass-through), which effectively gives you the same experience as if the iPhone’s charging port were USB Type-C.
The downsides are, unsurprisingly, weight and charging speed. There’s no getting around the added weight — the combination is heavier than the phone alone, so you definitely notice it in your pocket. And since charging isn’t rapid, it’s best to think of it as an extended battery for your phone.
It’s been a while since I came across such a great product, so I wanted to share it.
Among the many releases in the YOLO series, the newest one, YOLOX, came out in July 2021.
The YOLOX paper is available here (currently a preprint). The GitHub repository is here.
YOLO is an object detection algorithm. It is designed to run in real time, so it is extremely lightweight (inference alone can even run on a smartphone), it is easy to build systems around, and it has been adopted in many IoT devices.
“Object detection algorithm” may sound complicated, but an easy example to picture is a camera’s automatic face or eye focus. A marker appears telling you “here is a face”; the same idea applies to other objects as well, and each one can be classified as to what it is.
There are many versions in the YOLO series: YOLO, YOLOv2, YOLOv3, YOLOv4, YOLOv5, and YOLOX. It also runs not only on Python but on MATLAB as well, so you can adapt it to whichever platform you use.
Unlike the system used from YOLOv3 onward, YOLOX is based on the system of the original YOLO (the first published method), and it is said to be both faster and considerably more accurate.
Other blogs cover the details as well.
How to install YOLOX
Installation instructions are given on the GitHub page, but they are in English and do not cover using a virtual environment, so here I explain how to do it with an Anaconda virtual environment.
On both Windows and Mac, following the YOLOX manual exactly produced a string of errors. The errors will likely keep changing with future versions, so look them up as they come up.
See below for how to use the conda command in the macOS Terminal.
Open Terminal (Anaconda Prompt), and a black window filled with text will appear. To the left of the last line you should see (base). At this point you are not inside a virtual environment.
YOLOX will run without a virtual environment, but since environments can conflict with other packages, I recommend creating one.
First, enter the following code to create the virtual environment.
conda create -n YoloX python=3.8
YoloX is the name of the virtual environment; you can use any other name. You can also specify the Python version with python=3.8.
Then enter the virtual environment with the following code.
conda activate YoloX
If the (base) on the left has changed to (YoloX), you have succeeded.
Installing CUDA
First, if this is your first time installing machine learning libraries and you plan to train YOLO on a GPU, install CUDA. (Training on a CPU takes an absurdly long time, so I do not recommend it. Note, however, that GPUs cannot currently be used on Apple Silicon machines.) CUDA can be downloaded from the official site.
As for the CUDA version, I suggest checking which CUDA version PyTorch supports and then installing that version. PyTorch official site
To install an older version, click Download now and then, on the following screen, scroll down to Resources and use Archive of Previous CUDA Releases.
The latest version may well work too, but for now, matching the version to PyTorch should let you run everything without trouble.
To check whether it is installed on Windows, open “Edit the system environment variables,” go to Advanced > Environment Variables, and check whether there is a path beginning with CUDA_PATH. The number after the V indicates the version.
Installing PyTorch
Before installing, update pip. Enter the virtual environment in Anaconda Prompt and run the following command.
python -m pip install --upgrade pip
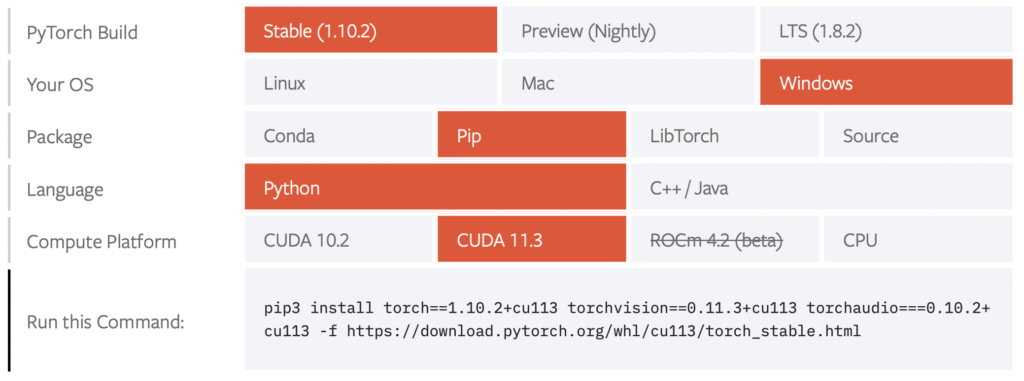
Go to the PyTorch official site and select the installation method that matches your environment. One thing to watch out for is the Package field: here, choose pip. Installing with conda will cause errors later on.
Copy and paste the command shown under “Run this Command” to install it in your virtual environment.
Once the installation finishes, use the following command to check that PyTorch is installed.
pip list
As long as torch appears in this list, you’re good to go!!! Just to make sure everything works, launch python and run the following command.
import torch
print(torch.cuda.is_available())
If the output is True, the installation went through without problems and torch is ready to run on the GPU. (On a Mac or on a computer without a GPU, you will get False, but as long as the import works you’re fine.) If you get an error, go back and check the installation again.
Installing the packages required for YOLOX
Download (clone) the various YOLOX files from GitHub. If you can use Git commands, you can clone it with the code below.
Next, navigate into the cloned folder and install the required packages.
First, edit the contents of requirements.txt in the cloned YOLOX folder as follows.
# TODO: Update with exact module version
numpy
#torch>=1.7
opencv_python
loguru
tqdm
#torchvision
thop
ninja
tabulate

# verified versions
# pycocotools corresponds to https://github.com/ppwwyyxx/cocoapi
#pycocotools>=2.0.2
#onnx==1.8.1
onnxruntime==1.8.0
onnx-simplifier==0.3.5
It seems that packages such as pycocotools cannot be installed with this command.
Once you’ve done that, save requirements.txt and run the command below in the terminal (Anaconda prompt).
cd YOLOX
pip3 install -r requirements.txt
pip3 install cython pycocotools
The YOLOX folder you downloaded contains a file called “requirements.txt” that lists the required packages. The second command opens this file in read-only mode and installs the packages listed in it.
pip3 install cython pycocotools
This command installs cython and pycocotools. It appears these need to be installed separately.
When you run this command, some of you may see the following error.
      building 'pycocotools._mask' extension
      error: Microsoft Visual C++ 14.0 or greater is required. Get it with "Microsoft C++ Build Tools": https://visualstudio.microsoft.com/visual-cpp-build-tools/
Apparently pycocotools requires Microsoft C++ Build Tools. (Even though there is no Mac version, the error still shows up on Mac.) If you’re on Windows, it’s a good idea to install it just in case.
Install it, then try installing again with the code below.
If that still doesn’t work, install it with the following command.
conda install -c conda-forge pycocotools
In general we’ve been installing these packages with pip, but since this one simply won’t install that way, we fall back on the last resort of installing it with conda.
Next, download yolox_x.pth. The download starts as soon as you click the link.
Move the downloaded file into the YOLOX folder you cloned from GitHub. This gives you the model used for detection in the demo, placed wherever you like.
Add the following lines near the top of tools/demo.py so that the script can access the yolox folder.
#demo.pyの中身に書き込みましょう。
import sys
import os
sys.path.append(os.path.join(os.path.dirname(__file__), '..'))
Without this, you will get an error saying that the yolox package cannot be found.
Then run the following command in the terminal. This lets you check whether the demo runs correctly.
I often pick out computers and give advice on them, and many friends told me I could make money doing computer consultations. Inspired by that, I decided to give it a try!
I’ll recommend a computer that suits what you plan to use it for and your budget. In particular, I’ve chosen and used many computers for machine learning.
And if you’d like, I can also advise you on what to look for the next time you buy a computer.
Computers I’ve picked out so far include lab analysis machines, everyday-use machines, game-streaming machines, machines for incoming university students, machines for architecture students that can run CAD, and basic no-frills machines.
I use both Mac and Windows, so I can talk about and recommend either!
What gets downloaded is an app you can run as is, so just move it into the Applications folder on your Mac.
Switching VS Code to Japanese
Install the “Japanese Language Pack for Visual Studio Code”.
Select Extensions from the menu bar on the left and type “Japanese Language Pack for Visual Studio Code”.
Then install the package with that same name that appears at the top of the list.
After that, restart VS Code and check that the interface is now in Japanese.
Installing the Python extension
Next, install the Python extension in the same way.
Select Extensions from the menu bar on the left, type “Python,” and install Python.
This sets up a Python development environment: you can use Jupyter when writing Python programs in VS Code, and the syntax is automatically recognized and color-coded.
Checking that it actually works
Create a file called test.py in any directory you like.
Create a new file, choose a text file, and specify Python as the language.
Then name it test.py and enter the following program:
print(“Hello World!!”)
Type that in.
Then run it with the play button in the upper right.
Hello World!! will be printed in the terminal below. Once you get this far, your Python development environment is up and running.
If you have set up virtual environments with Anaconda, you can select the one you want from the Python interpreter selector in the lower right. Alternatively, you can activate a virtual environment with the conda command in the terminal.
Blogging is a popular side hustle, but how many people actually make money from it? And how much can you really earn?
Most of the information floating around in books and online comes from professional bloggers or people who write posts in earnest. There’s almost nothing out there from people who just blog casually.
When I set up this blog, I decided to use WordPress, but it costs money, and I remember wondering when I would ever break even. I’m still in the red, but revenue has finally started coming in, so I’d like to write about where this blog stands right now.
The current state of the blog
Starting with the basics: my first post went up in March 2021, and as of writing this in September 2022, the blog has 46 posts. That works out to about four posts a month. The quality varies quite a bit, and most posts are things I can write in about an hour.
The main topics are programming and everyday life.
The latest traffic numbers are about 3,500 pageviews and about 2,500 visitors per month. My most popular post gets about 35 views a day.
The trends I can see are that programming posts are in high demand, and that even with few visitors, pageviews add up because the same people come back repeatedly.
Everyday-life posts, on the other hand, are mostly diary-style pieces that don’t turn up in searches, so they get far less traffic.
The current state of the income
Right now I mainly use Google AdSense and Amazon Associates.
I passed the AdSense review in May 2022 (I think I had about 35 posts at the time), and my total earnings so far are 5,000 yen.
My Amazon Associates earnings are 0 yen.
So the blog’s total income to date is 5,000 yen.
As for trends, I don’t really write Amazon product reviews, so the reality is that I hardly ever post Amazon links in the first place. Which means it might as well not exist…
Thinking about revenue rates
Google ads pay roughly 1 yen per 100 impressions, and for a click, around 10 yen on mobile and around 50 yen on desktop.
So the return rate is fairly low, and it seems hard to earn any real income without racking up serious pageviews.
With Amazon Associates, I believe the commission is somewhere around 3–10% of the item purchased. (Apologies if I’ve got that wrong.) So if someone buys a 10,000-yen item, you can earn up to about 1,000 yen. It’s the kind of ad that can bring in decent income even without huge traffic.
Apparently, for most people who make money blogging, ads like Amazon’s bring in more than Google ads do.
Blog running costs
In my case the running costs are high: 15,000 yen a year. Almost all of that is the hosting contract.
If you shop around, there are hosts that charge about 5,000 yen for three years and keep setup fees down too, so that’s much better value.
I’m sticking with my current host because I don’t really know how to migrate, and because it has a good reputation.
At this rate, who knows when I’ll actually turn a profit.
That said, even doing this pretty haphazardly, just keeping at it earns more than I expected. I’ve come to feel that blogging rewards you in proportion to how seriously you take it. Also, pageviews don’t usually drop sharply all of a sudden, so as long as you keep writing reasonably well, the numbers steadily climb.
More than anything, blogging is genuinely fun, so I’d encourage everyone to give it a try, even for free.

![How to Write a JST Application [Internal University Application Form]: A Memorandum](https://www.tankobucreate.com/wp-content/uploads/2023/02/25331960_l-scaled.jpg)
![[Updated December 2022] How to install YOLOX](https://www.tankobucreate.com/wp-content/uploads/2022/11/dog.jpg)