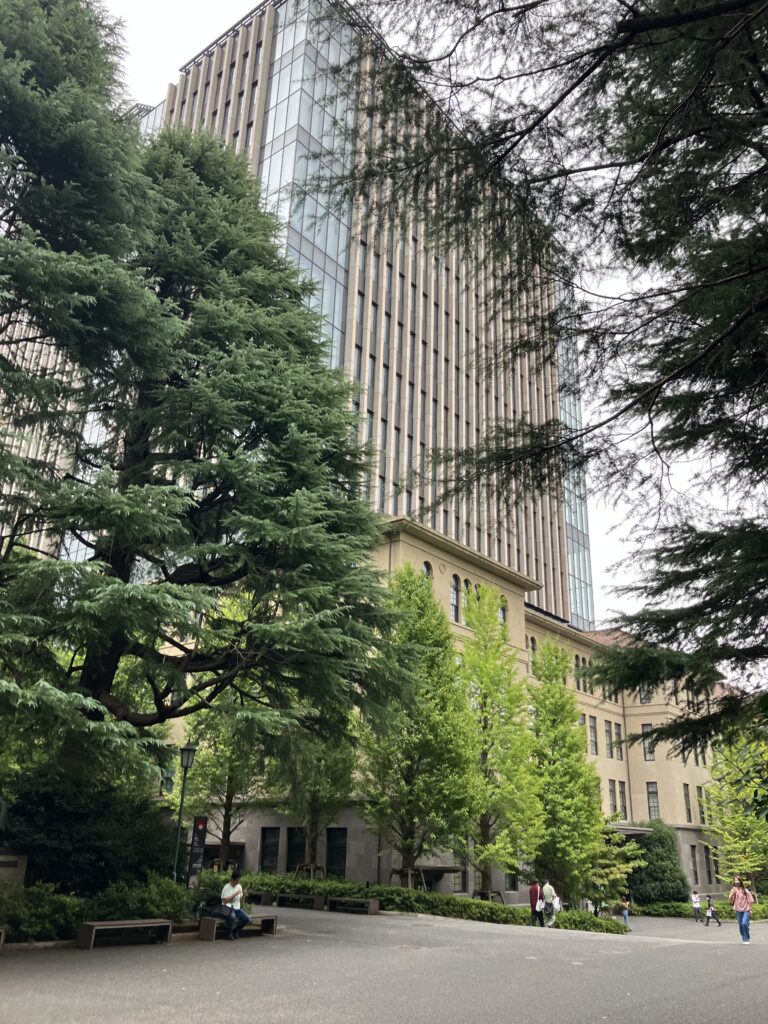
I visited Waseda University for the first time to attend a conference. Waseda is as well known as Keio as a prestigious private university, but you rarely see photos of it, and I had so little sense of its campus that I almost wondered whether it really existed.
There was a conference at Waseda University, and I was really looking forward to finally setting foot on the famous Waseda campus.
My first impression of Waseda University was: what a great atmosphere! It sits close to busy districts like Takadanobaba, yet it isn’t just a cluster of office buildings—it’s a university with a proper, characterful campus.
Impressions of Waseda University
Here are my rough impressions of Waseda University.
Lots of stylish cafés
Many international students and visitors
Spacious for a campus in central Tokyo (though still compact compared with rural universities)
A European feel
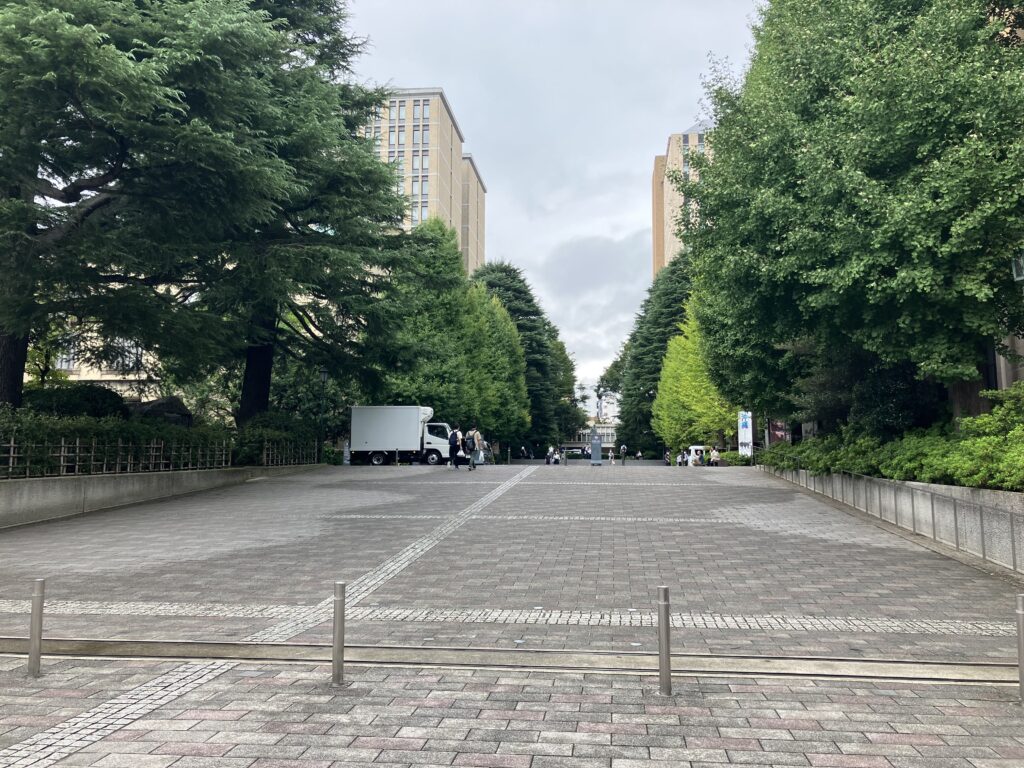
Compared with the University of Tokyo, Kyoto University, and the other former imperial universities, the campus grounds are small and the buildings tall. The buildings stand fairly close together and there aren’t all that many of them, so it didn’t feel like a sprawling campus.
Since the buildings are close together, moving between classes looks easy. That said, there are so many floors that even once you reach a building, getting up to your room takes a while.
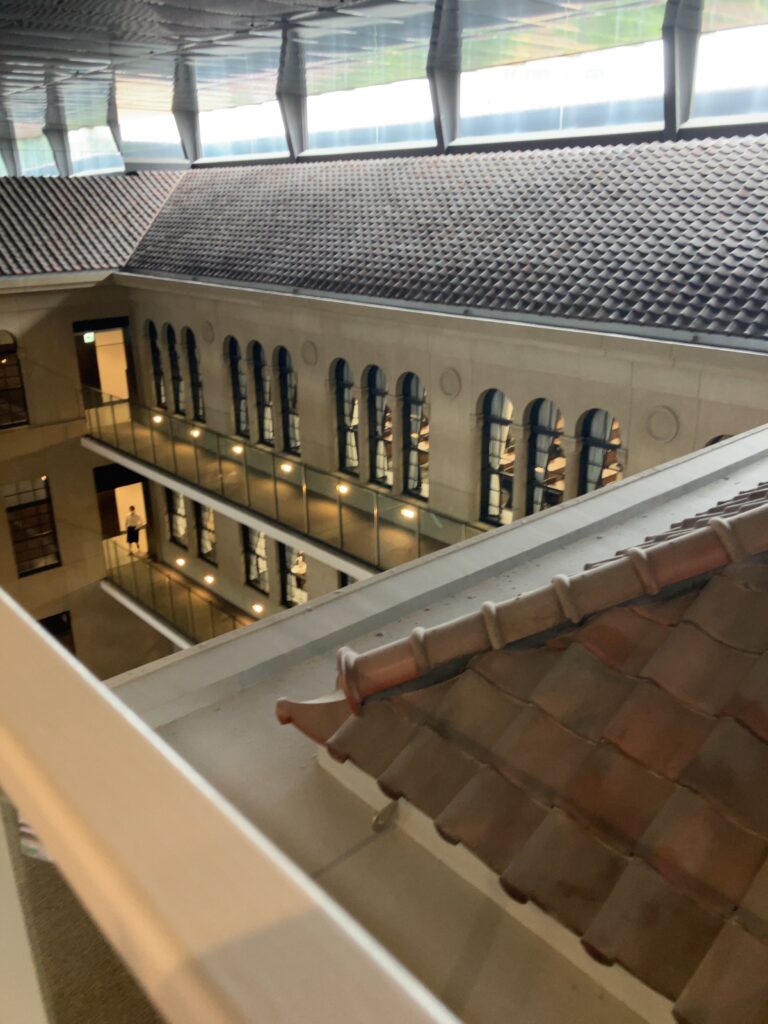
Some of the university buildings are made of brick, giving the campus a somewhat Western atmosphere. There’s a building called Building 3 where an older structure appears to be wrapped inside a newer one; from the inside you can see both the characterful old section and the modern one, and neither clashes with the other—together they create a wonderful atmosphere.
Even the classrooms themselves were stylish and chic. The rooms in the newer building are done in black and white for a sleek look, while those in the older building don’t feel dated at all—they retain the warmth of wood while remaining comfortable spaces.
Another surprise was finding escalators inside the buildings. As someone at a national university, where escalators inside academic buildings are almost unheard of, I couldn’t help thinking how nice it must be to move between classrooms so easily.
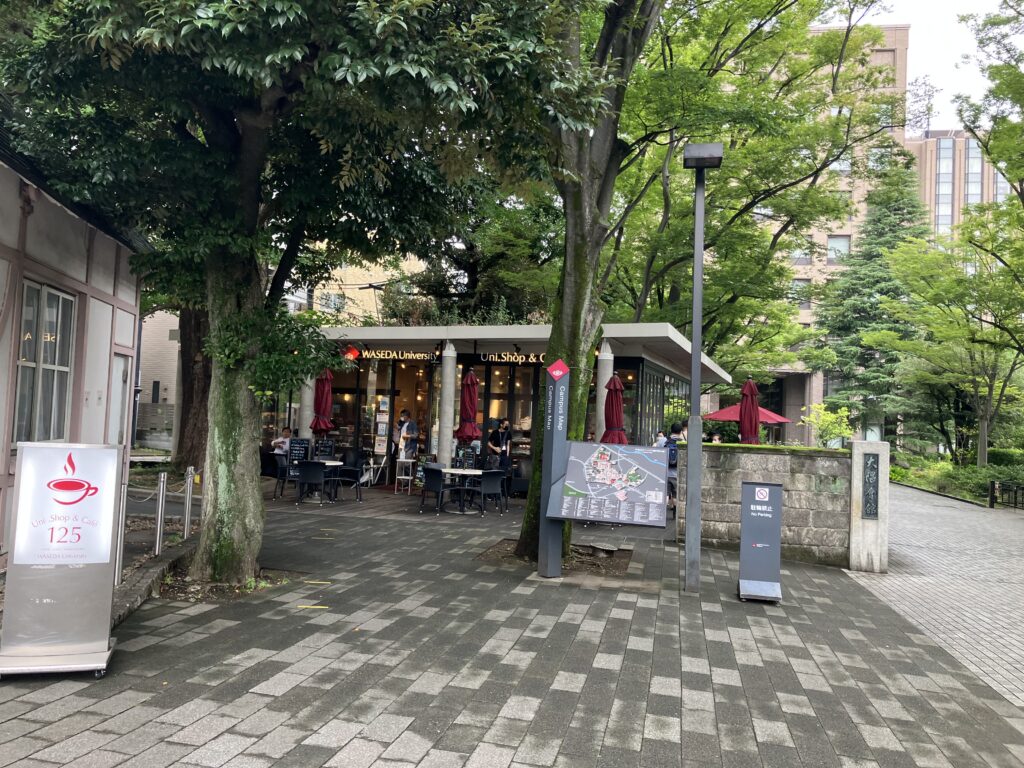
I was struck by how many international visitors there were on campus. There’s a Waseda University café in front of the main gate, and even during summer break it was full of people from abroad.
The café also sells university merchandise, and it was packed with Waseda Bears. Kind of adorable.
When you think of Waseda, isn’t the image below what comes to mind?
I had always wondered why the statue was shown from behind, but it turns out the photo is taken from inside the campus looking out toward the main gate.
The iconic building actually stands outside the main gate and doesn’t seem to house classrooms or anything like that. Photograph it from behind the statue and you get this classic shot.
The statue is of Shigenobu Okuma, and it greets you right as you come through the main gate.
The atmosphere around campus
The area around the university is full of stylish shops and restaurants—a neighborhood built for students that still has real character. On the walk from Waseda Station to campus there are chain restaurants, cafés, and general goods stores, and with a Tully’s nearby you could easily spend a relaxed afternoon in a café.
Just outside the main gate there’s what seems to be an ASICS Waseda University store, apparently stocking Waseda collaboration merchandise. What even is this shop, haha.
Everywhere I looked, Waseda University was beautiful and its atmosphere carefully preserved. It felt clearly different from the university I had imagined, and I thoroughly enjoyed the visit.
Have you ever wanted to branch on multiple conditions with an if statement, tried using elif, and found that although no error was raised the results still weren’t right? If so, the situation described below might be what’s happening. I made this mistake myself, so I’m writing it down here for reference.
The problematic program
The problem arises when you write two conditions in the if and elif statements of a program that includes elif.
def trable(a, b):
    if a >= 10 & b >= 10:
        print("patern A")
    elif a >= 10 & b < 10:
        print("patern B")
    elif a < 10 & b >= 10:
        print("patern C")
    else:
        print("patern D")

trable(11, 11)
trable(11, 9)
trable(9, 11)
trable(9, 9)
When you run the program above, you might expect the cases to be sorted into patterns A, B, C, and D in order from the top, but what you actually get is the output below.
patern A
patern B
patern C
patern B
So what happens if we swap the order?
def trable(a, b):
    if a >= 10 & b >= 10:
        print("patern A")
    elif a < 10 & b < 10:
        print("patern B")
    elif a >= 10 & b >= 10:
        print("patern C")
    else:
        print("patern D")

trable(11, 11)
trable(9, 11)
trable(11, 9)
trable(9, 9)
If you swap the code for patterns B and C, expecting the output to come out as A, B, C, D, what you actually get is the output below.
patern A
patern D
patern D
patern D
elif itself is used as follows when you want to define multiple conditions.
if 条件式A:
  条件式Aが真(True)となった場合の処理
elif 条件式B:
  条件式Aが偽(False)で、条件式Bが真(True)となった場合の処理
else:
  条件式Aが偽(False)で、条件式Bも偽(False)となった場合の処理
However, once the conditional expressions in the if and elif statements contain two conditions, the problem described above is likely to occur. As a result, you don’t get the output you intended.
The tricky part is that no error is raised, so you can’t tell whether things are working until you actually look at the results.
How to fix it
When you want to branch into multiple cases using compound conditions, avoid specifying multiple conditions in the elif statement.
def resolve(a, b):
    if a>= 10:
        if b >= 10:
            print("patern A")
        else:
            print("patern B")

    else:
        if b >= 10:
            print("patern C")
        else:
            print("patern D")

resolve(11, 11)
resolve(11, 9)
resolve(9, 11)
resolve(9, 9)
It’s more cumbersome, but doing it this way gives you exactly the output you expect.
Programming has unexpected pitfalls like this, so it’s a good lesson in carefully checking the code you write.
Addendum (August 2022)
It turns out the problem was that I hadn’t wrapped the conditions in parentheses.
def trable(a, b):
    if (a >= 10) & (b >= 10):
        print("patern A")
    elif (a < 10) & (b < 10):
        print("patern B")
    elif (a >= 10) & (b >= 10):
        print("patern C")
    else:
        print("patern D")
With this change, the branching worked correctly. Alternatively, you can also fix it by writing and instead of &.
def trable(a, b):
    if a >= 10 and b >= 10:
        print("patern A")
    elif a < 10 and b < 10:
        print("patern B")
    elif a >= 10 and b >= 10:
        print("patern C")
    else:
        print("patern D")
& and and may seem equivalent, but & also acts as a bitwise AND, so in the original program
a >= 10 & b < 10
this apparently means a >= (10 & b) < 10, and with a=9, b=9 the inequality becomes 9>=8<10, which evaluates to True.
Apps that let you earn points or miles just by getting around have become popular in recent years. The trouble is, many of them make you open the app and watch an ad every single time you move, or they simply bombard you with ads. It gets so irritating that you start to wonder whether you’re collecting points or just collecting frustration.
Recently I came across two apps featured in a magazine that are remarkably convenient: none of the tiresome ads I’d come to expect, and you can actually enjoy racking up miles.
They made quite an impression on me, so I thought I’d write up a blog post about them.
About the two apps
The two apps use almost the same system, and you can run both at once, so I’d recommend using them together.
With both apps, you accumulate miles as you travel, and those miles can be exchanged for points or goods. Note that neither offers a cash-back option.
The rate at which you earn miles depends on your mode of transport, with walking earning more per unit distance than driving.
Your mode of transport is classified automatically, and if it gets it wrong you can request a manual correction.
You can also view your travel history, so you can check how far you moved on any given day.
In my experience, both apps track movement quite accurately—they properly register even a quick trip from home to the convenience store, and you earn miles for it!
The one drawback is that your phone’s battery drains unusually fast. Well, of course it does—they’re using location services continuously. That’s just something you have to live with.
About Miles
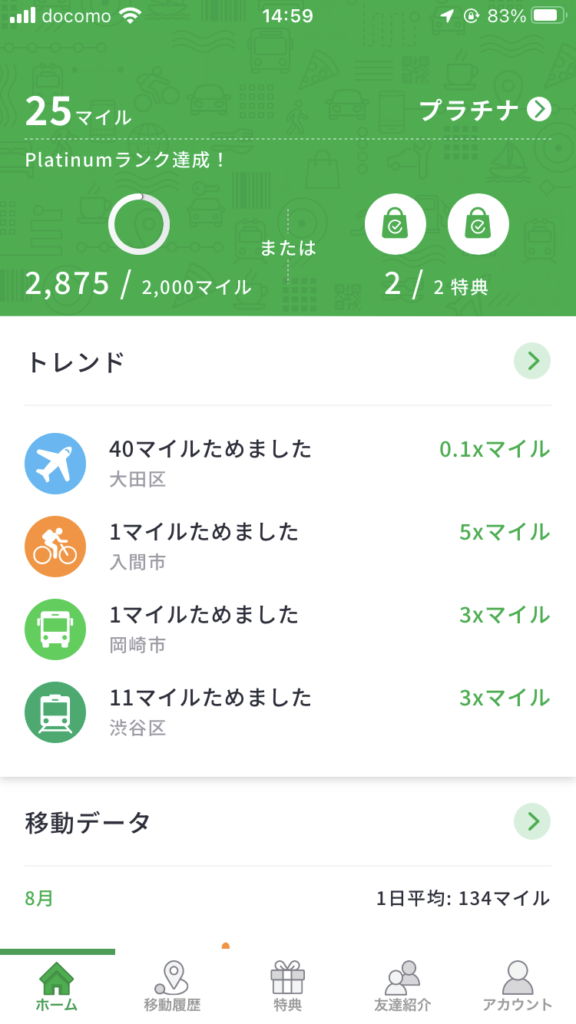
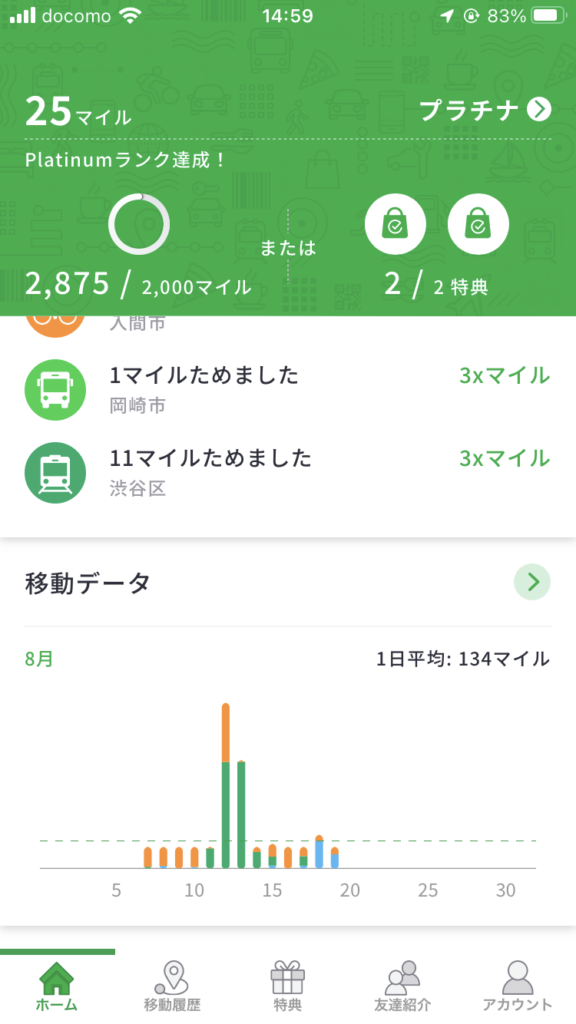
Miles is an app made by Miles Japan Inc., and as the original app of the two, it’s very solidly built. The actual screen looks like the one below: beyond your earned miles, it shows travel data and lets you view detailed trips in your history, which makes it handy for getting a rough picture of your health and daily activity.
The miles you accumulate can be exchanged for all sorts of things—JAL miles, campaign entries, convenience store coffee, and more.
There’s nothing you have to do on a daily basis, so you can just leave it installed and check in whenever you feel like it. That’s a nice difference from ANA Pocket.
Invitation campaign code (Install the app using the code below and you’ll get 100 yen in Amazon gift credit!)
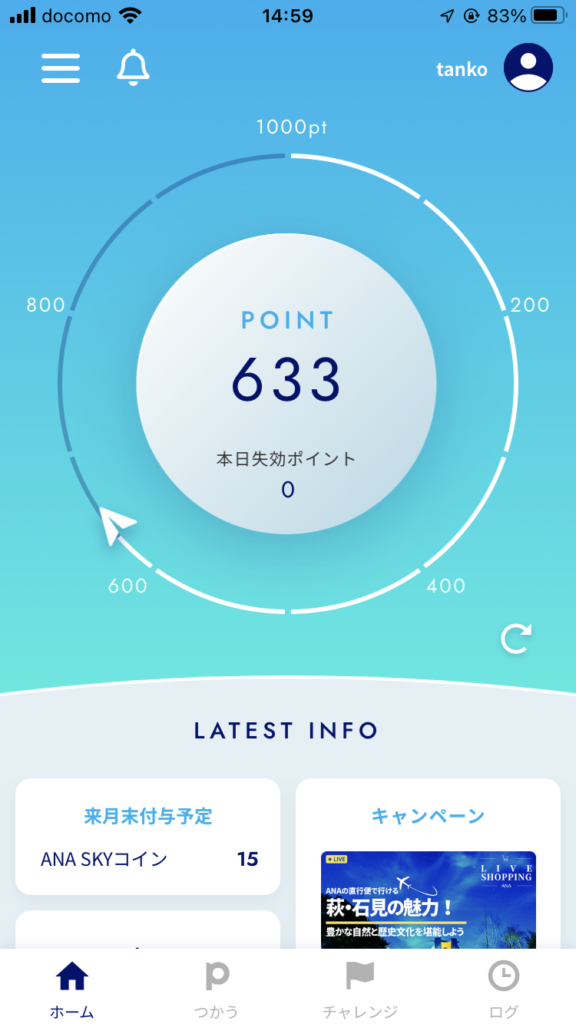
ANA Pocket is ANA’s app, which runs on the Miles system. As you’d expect from a major company, the home screen is extremely easy to read.
Here you accumulate points instead of miles. ANA Pocket has a “Challenges” system: you sign up for a challenge, and if you meet its conditions you earn bonus points.
The best thing about ANA Pocket is that you can convert your points into ANA miles, and there’s also a gacha you can spend points on, so you’re never at a loss for how to use them.
Converting to ANA miles always feels like good value, so if there’s nothing else you want, that’s a perfectly fine default.
Like Miles, it also lets you view your travel history, so you can review your activity in the same way.
The biggest sticking point is probably that it isn’t available on Android… Here’s hoping that changes.
Invitation campaign code (Install the app using the code below and you’ll get 5,000 pt!)
I replaced my iPhone for the first time in four years. My previous phone was an iPhone XR, which had no home button.
When the first iPhones without a home button came out, my reaction was “seriously?” But as things stand now, the home-button-less iPhone 12 and 13 actually outsell the iPhone SE.
So, honestly, what’s the deal with the iPhone home button? And did switching to the iPhone SE make any difference? Let’s take a look.
About the home button
First, the home button question, which was what I cared about most. I’m firmly in the anti-“iPhone without a home button” camp. On my iPhone XR I never used Face ID and always typed in my passcode. Holding the iPhone up in front of my face for Face ID was a hassle, and I found it more convenient to just quickly punch in the passcode.
The biggest difference, I think, is whether the screen wakes when you touch it. On the iPhone SE, touching the screen doesn’t wake it, whereas on the home-button-less models the screen turns on with just a tap.
Personally, I prefer a phone that doesn’t wake on touch alone. The reason is that when the phone is in your pocket, the screen turns on and off from accidental input, wasting battery. (For some reason the screen responds even through clothing.) And if you leave it somewhere you might brush against it, the screen suddenly lights up and you mistake it for a notification.
Having the screen wake via the home button is extremely useful for preventing accidental screen input.
Coming back to a home button, I was reminded that fingerprint authentication really is the best. The iPhone SE uses the same chip as the iPhone 13, so unlocking is extremely fast. (So fast that the lock screen barely serves a purpose anymore.)
They say Face ID works with a mask on the iPhone 13, but I’ve heard mixed reactions. With a fingerprint sensor, when the phone is sitting on the desk and I want to open it quickly, I don’t even have to pick it up, and I can unlock it in any situation without depending on my face. It’s just too convenient.
The home button and fingerprint authentication really are the best!! Glad I bought it!!
Other aspects of the iPhone SE
As for other features, the first is battery life. Surprisingly, the battery doesn’t last as long as I’d hoped.
When I switched to the iPhone XR, I thought the battery was infinite, but with the iPhone SE I was only impressed to the extent of “yeah, about what I expected.” Honestly, batteries may have reached the point where further improvements are hard to notice.
That said, the battery life isn’t bad. Four hours of YouTube seems to be no problem, and it lasts a day well enough.
As for heat, my impression is that it stays fairly cool. I thought the small, thin body might trap heat, but it hasn’t gotten hot at all so far, so it doesn’t seem to be an issue.
The camera obviously can’t compete with something like the iPhone 13, but I think it’s more than good enough for practical use. iPhone cameras have always been excellent. If you own a separate DSLR or mirrorless camera, the iPhone SE may be plenty; it’s certainly not impractical. If anything, the small camera on a small phone makes for a nice compact package.
On home-button-less models, notifications and Control Center are pulled down from the right and left of the notch, but on the iPhone SE it’s top and bottom, which I think is another plus. The display isn’t interrupted by a notch, so you get a clean rectangular screen.
Still, now that so much functionality differs depending on whether there’s a home button, I’m a little worried about where iOS is headed. It seems like a lot of things have to be built twice, once for each design. I really hope they don’t drop support any time soon.
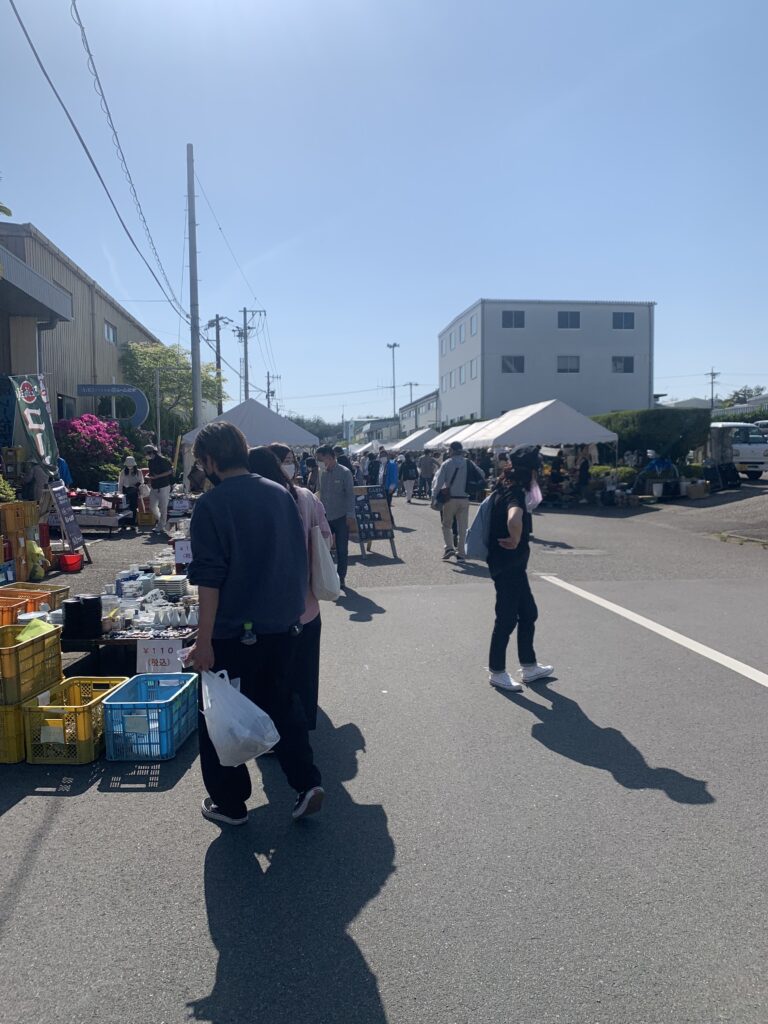
A friend invited me out of the blue, so I went to the Toki Mino-yaki Pottery Festival on May 4. This was the 46th festival, held May 3–5, 2022 — just three days — and since the website had announced there would be no shuttle bus from Toki Station, it seemed everyone came by car.
I went without doing any research beforehand, and it was incredibly crowded. “This busy, for a pottery festival!?” I thought, but once I started walking around the venue it was a lot of fun, and even someone who doesn’t know much about ceramics can enjoy it.
What is the Mino-yaki Pottery Festival?
The most fitting description is a festival where tons of Mino-yaki pottery is sold all at once. Everywhere you walk: pottery, pottery, pottery!!!
There were food stalls, knives, glassware, and not just tableware — plenty of figurines, accessories, and other attractions beyond plates. The pottery also ranged from expensive pieces to heavily discounted sale items, so if you have a specific plate in mind, this is a great place to go.
Apparently there are famous potters and brands there too — searching on Google turns up Instagram accounts and roundup blog posts.
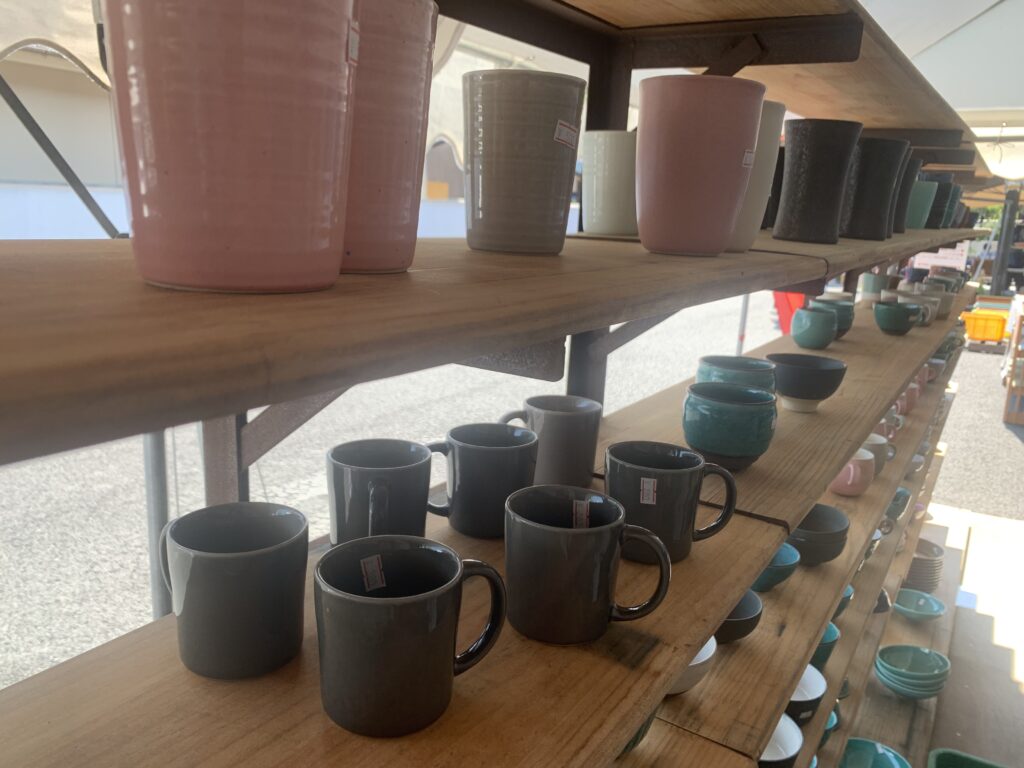
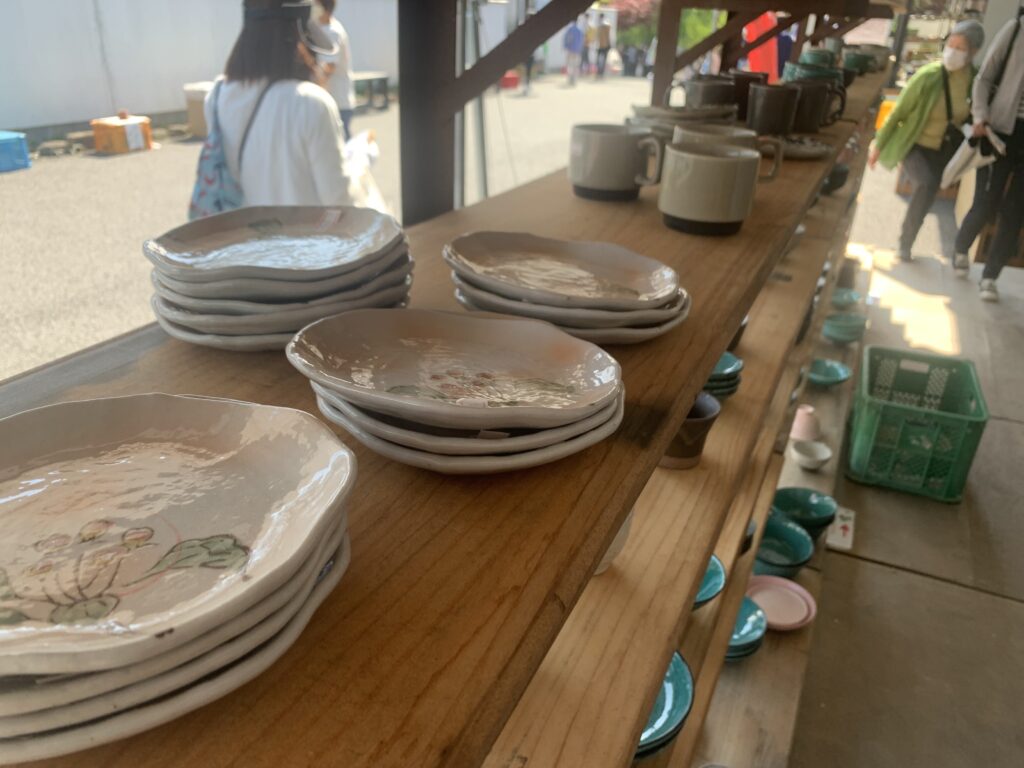
My personal impression is that Mino-yaki (though this isn’t unique to Mino-yaki) has a strong association with Japanese-style tableware, and since what I was after at the time was Western-style tableware, I was worried I wouldn’t find any. But there was plenty of Western-style tableware, including pieces that made me think, “Wow, they even make plates like this!?” It’s fun just to look, and it’s a place where you can find a plate you really love.
Conditions and schedule on May 4
We left Nagoya around 10 a.m. and headed to Toki City on local roads. As we got close, there was a 4 km traffic jam leading to the venue parking lot. It was so packed that we couldn’t get into the lot — we arrived nearby at 11:30 but didn’t actually park until 12:50. (Some people apparently come the day before or arrive first thing in the morning. Leaving Nagoya early enough to reach Toki in the morning is pretty tough…)
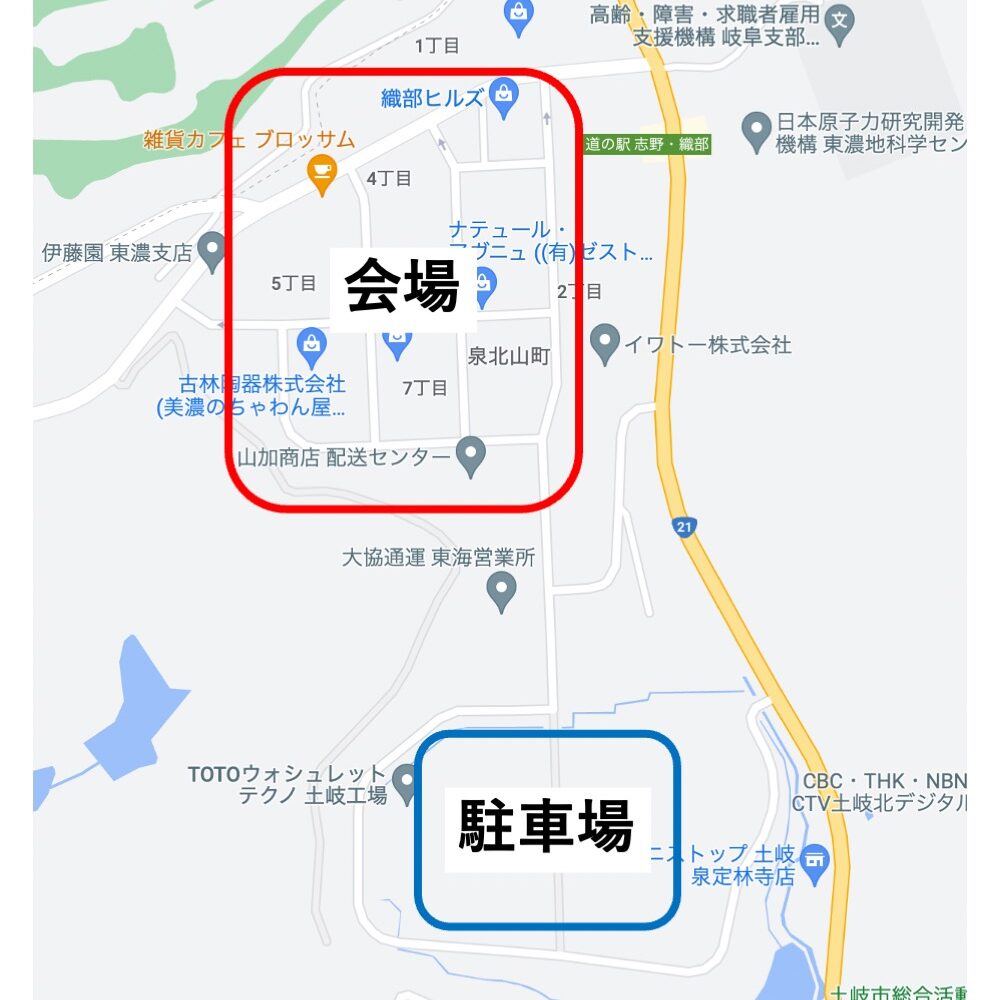
The venue is quite large, with so many shops that two hours wasn’t enough to see them all. The parking lot is the TOTO factory lot, rented out for the event, so it’s spacious with plenty of capacity.
Google mapより
The venue is enormous, but there are relatively few vending machines or places selling drinks, so I’d recommend bringing your own. On a sunny day you’ll be walking around in real heat and could get heatstroke. There’s also little shade, so it takes a lot out of you.
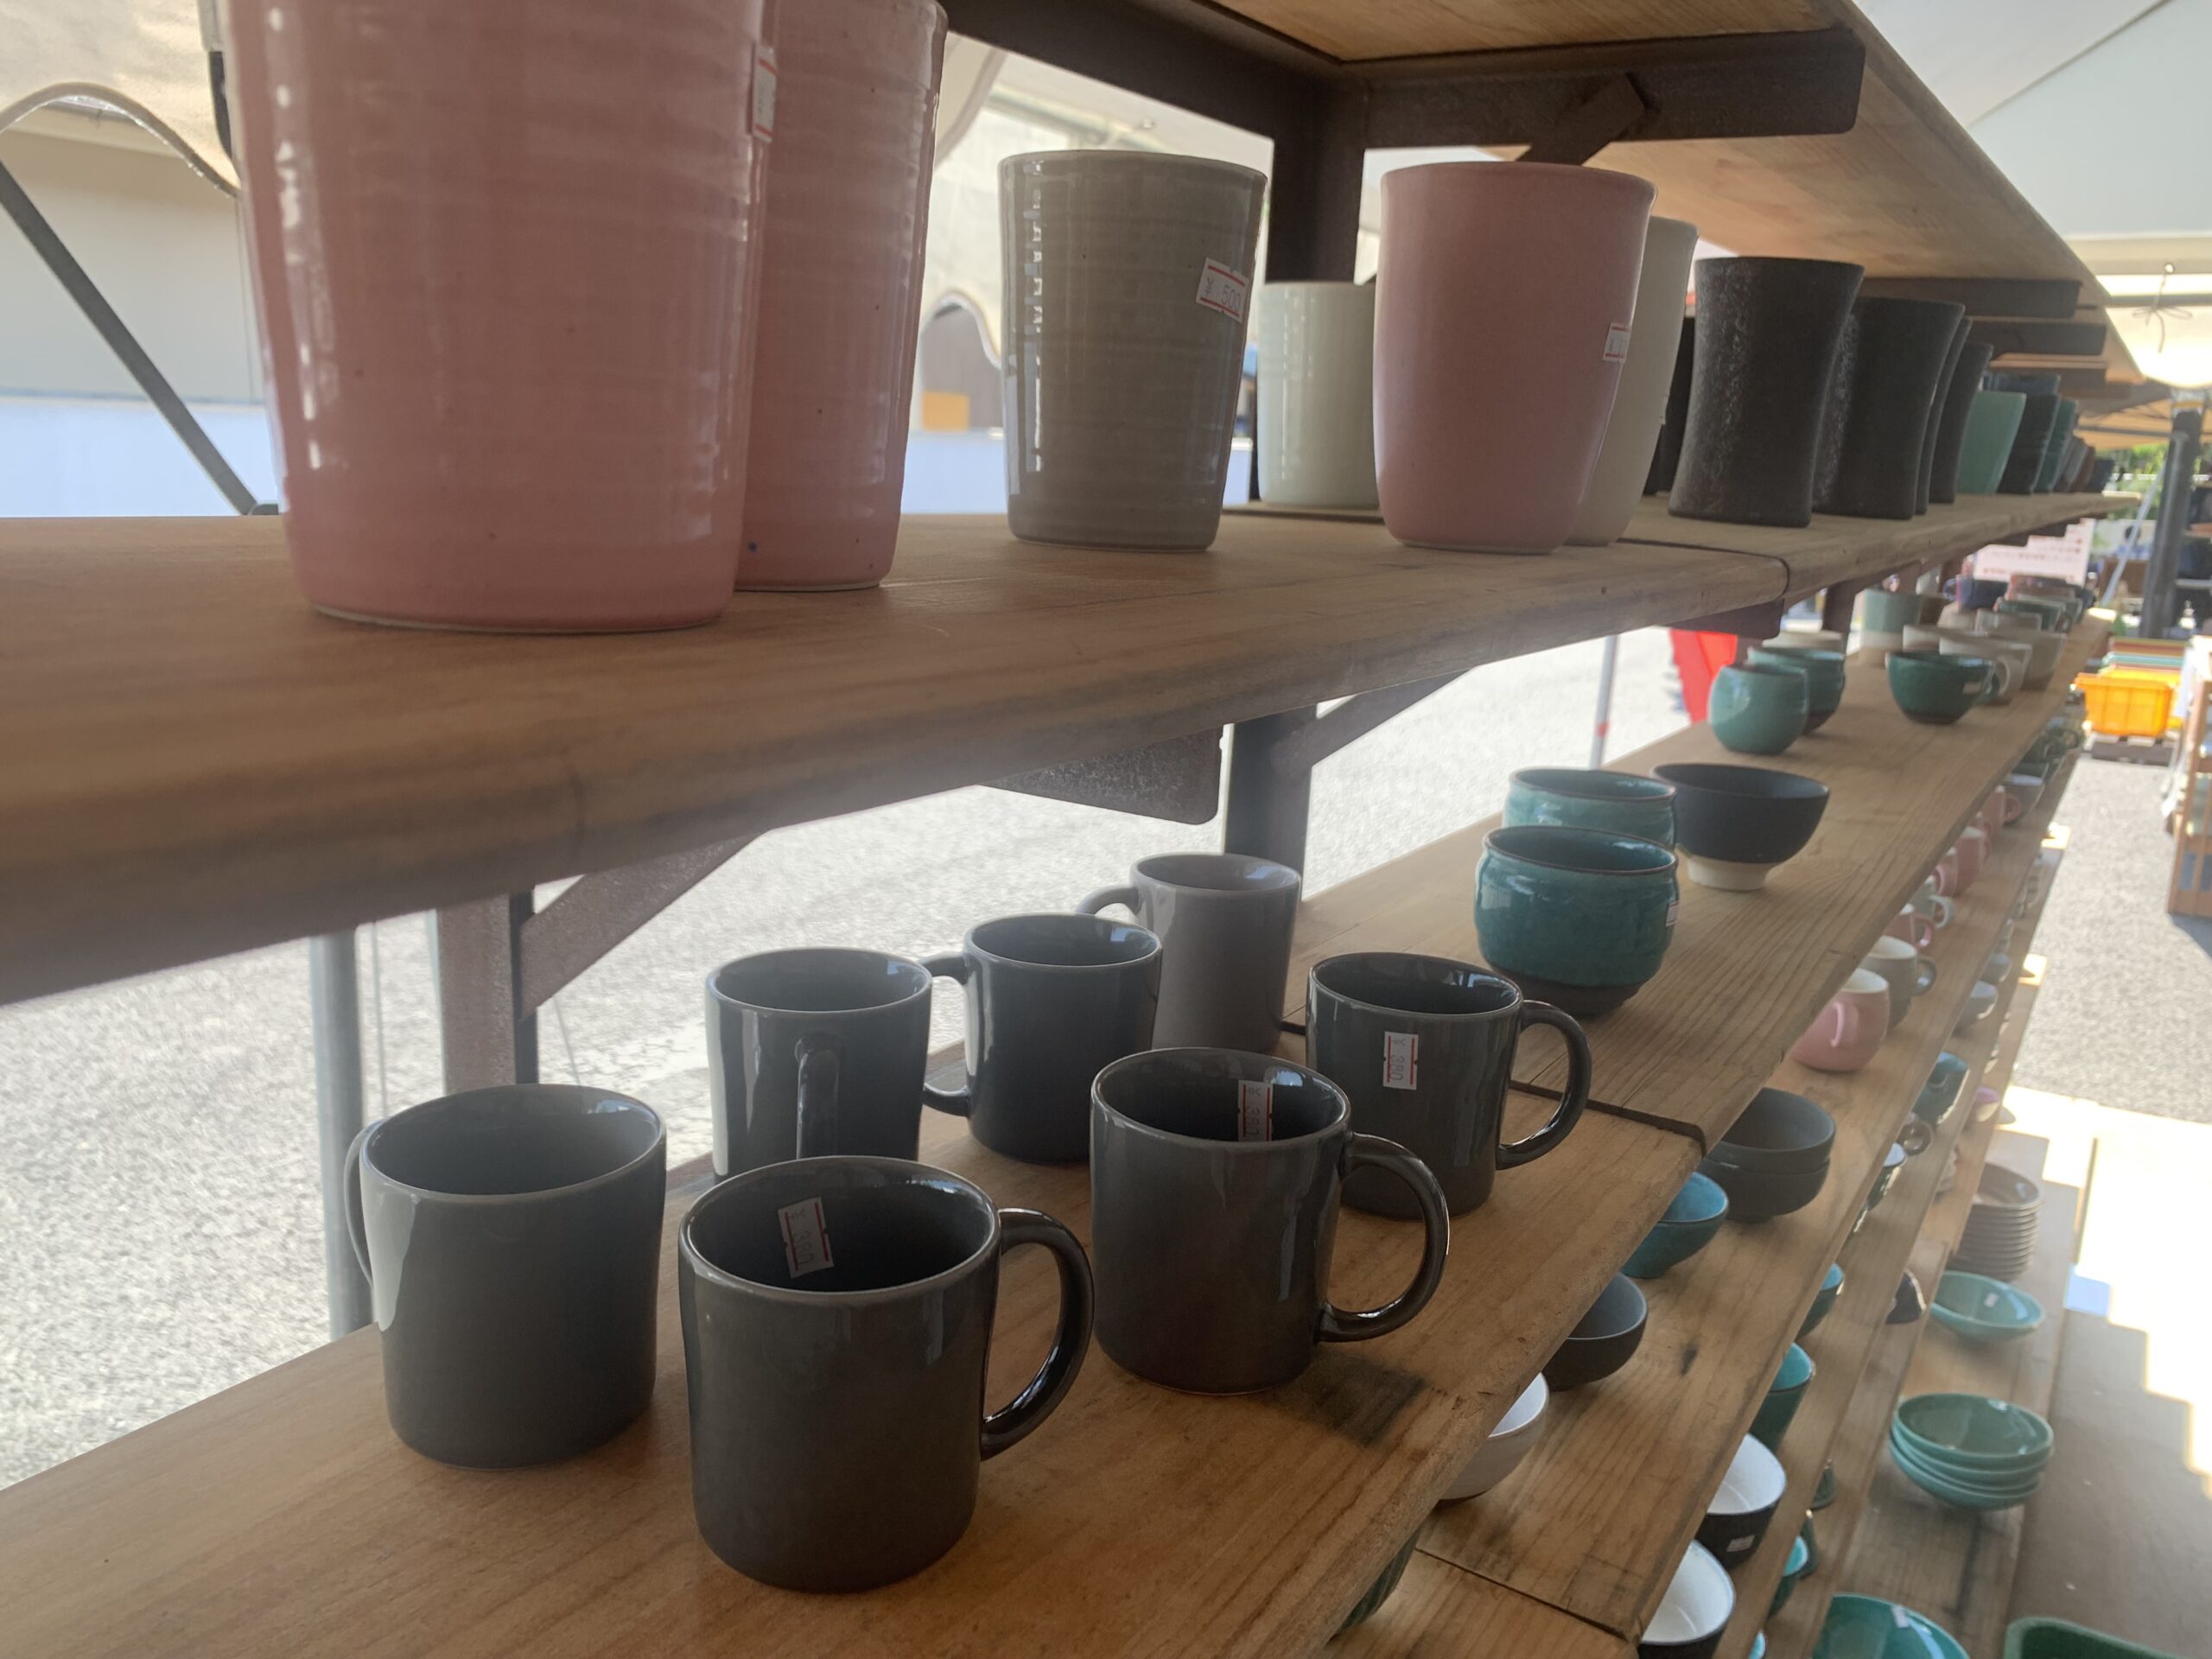
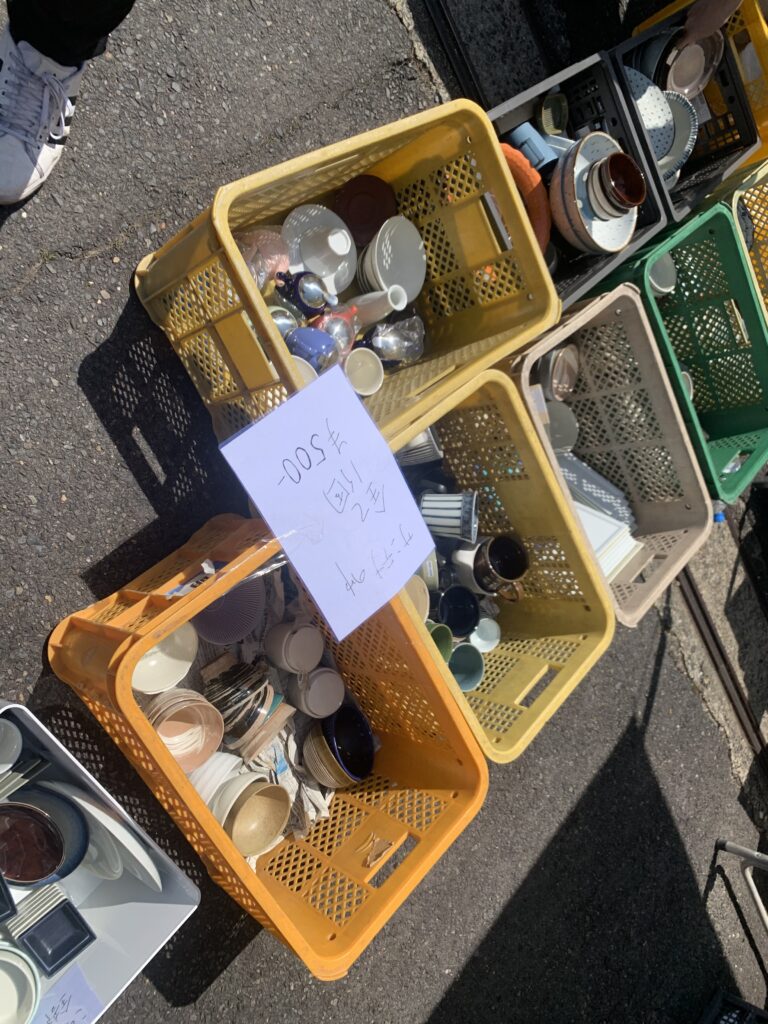
The individual shops set up under tents had distinctive plates, cups, and figurines, averaging around 1,000 to 3,000 yen. The pricier items went for over 5,000 yen.
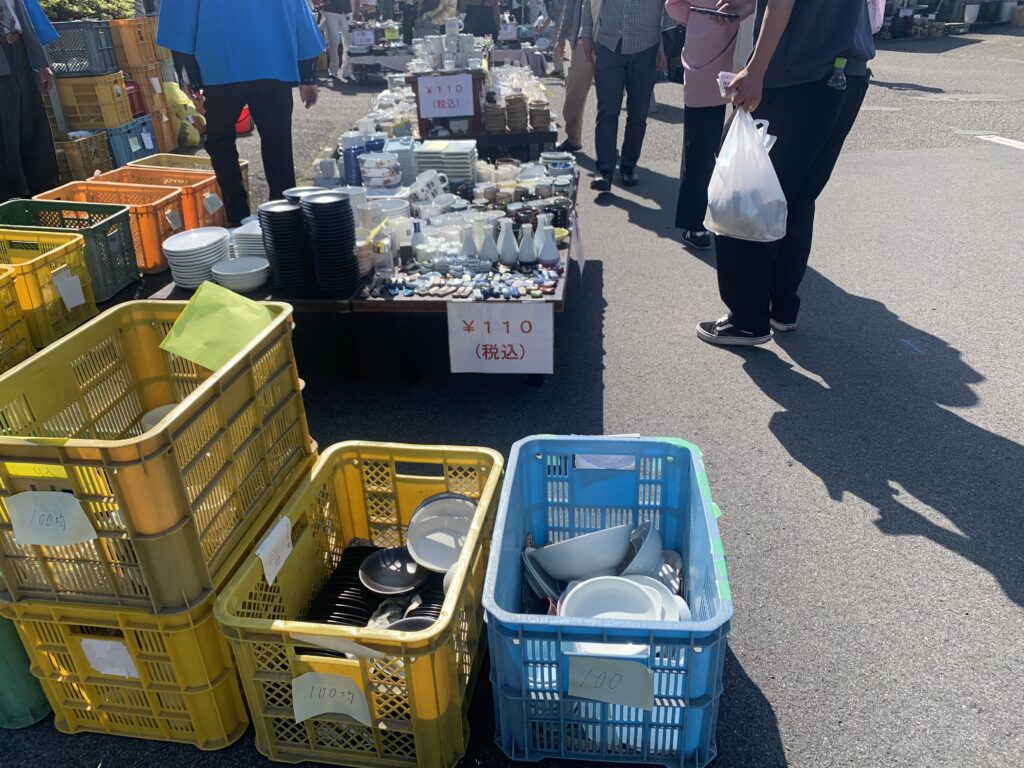
At the large-scale shops set up in warehouse-like spaces, prices were very low — some items started at just 100 yen each.
Even the cheap pieces have perfectly good designs and are genuine pottery. Being able to get Mino-yaki at such low prices is a real treat.
The individual exhibitors had lots of distinctive tableware, so I thought they’d be great not just for yourself but as gifts for friends and family.
What I personally loved was the abundance of B-grade items. These are pieces with minor scratches or uneven glazing from the production process, and even when the flaws are tiny they’re sold at incredibly low prices.
Some of the blemishes, in spots that don’t affect durability, actually start to look like character, and I was able to get nicely designed tableware for very little.
In the end I bought one large black board-like plate, two blue cups, and a coffee roaster (a ceramic one that roasts using far-infrared, I think).
I want to go again next year.
Who would I recommend it to?
I’d recommend it to anyone who has just moved and needs plates, anyone really into tableware, or anyone with a specific kind of plate in mind — it’s a great opportunity.
Even if you’re not interested in tableware, your interest will gradually grow, and you’ll come across things that make you think, “Huh, I might actually want this” (the friend I went with had zero interest, but ended up buying a few things by the end), so I think it’s worth a visit.
That said, it gets extremely crowded, so come prepared somehow — maybe stock up on snacks in the car and settle in for the slow crawl!! The convenience stores along the way aren’t much help…
My best recent purchase is a pair of Cutipol forks. My sister bought me the cutlery I’d wanted for ages as a housewarming gift.
Features
What I bought is from the GOA series—a design so well known that it’s fair to call it the emblem of the brand.
The handle is resin and the eating end is stainless steel. They have a pleasant heft: substantial without being heavy, exactly the right weight.
The weight is distributed evenly, so they feel very well balanced.
Personally, my first impression when I saw them in the shop was, “These are huge!!!” It’s hard to judge the scale online, but seen in person, even the smaller sizes of Cutipol cutlery are fairly large. So I’d recommend seeing them in a shop before deciding which size to buy.
There are many imitations of Cutipol, and lookalikes of the GOA series in particular are extremely common. Here are the differences from other products, as listed on Cutipol’s website.
The resin joint on the GOA is roughly made and risks coming apart
The stainless steel section is heavy
It looks like a GOA but is made entirely of stainless steel
As this suggests, the genuine article is well made and will last a long time.
How they feel to use
They are very comfortable to use, and my hand never gets tired even after long use. The handle is thicker than it looks in photos, so even with my thick fingers it feels perfectly natural to hold.
I love the design too. Once you buy good cutlery, all sorts of ideas about what to eat with it start coming to mind. I can’t wait to have some cake…
Comments
They come in many colors, so I think they’d suit all kinds of plates and meals. I’d admired this cutlery ever since I saw it at a café, so I’m delighted to finally own some.
They make a great gift or a treat for yourself, so do take a look in a shop or on their website.
As a home 3D printer, this is a machine that personally makes me think there may be nothing better.
It is an excellent machine in every respect: cost performance, practicality, and design. It does have some drawbacks, but even so, considering the price, you have to wonder whether anything could beat it.
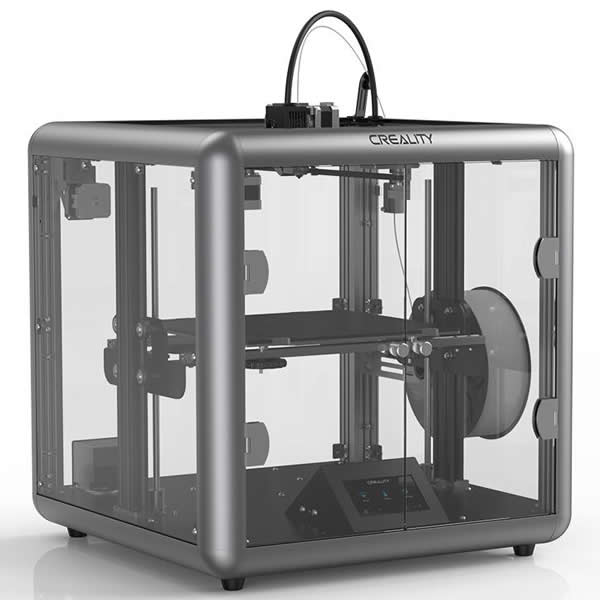
Creality 3D Sermoon D1
Features of the Sermoon D1
Unusually for a low-priced home model, it is a fully enclosed 3D printer, so heat does not escape easily while printing, making it easier to get clean prints.
And because it is built from an aluminum alloy frame with transparent side panels, you can watch the printing process from every direction.
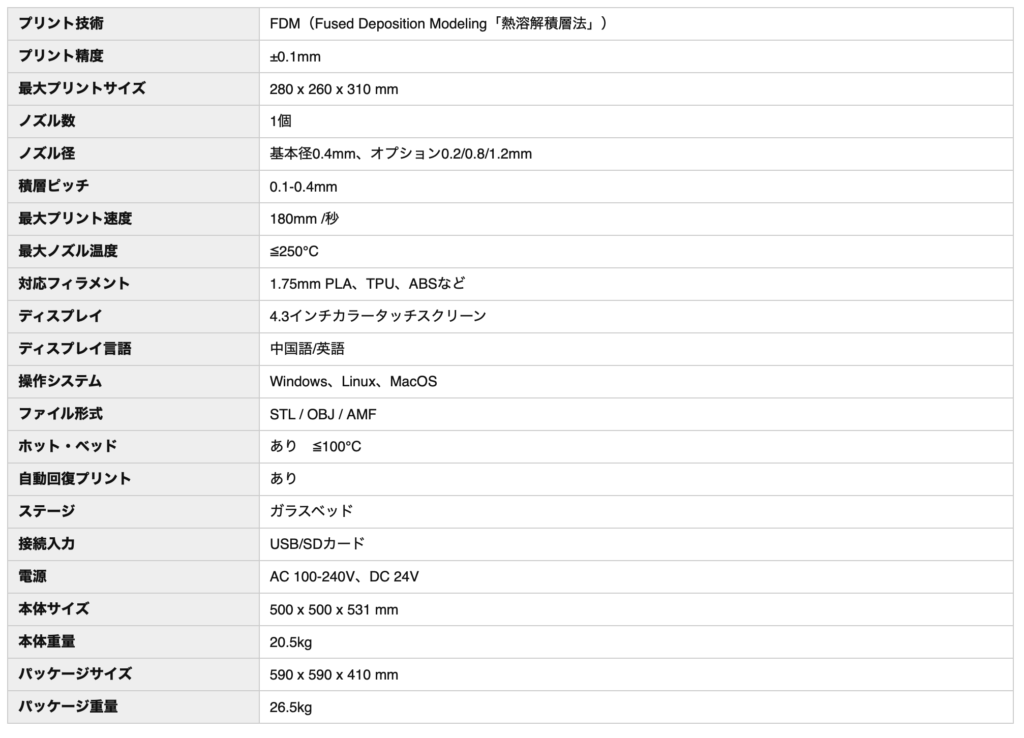
The build volume is a very generous 280 x 260 x 310 mm, which is extremely handy for printing large objects.
It handles PLA and ABS without any problems, of course.
Operation is via a touchscreen and is very easy.
Sermoon D1のスペック(販売ページより)
Buying it and using it
The first thing that surprises you after buying it is the size. When the box arrived and I tried to bring it into the room, it barely fit through the door.
Apparently there are cases where the outer box will not fit through the front door when it arrives at your home.
The printer itself is smaller than the outer box, so you can get it in by taking the contents out, but even so the size is overwhelming.
The unit measures about 500 x 500 x 531 mm, so you need a fair amount of space to place it in a room.
This too comes down to it being fully enclosed: the build volume is 280 x 260 x 310 mm, but the width is nearly twice that.
Assembly after delivery was very easy—just attaching two parts.
I think the greatest feature of this model is how quiet it is. Even with the fan running at 100%, it is remarkably quiet.
Sleeping right next to it at night is admittedly not feasible, but taking a nap is no problem at all, and if you are on the phone beside it, the printer is barely audible.
Even when you print with a raft, the raft comes off easily.
And depending on the object, you can print beautifully without a raft at all.
During printing the bed is warm so the print sticks to it, but once printing finishes the bed cools down, so the print is easy to remove. The bed is made of some curious material, and having prints come off it so easily after printing is genuinely fun.
Recommended settings
The default settings already print cleanly enough, but I tuned the settings myself to get even better prints, and here I share the configuration that worked well for me.
These are settings for Creality Slicer. Basically, you set the infill (how densely the interior is filled) however you like. I use 15%.
I lowered the retraction speed—the speed at which the filament is pulled back—and slowed the print speed. I raised the head travel speed as high as I could while still getting properly formed prints.
Once you understand what each parameter means and what values it takes, you can customize things yourself to a fair degree.
Keep in mind that what I present here is just one example, and since other people’s recommended settings did not work all that well for me, please treat it as a reference for finding settings that suit your own setup.
Drawbacks
Being a home model, it does have a few drawbacks.
– It has no auto-leveling, so getting a feel for leveling at first is difficult for beginners.
– Changing the filament is difficult (is this true of all printers?).
– There are few reviews, so there was not much to refer to when I wanted to tweak the settings.
– You have to put your data on an SD card, so sending data over Wi-Fi and the like is not possible.
Among home models it is very easy to use, and I can recommend it to beginners and advanced users alike. If you are thinking about getting a 3D printer, definitely give it a try.
When you live alone, dirty dishes pile up endlessly, and washing them is honestly a pain. Even when you plan to cook for yourself, the thought of the washing up kills your motivation and you never quite get around to it.
When I started living alone I decided I’d really commit to cooking for myself, and I bought a dishwasher to keep myself motivated!! After a lot of deliberation, I went with the MOOSOO MX-10.
In this post I want to explain why I chose this dishwasher, and why I didn’t go for the very similar MAXZEN JDW03BS01.
Why MOOSOO?
The first decision when buying a dishwasher for your home is whether to get an installation-free tank-type model or a conventional one. I’m in a rental, and installation work sounded like too much hassle, so I went with a tank-type model that requires no installation.
With a tank-type unit, you just plug it in, fill the tank with water, add detergent, and it washes your dishes. You can use it the day it arrives, which is incredibly convenient, and it’s easy to move around too.
There are plenty of tank-type models out there these days, from cheap ones to expensive ones. So the next thing to think about is where you’ll put it.
In my case, the spot was on top of the fridge — fairly high up. If you live alone in a place with no spare space, isn’t the top of the fridge by far the most likely place you can actually fit a dishwasher (somewhere reasonably wide and close to the sink)?
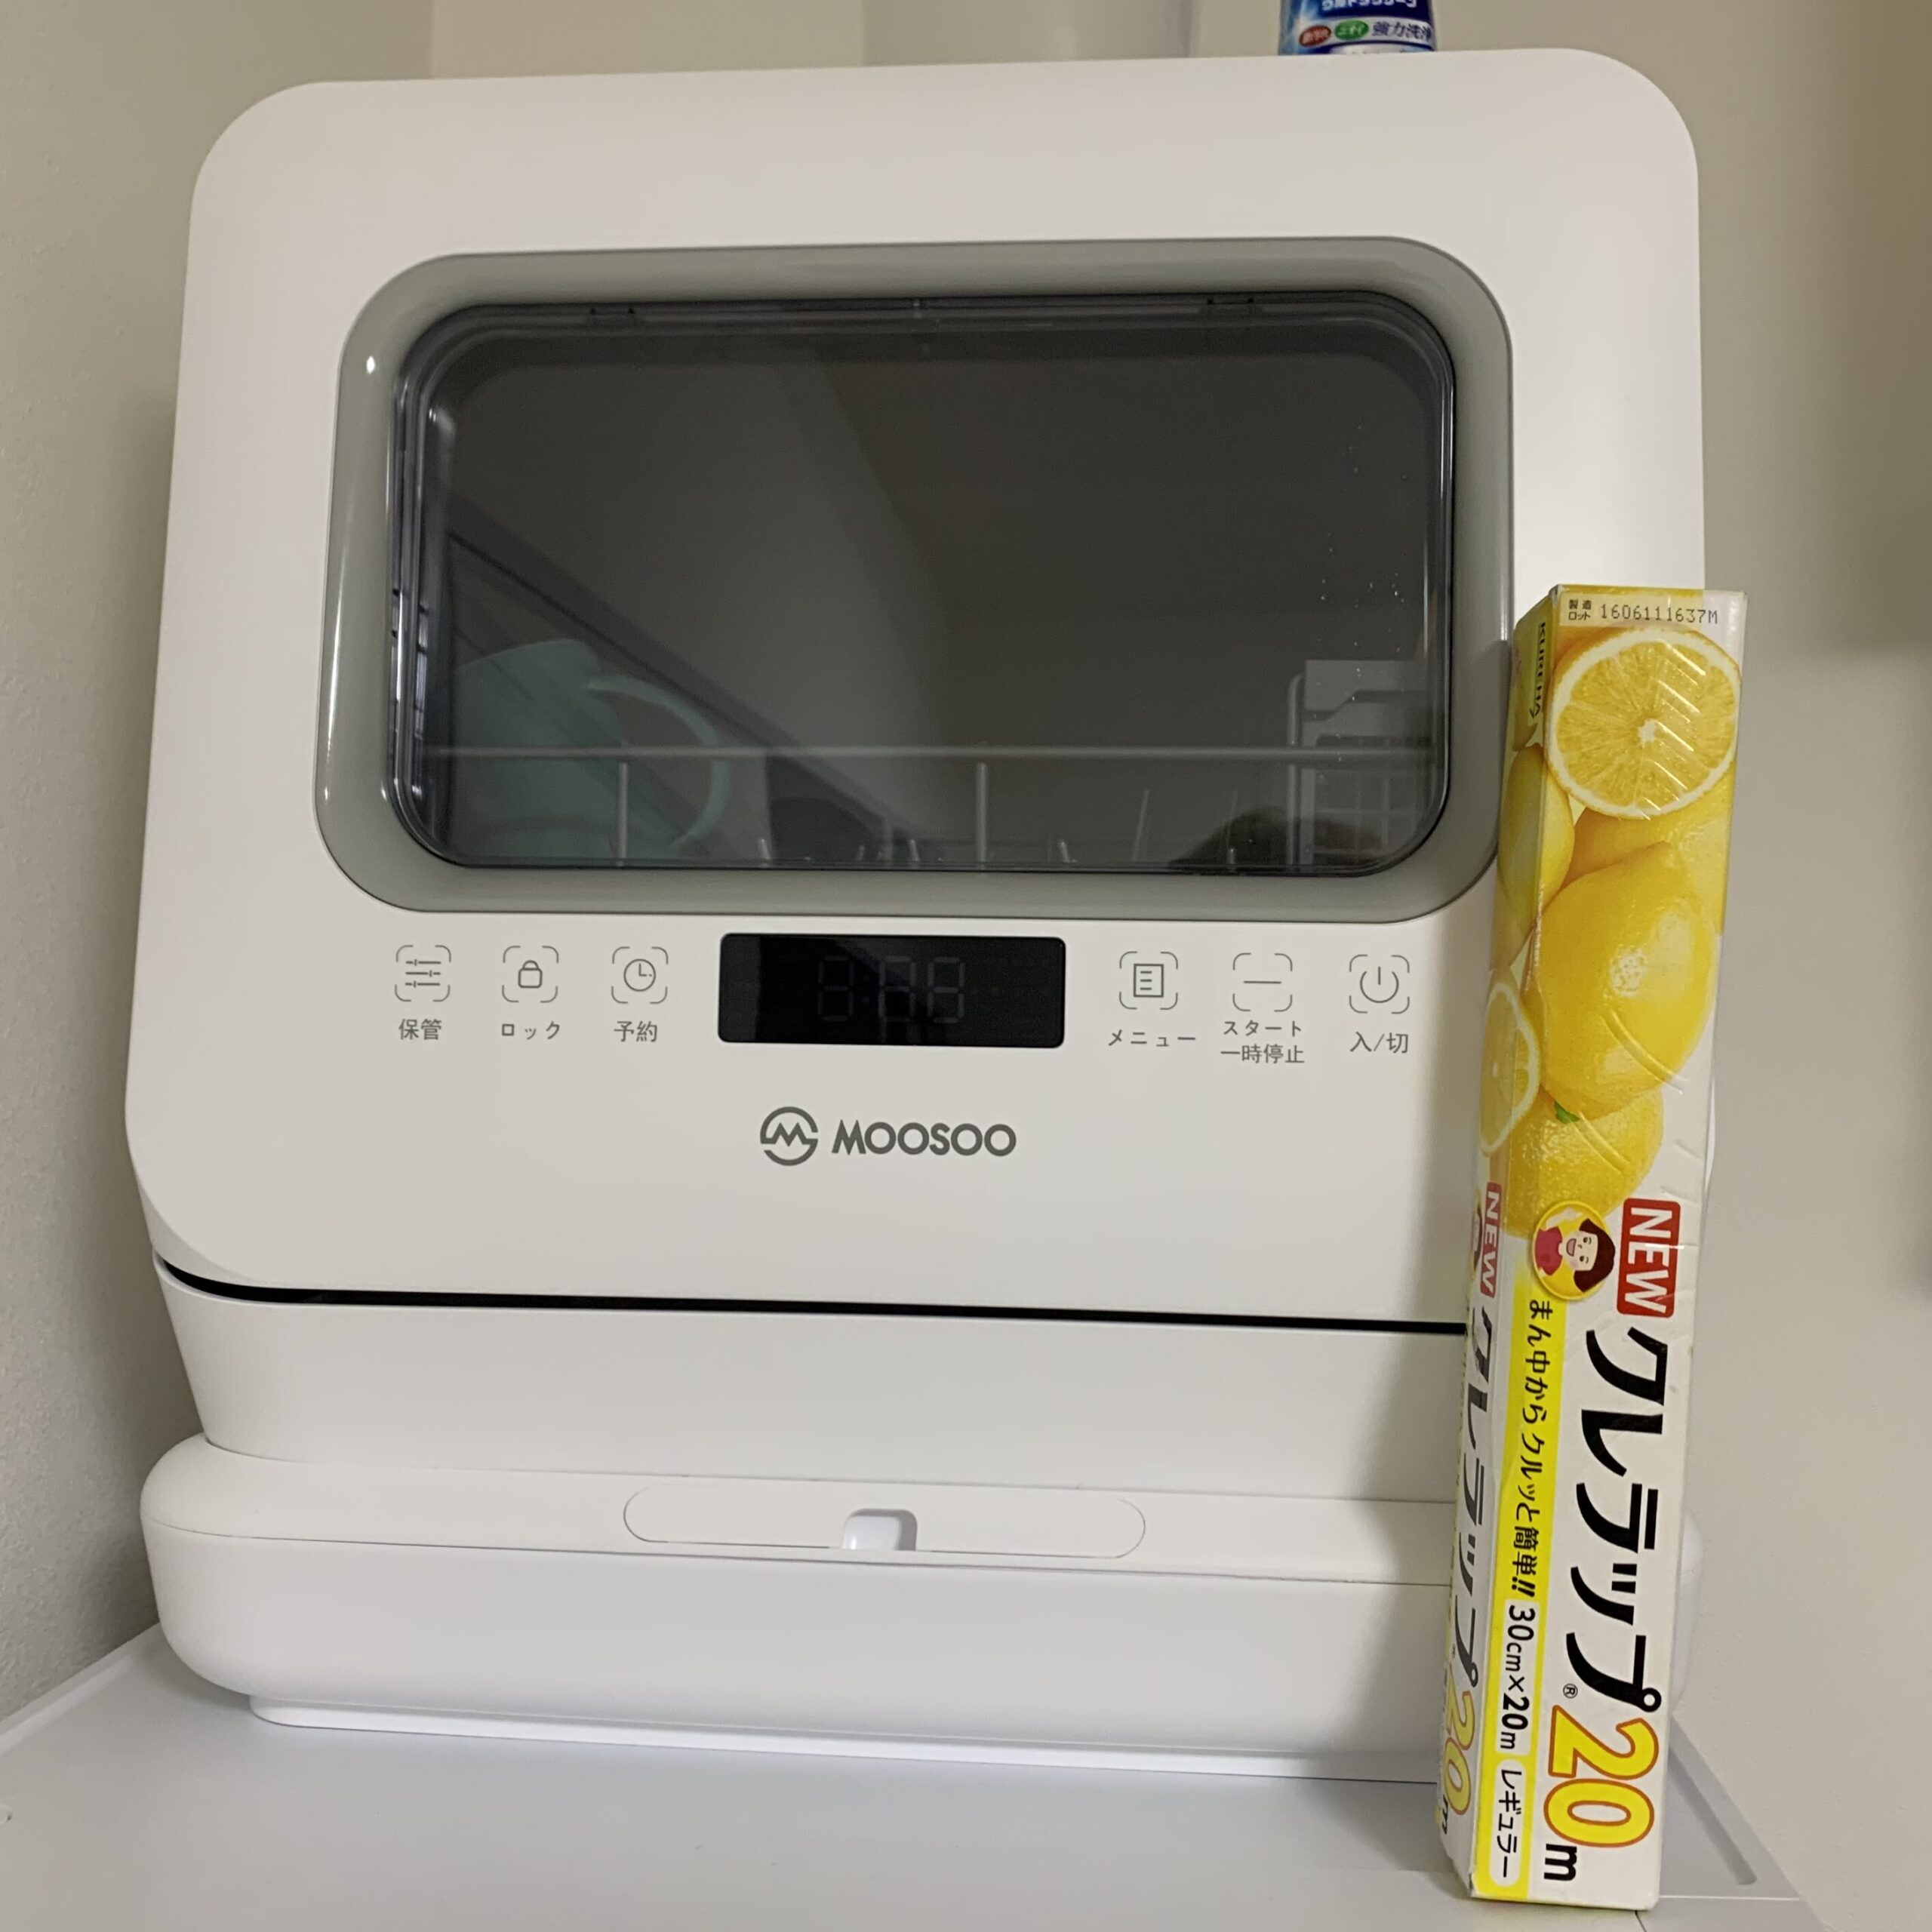
I stood a box of plastic wrap next to it in the photo so you can gauge the size. It’s bigger than you’d expect!!
When you think about filling the tank, you want the fill point to be low and easy to reach — so having the water inlet on the bottom is ideal.
The problem is that most tank-type dishwashers have the fill opening on top, which makes filling awkward if the unit is up high. As far as I could find, the tank-type dishwashers with the water inlet on the lower front are Panasonic’s NP-TSP1-W, MAXZEN’s JDW03BS01, and MOOSOO’s MX-10. Incidentally, judging from the reviews, cleaning performance is basically fine on all of them unless something is really off.
Of these three, I’d love to go with the Panasonic, but the price… So that left the latter two models. Both can be had for under about 30,000 yen, which seems pretty good. (Though I’m a bit worried about durability.)
What’s the difference between the MAXZEN and the MOOSOO?
The two models look very similar and have very similar wash modes, so you may well wonder what actually differs. The big difference is the drying function.
The MAXZEN uses fan drying, while the MOOSOO uses heated-air drying. With the MOOSOO, once the wash and dry cycle finishes you can put the dishes straight back in the cupboard. (I’ve never used the MAXZEN, so I don’t know how dry it gets things.)
You could just leave the dishwasher door open after the wash finishes, but since the MOOSOO has heated drying, things dry quickly and you can get by with relatively few dishes on hand.
The MAXZEN is a bit cheaper, so if you don’t really need the drying function, I think it’s plenty. (Washing performance seems to be about the same.)
MOOSOO frequently offers coupons on both Rakuten and Amazon, so you can often pick it up at a really good price — in which case the gap with the MAXZEN may not be that big after all.
How to set it up
First, attach the drain hose and the adapter (intake hose) that draws water up from the pump at the bottom to the back of the unit. I’d recommend attaching them before putting the unit in place.
The water supply hose is used if you connect to a faucet diverter. Doing so means you don’t have to fill the tank, but it leaves hoses everywhere, so I don’t recommend it.
Next, position the drain hose so it sits nicely in the sink. One suction-cup clip is included for holding the drain hose in place, so use that to secure it. One time my drain hose thrashed loose and made a real mess of the room.
After that, just plug it in and use it. For the first run, do an empty wash cycle to clean out the interior.
That’s all it takes to get going — very easy.
The drain hose is about 1.5 m long, so even from roughly fridge height with some distance to the sink, it reaches comfortably.
As for the results, even annoying messes like curry-stained plates come out beautifully clean with no slimy residue — I’m very satisfied.
Summary
Personally, if you’re going to make a real effort to cook for yourself, the very start of living alone is exactly when you should buy a dishwasher. There are plenty of cheap models, so with a little effort a much more convenient life awaits.
There’s a VIBMI dishwasher on Amazon that looks extremely similar to the MOOSOO MX-10, but there’s so little information about it that I won’t cover it here. The Amazon listing claims the features are literally identical, but it seems sketchy, and personally I wouldn’t recommend it…
When you turn on your computer and the fan starts spinning at full blast, you might worry that the machine has broken. When a computer suddenly starts behaving strangely, it’s easy to assume there’s nothing you can do, but you can often fix these problems yourself.
That said, you do this at your own risk, so be very careful, and if you know someone knowledgeable, it’s a good idea to work on it together. Computers are expensive, after all…
In this post, I’ll describe—based on my own experience—what to do when the fan spins at full speed at startup and doesn’t calm down even a while after Windows has booted.
Symptoms
I had left my desktop computer on overnight, and in the morning I noticed the fan was running at full speed.
I shut the computer down once, but the fan kept spinning, so I flipped the power supply switch off and unplugged the power cord. I pressed the power button a few times to discharge it and then booted up, but the fan was still running at full speed.
Other than booting somewhat slowly, though, there were no other apparent problems.
What I did
I checked the CPU temperature in the BIOS setup screen, but it only reached about 30 °C, so there was no problem there.
I set the PC to power-saving mode in the BIOS, but nothing changed. I also lowered the minimum fan speed, with no effect.
I unplugged every cable connected to the computer, including the power and USB cables, pressed the power button a few times to discharge it, and then opened up the case.
I removed the coin cell battery and pressed the power button several times (clearing the CMOS). [There are other ways to clear the CMOS. It’s also a good idea to disconnect the power supply cables to the motherboard at this point.]
Clearing the CMOS is a way of resetting the motherboard’s BIOS: after removing the coin cell battery, you drain the residual electricity from the motherboard.
I put the coin cell battery back in, reconnected the keyboard, power, and video cables, and turned the computer on. The fan then returned to its normal speed. Just to be safe, I also updated the BIOS.
For now, everything is running normally.
Cause
The direct cause seems to have been a BIOS error. Something apparently went wrong, resulting in the fan running at full speed.
BIOS errors can often be fixed by clearing the CMOS, so whenever you suspect a BIOS error is to blame, resetting the BIOS with a CMOS clear will frequently solve the problem.
BIOS errors can be caused by leaving the computer powered on for long periods, dust building up inside the case, shutting the computer down abruptly at an inopportune moment, or installing dubious software.
Dust buildup inside the case is especially common, so you can prevent it by cleaning the interior with compressed air about once a year.
I updated the BIOS at the end this time. The reset alone is probably enough, but updating may also clear latent errors. It’s the same idea as a camera that won’t power on starting up again after a firmware update.
Being able to fix computer errors yourself is a genuinely valuable skill, since it saves on repair costs. Also, when a computer won’t boot, there are surprisingly few things you can do besides replacing parts, so it’s worth looking into other options first.
Bonus
I’ve decided to offer consultations on computer problems through Coconala!
I’ve worked with all kinds of computers and seen all kinds of problems. My Coconala listing mentions computers that won’t turn on, but I’m happy to help with any trouble you run into while using a computer.
I’ve only just started using Coconala, so I may still be getting the hang of it, but please give it a try the next time you run into computer trouble.
I use both Mac and Windows, so I can help with problems on either platform.
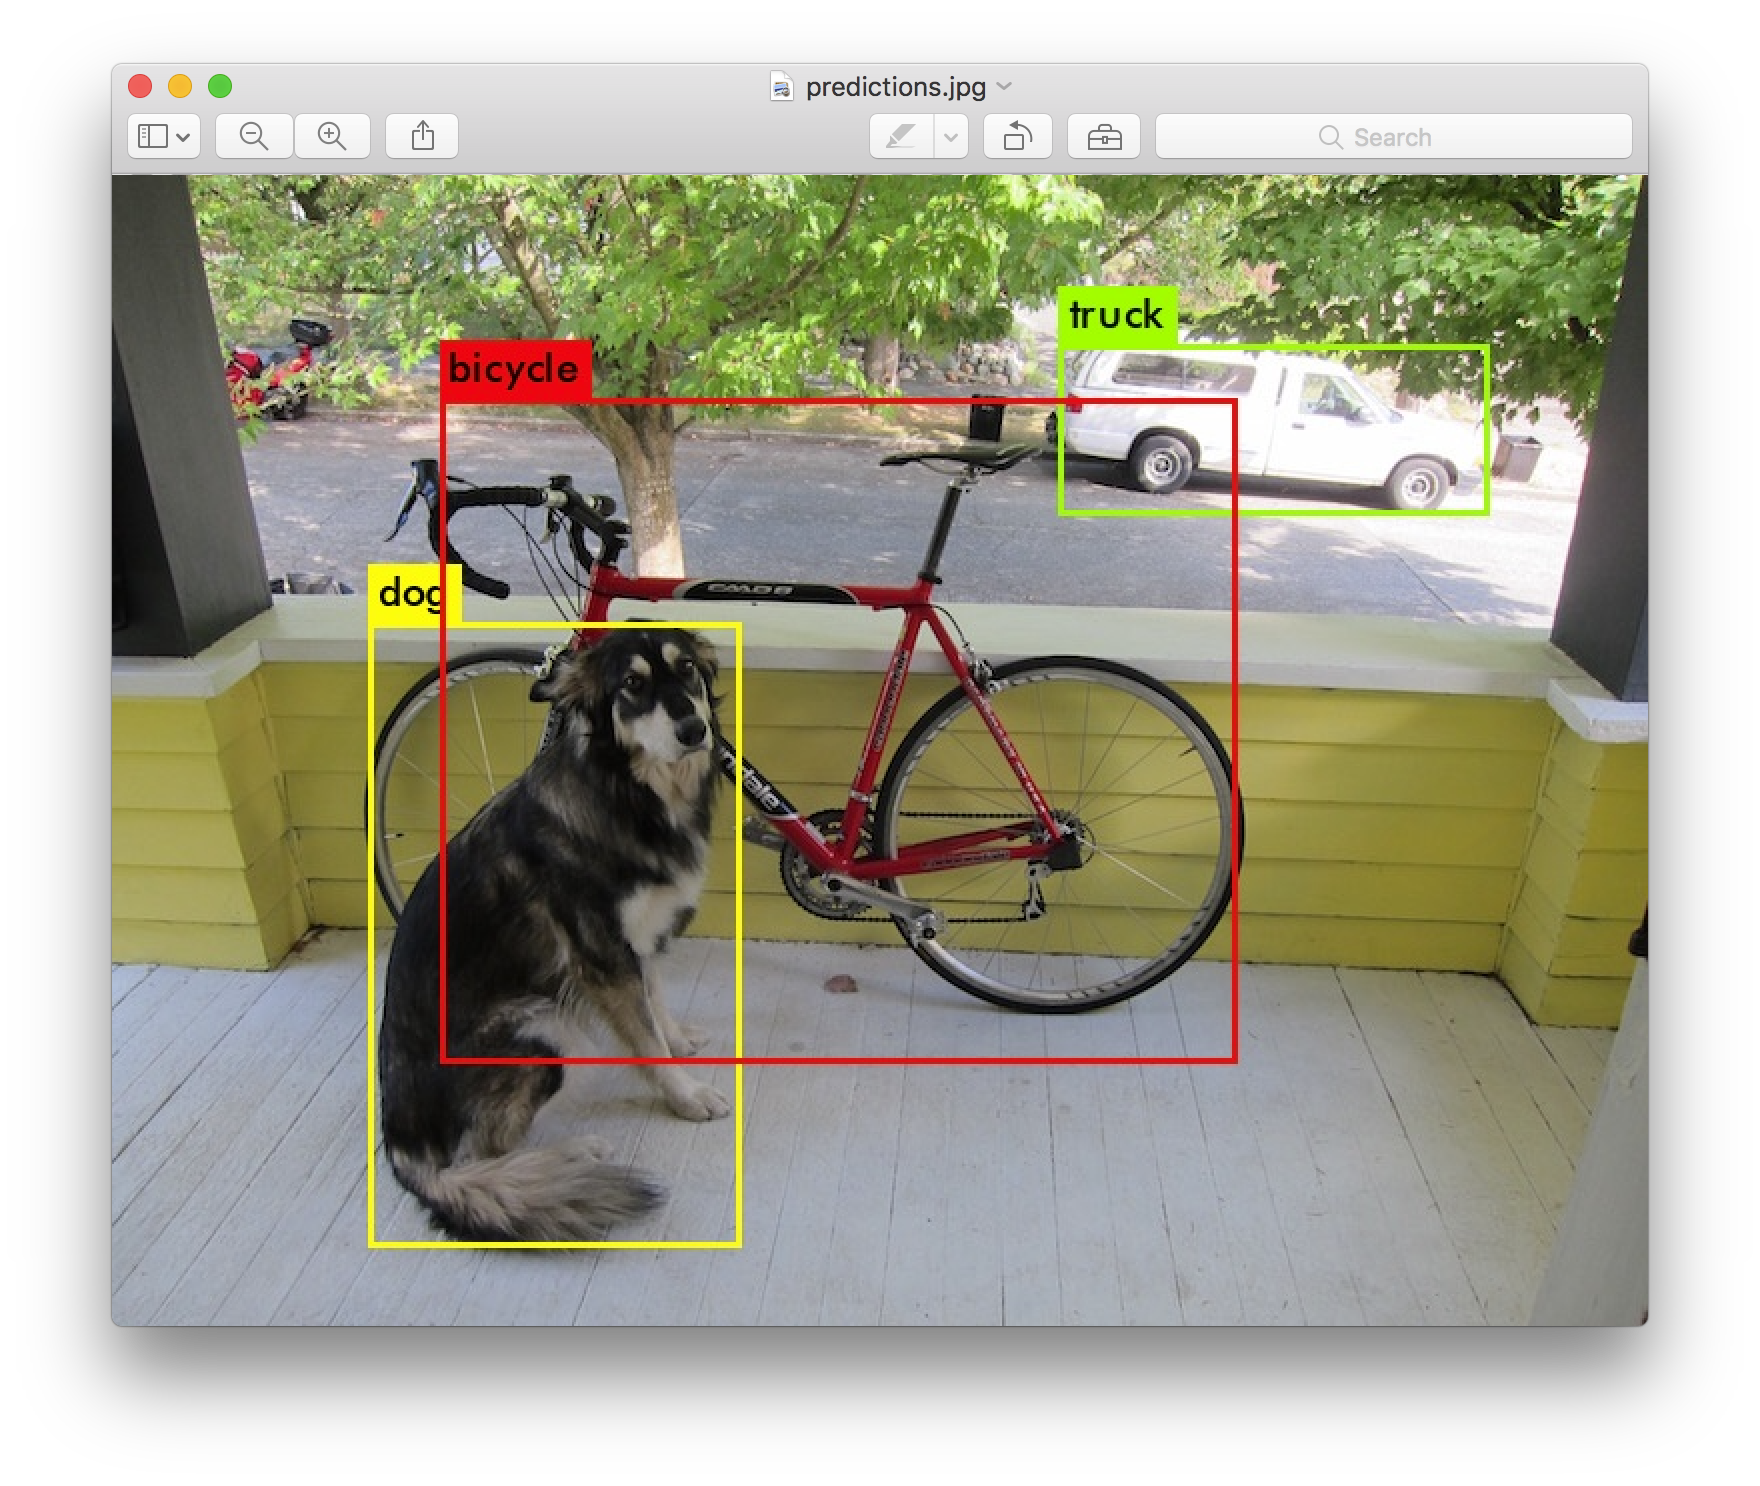
YOLO is an object detection algorithm. The name stands for “You Only Look Once.” It differs somewhat from object tracking: it detects objects and identifies what they are.
YOLOのHPより引用(https://pjreddie.com/darknet/yolo/)
In applications such as autonomous driving, YOLO detects and classifies objects the way a human would judge them—deciding whether something is a person, a pet, or a car.
The classification algorithm itself is complex, so I will not go into it here, but a quick search will turn up a great many sites that explain it.
New versions of YOLO have been appearing at a pace of roughly once every two years. So far we have had YOLO v1 through YOLOv5, and in August 2021 a new version, YOLO X, was announced. The differences between versions involve substantial changes in the details, but as a rule accuracy improves with each new release.
In this post I will walk through the steps for installing YOLO v5 and verifying that it works—a version that offers sufficient accuracy and, now that plenty of information is available, is easy to get up and running.
Installation environment
OS: Windows 10 (macOS Monterey also worked) Python: 3.9.7 (3.6 or later) CUDA: 11.3
How to install
Creating a virtual environment
We will create a virtual environment using Anaconda. If you do not have Anaconda installed, install it first.
Installing YOLOv5 pulls in quite a few packages, so I recommend installing it inside a virtual environment. You can name the environment anything you like; here we will call it “Yolov5_env”. Enter the following command in Anaconda Prompt.
conda create -n Yolov5_env python=3.9
This should create the virtual environment. Activate it with the following command.
conda activate Yolov5_env
Installing CUDA
First, if this is your first time installing machine learning libraries and you plan to train YOLO on a GPU, install CUDA. (Training on a CPU takes an absurdly long time, so I do not recommend it.) CUDA can be downloaded from the official site.
As for which CUDA version to use, I suggest checking which CUDA versions PyTorch supports and installing that version. PyTorch official site
To install an older version, click Download now and then, on the screen that appears, use Archive of Previous CUDA Releases under Resources near the bottom of the page.
The latest version may well work too, but for now, matching the version to PyTorch should let you run everything without trouble.
To check whether it installed, on Windows open “Edit the system environment variables,” go to Advanced > Environment Variables, and look for a path beginning with CUDA_PATH. The number after the V indicates the version.
Installing PyTorch
Before installing, update pip. Activate the virtual environment in Anaconda Prompt and run the following command.
python -m pip install --upgrade pip
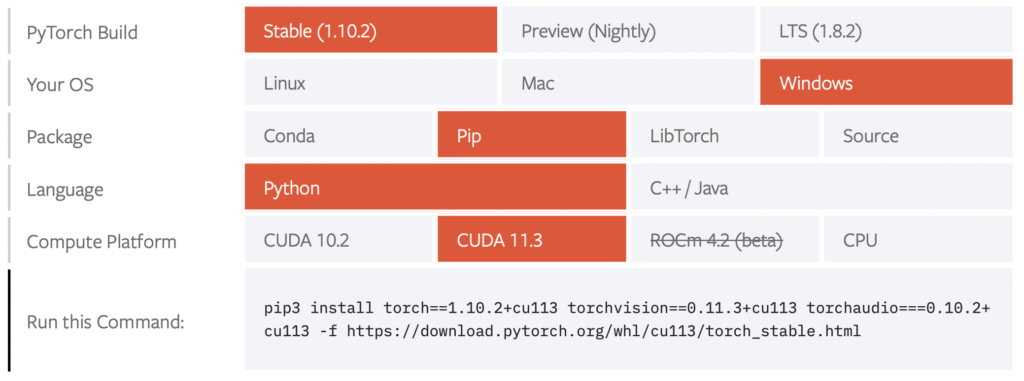
Go to the PyTorch official site and select the installation options that match your environment. One thing to watch out for is the Package field: be sure to choose pip here. If you install with conda, you will run into errors later on.
Copy and paste the command shown under “Run this Command” to install PyTorch in your virtual environment.
Once the installation finishes, use the following command to check that PyTorch is installed.
pip list
If torch appears in the list, you are all set! As a quick sanity check, launch python and run the following commands.
import torch
print(torch.cuda.is_available())
If the output is True, the installation succeeded and torch is ready to run on the GPU. (On a Mac, or on a computer without a GPU, you will see False, but as long as the import goes through you are fine.) If you get an error, go back and review the installation.
Installing YOLOv5
Download (clone) the YOLOv5 files from GitHub.
git clone https://github.com/ultralytics/yolov5
If you cannot use the git command, either install git or download the files from the YOLOv5 GitHub repository.
Next, run the following command in your virtual environment in Anaconda Prompt.
cd yolov5
pip install -r requirements.txt
The first command moves you into the yolov5 folder you downloaded from GitHub. If you installed it with the git command, this will work as is; if you downloaded it directly from the website, you will have to navigate to that directory yourself.
The downloaded yolov5 folder contains a file called “requirements.txt” that lists the necessary packages. The second command opens this file in read-only mode and installs the packages listed in it.
Once the installation is finished, let’s check which packages were installed.
pip list
You will probably see that quite a few packages were installed. With that, the YOLOv5 installation is complete for now.
Running it
To check that everything works, let’s try it with the data that comes with the yolov5 folder. Open Anaconda Prompt, activate the virtual environment, and use the cd command to move into the yolov5 folder.
detect.py is the program that performs object detection using YOLO. With source you specify the path to the folder containing the material you want to run detection on. Here I used the images included in yolov5.
With weights you choose which model to use. Here we use yolov5.pt.
conf sets the likelihood threshold at which an object is recognized. This is a term you will run into often when studying machine learning. If you are not sure, leaving it as is should be fine.
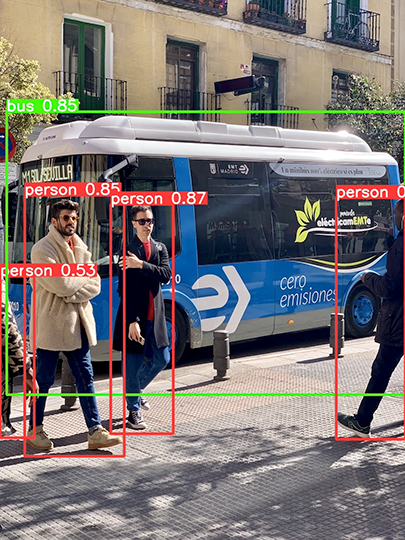
After running it, you should find the annotated images in runsdetectexp inside the yolov5 folder. This is how object detection is done in YOLOv5.
Errors I ran into
・ModuleNotFoundError: No module named ‘torch’
You may see this error when trying to run YOLO. It means PyTorch is not available, i.e., the module cannot be found.
If you get this error, first check whether torch is installed in your virtual environment.
pip list
If torch is not listed, install PyTorch. If it is there but things still don’t work and you’re not sure why, start Python, import PyTorch, and check whether it is usable.
import torch
torch.cuda.is_acailable()
If it is available, True will be returned; if not, you will likely see the error above.
One possible cause of the error is that PyTorch was installed with the conda command. If PyTorch is installed via conda while the other packages are installed via pip, the error above can occur.
In that case, uninstall torch with the conda command and reinstall it with pip.
“Module not found” problems often arise when you have mixed up pip and conda when installing. Here I have used pip throughout, but it’s a good idea to always keep track of which command you used to install something.
I often pick out computers and give advice about them, and many friends have told me I could make money doing PC consultations. Inspired by that, I figured I’d give it a try!
I’ll suggest a purchase that fits how you plan to use the computer and your budget. In particular, I’ve chosen and used many computers for machine learning.
And if you’d like, I’m happy to also advise you on what to look for when buying a computer in the future.
Computers I’ve picked out so far include analysis machines for the lab, everyday-use machines, PCs for game streaming, PCs for incoming university students, PCs capable of running CAD for architecture students, and simple stopgap machines.
I use both Mac and Windows, so I can discuss and recommend either!





![My elif conditional branching isn’t working!! [Python]](https://www.tankobucreate.com/wp-content/uploads/2021/06/python_cover.png)


![[商品価格に関しましては、リンクが作成された時点と現時点で情報が変更されている場合がございます。]](https://hbb.afl.rakuten.co.jp/hgb/257504f1.74308428.257504f2.4f37200f/?me_id=1365223&item_id=10000300&pc=https%3A%2F%2Fthumbnail.image.rakuten.co.jp%2F%400_mall%2Fmoosoo%2Fcabinet%2F17%2F07762552%2Fimgrc0162295961.jpg%3F_ex%3D240x240&s=240x240&t=picttext "[商品価格に関しましては、リンクが作成された時点と現時点で情報が変更されている場合がございます。]")


![[Updated December 2022] How to Install YOLOv5 [Object Detection Tool]](https://www.tankobucreate.com/wp-content/uploads/2022/02/YOLO.jpg)