When doing object clustering, there are times when you want to use not only the pre-existing trained models but also a model you built yourself.
YOLO is a well-known tool for object clustering, and labelImg (written in all caps as LABELIMG) is extremely useful when creating the training data for it.
Here I introduce how to install labelImg.
Environment
OS: Windows 10 (it also worked on macOS Monterey) Python: 3.9.7 (3.6 or later)
Installation
I recommend creating a virtual environment with Anaconda and installing it there. That way, you can install it without affecting your other environments.
The name of the virtual environment can be anything as long as you recognize it, but here we’ll use “labelimg_env”. Run the following command in Anaconda Prompt.
conda create -n labelimg_env python=3.9
Here I am installing with Python 3.9, but anything from 3.6 onward should be fine.
Next, let’s update pip and setuptools. Doing this prevents mysterious errors (probably).
python -m pip install --upgrade pip setuptools
Then install labelImg.
pip install labelImg
You can check whether it was installed with the following command.
pip list
If labelImg appears in the list, you’re all set.
Launching
First, activate the virtual environment.
conda activate labelimg_env
Then launch labelImg.
labelImg
If a separate window opens, you’re good to go!
Afterword
LabelImg’s GUI is built with PyQt5. The reason Python 3.6 or later is preferable is that the current version of PyQt5 requires Python 3.6 or later.
Generally, the latest version should work without any problems.
Hello. I’m a cash-strapped biology major who kept saying “Once I get into university I’m definitely buying a 3D printer!!” and, now that I’m a senior, has finally managed to buy one.
Between classes and research I was too busy to work many part-time hours, so money was tight, but I made up my mind to buy the 3D printer I’d always dreamed of. Still, I didn’t want to waste money…. And if I compromised on my choice, I’d just end up wanting a better one later….
I wanted something I’d be truly happy with, so I searched the web endlessly, asked people at my university who know engineering, and bought one only after researching it thoroughly.
When you decide you want a 3D printer and actually start searching, you find a huge number of models, from ones in the ten-thousand-yen range to ones costing over a million yen. You’ll probably agonize over which one is best, and honestly it’s hard to tell what the differences even are.
This article is for people wondering, “I want a consumer 3D printer as a hobby, but I don’t know what to look out for when choosing one” “Which one should I actually buy?” I’ll walk through it, including the reasons behind my own choice.
What’s the difference?
With prices ranging from tens of thousands to millions of yen, you’re bound to wonder what actually differs.
First, as a premise: print accuracy and how clean the finished object looks don’t change much with the price of the 3D printer. Accuracy and finish vary a lot depending on the printing method, but within the same method there isn’t much extreme difference.
Basically there are two printing approaches: FDM (melting filament with heat and building up layers) and optical/resin curing (hardening with light). Generally, the optical method gives a cleaner finish (build marks are less visible) and better accuracy, while FDM has the advantage of being easy to work with. I’ll explain the differences between the two in my next blog post.
Print accuracy and finish are determined by the detailed settings that tell the 3D printer how to print. So even a cheap printer can print beautifully if you configure it properly, and it’s quite common for an expensive printer to fail to print at all if you set it up carelessly.
So what does change with the price? In a word, it’s the extra features on top of the basics.
To give a few examples:
Supports a wider variety of filaments
Larger printable size
Built-in Wi-Fi
Heated build plate
Two filament nozzles, so you can print with two materials — and so on
On top of the basic performance, the price changes depending on which options are included. If you think about which features you want, the list of candidate models will narrow down naturally.
Criteria for choosing
That said, you may not even know what features exist, or which ones are actually useful. So let me introduce a few points worth paying attention to.
Print size
The size you need depends on what you want to make and where you’ll put the printer. Roughly speaking, the 3D printer itself will be about 1.5 to 2 times the size you want to print.
If you’re making small containers or pen stands, a small printer is fine, but if you plan to make headphone stands or cases, you need to think about size.
What I realized after buying one is that very large prints are a hassle and take a long time, so I didn’t print big things very often. But when I made a headphone stand, I needed quite a bit of size, and I was glad I’d bought a large one.
A larger printer also has the advantage of letting you print multiple parts at once.
Number of usable materials
Different materials require different melting temperatures. Optical 3D printers can only use light-curing resin, but with FDM you have the commonly used PLA, ABS which is a bit harder than PLA, TPU with its slightly rubbery feel, and even printers that can handle carbon fiber.
The more material types supported, the higher the price. Most printers can handle PLA and ABS at a minimum.
I use almost nothing but PLA and have never found that inconvenient, so maybe you don’t really need support for many materials… perhaps?
Number of filament feed mechanisms
Some models have two or more nozzles for extruding filament. This lets you use multiple materials and, for example, color different parts of the object differently.
Another popular recent approach is water-soluble filament, which can be used as support material so you can print even complex geometries.
Supports are something you absolutely have to think about when making an object, but with water-soluble filament you can print without leaving support marks.
One caveat: with multiple nozzles, apparently the idle nozzle can sometimes collide with the object depending on what you’re printing.
Whether the build plate can be heated
This is a feature that budget 3D printers often lack.
The nozzle heats up and melts the filament to build the shape, and when the build plate is heated as well, the molten filament adheres to the plate more easily and the print is less likely to peel off during printing.
Also, once printing is finished the temperature drops, which makes it easier to remove the print from the plate.
Personally, I have benefited from this feature to a surprising degree. Because prints stick firmly to the plate, large objects don’t shift during printing, and tall objects can be printed as well.
The structure of the printer
Enclosed or open-frame? Aluminum frame or plastic?
An enclosed design keeps odors from printing (especially with ABS) contained, and it also keeps the interior somewhat warm, which prevents warping caused by prints cooling too quickly.
With an open design, you can check the print from every angle. Access is also better when the nozzle clogs, so maintenance is much easier.
As for the frame material, it affects how stable the printer’s motion is. A metal frame is rigid and very stable. The downside is the added weight, which makes the printer much harder to move around.
Ease of operation
One thing you really shouldn’t overlook is how easy the printer is to operate.
There’s a wide range, from models with nothing but buttons, to ones with an LCD plus buttons, to touchscreen models.
A common issue with cheap 3D printers is that they’re advertised as having a touchscreen, but when you actually try to use it the responsiveness is terrible. That in itself becomes a source of frustration. Check reviews for comments on touchscreen responsiveness, and be wary if the ratings are lukewarm.
Personally, I find touchscreens very pleasant to use and recommend them, since you can operate them intuitively without reading the manual.
Other features
As for other features, I’d like to mention Wi-Fi and camera functions.
With Wi-Fi, you can send print data to the printer over the network. Normally you put the file on a USB drive or SD card and plug it directly into the printer, but Wi-Fi saves you that trouble.
The camera function means a camera is installed inside the printer so you can check on the state of your print even when you’re away from home.
If you’re the kind of person who leaves the printer running for hours while you’re out, having a camera might be worthwhile.
Recommended models
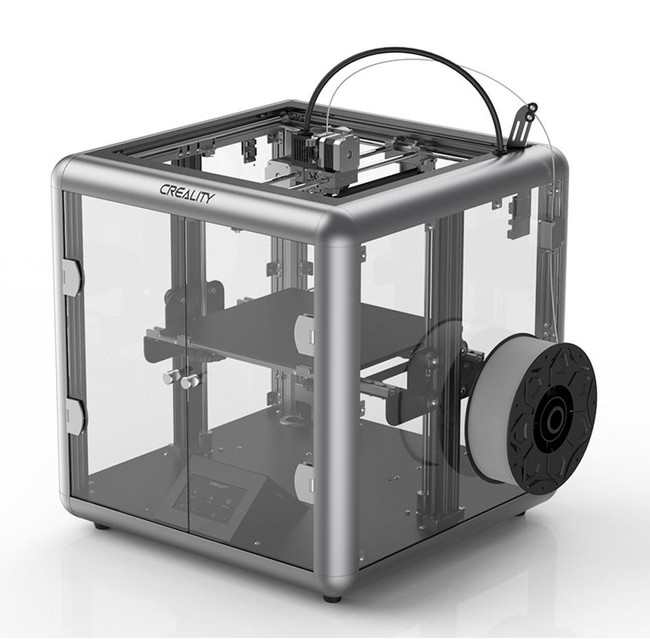
Creality Sermoon D1
This is the model I actually use myself.
Although this model is enclosed, the panels are transparent, so you can check your print from every angle. The frame is aluminum, so it’s extremely rigid.
Because the build plate moves along the Z axis, prints don’t shift during printing, and the printer is also very quiet. I keep it next to my bed, and I can take a nap with no problem while it’s running.
The build volume is 280 × 260 × 310 mm, so you can print fairly large objects. It’s operated via touchscreen, which is very intuitive.
The supported materials are PLA, ABS, and TPU. There’s no Wi-Fi or similar extras, so my impression is that it’s simply a well-performing 3D printer.
One drawback is that loading filament into the nozzle takes a bit of a knack. The first time, you might struggle with it for about ten minutes.
Other than that, I’ve had no trouble using it and I’m very satisfied.
The price is just under 100,000 yen, which is a little steep for home use, but the performance is more than worth it.
This is probably the best-performing and most user-friendly model you can buy for under 50,000 yen.
The build volume is 220 × 220 × 250 mm, and the supported materials are PLA, TPU, and PETG.
It covers all the basics: the build plate is heated, and it’s operated via touchscreen.
The body is metal and nicely rigid. There’s a storage compartment under the build plate where you can stash various tools — a quietly welcome touch.
The printer costs under 50,000 yen, which puts it among the cheaper home 3D printers.
This is the kind of model that will leave you with no real complaints, so if you’re thinking of just giving 3D printing a try, why not start with this one?
The Prusa i3 is a 3D printer made by a Czech company.
What’s distinctive here is that they make their 3D printers using 3D printers — apparently their factory is filled with their own machines.
It’s a world-famous printer, and among machines in the 100,000 yen range it’s the most highly recommended and simply the best there is.
It comes in kit form and pre-assembled, and the kit version can be had for around 100,000 yen.
The basic specs are beyond reproach: a heated build plate and quiet operation while printing. The build volume is 250 × 210 × 210 mm, which is roughly enough for most needs.
What’s impressive about this model is that the nozzle reaches very high temperatures, so it supports a huge range of materials: PLA, PETG, ASA, ABS, PC (polycarbonate), CPE, PVA/BVOH, PVB, HIPS, PP (polypropylene), Flex, nGen, nylon, wood-fill, and more.
The only drawback for me personally is usability. I haven’t actually tried it, but instead of a touch panel, it uses a physical dial for control. The display shows text only.
It will probably take a little while to get used to operating it.
In terms of basic specs alone, it easily surpasses 3D printers costing over 200,000 yen. I agonized quite a bit over whether to get the Sermoon D1 or this model.
Incidentally, although it isn’t available on Amazon, Prusa’s website also offers the Original Prusa MINI+. Its print volume is smaller, but the price is kept to around 50,000 yen, making it an excellent product as well.
Flashforge is a fairly popular 3D printer company in Japan, and if you look around, you’ll find it featured in all sorts of places.
Among their lineup, the model I’d recommend here is the Creator Pro.
Because this model has two nozzles, you can print with the two types of material mentioned earlier at the same time. What’s more, the unit costs about 80,000 yen, which is by no means expensive for home use.
It supports materials such as ABS, PLA, and HIPS, and its print volume is W227 × D148 × H150 mm, which is a bit smaller than other models.
The filament holder is at the back, so it isn’t noticeable from the front. The downside is that swapping filament is a bit of a hassle.
Control is via physical buttons and a text-only LCD, so usability probably isn’t as good as a touch panel. Still, it’s perfectly workable once you get used to it, and with Japanese-language support and a large user base in Japan, a quick search will turn up instructions for just about anything, so you’re unlikely to run into much trouble.
Since the front is enclosed, temperature control is very easy, but you can only check the print from one direction, and maintenance is a little awkward.
That said, being able to use two materials at this price is very appealing.
Roasting your own coffee is often thought to be a fairly high hurdle, but in fact there are machines out there that let you do it easily for around 20,000 yen.
It’s one of the best-known home roasters for doing proper coffee roasting with minimal fuss.
I had the chance to buy one, and after using it for a while, I’d like to share my impressions.
What I like
Green beans are cheap You get to drink freshly roasted coffee You can roast small amounts, so you never struggle to use it up
Buying coffee as green beans costs about a quarter of what you’d pay for roasted beans. Also, while roasted beans are said to stay good for one to two months, green beans keep for about two years.
In other words, once you find a bean you like, buying it green lets you get it cheaply and drink it at its best—right after roasting.
Coffee beans are said to taste best from three days to about two weeks after roasting. When you buy beans at a coffee shop, they’re usually sold in 100 g units and at least a day or two has already passed since roasting (much longer at coffee chains), so if you want to drink the coffee at its best, you have to get through that 100 g pretty quickly.
100 g is roughly ten cups, which is quite a lot for one person even drinking every day.
This roaster handles 40–60 g of coffee at a time, so you can drink beans in their best condition in amounts you can comfortably finish.
Roasting is quite a chore to do by hand, but here you just leave it running—which is why I personally like it so much.
What I don’t like
It’s fairly noisy The roasting smell is quite strong You can’t fine-tune the roast level
The first thing that surprises you is how loud it is in operation. It’s loud enough that watching YouTube next to it while it runs is a bit rough.
It’s not a booming kind of noise, so it’s not unusable in an apartment, but it does make a fair amount of sound and will probably startle you at first.
As for the roasting smell, this is probably true of any machine: roasting fills the room with a real coffee-shop aroma.
It’s strong enough that you should ventilate while roasting, and even then the smell lingers for a day. It’s a coffee smell, so for coffee lovers it isn’t unpleasant at all—more like a room fragrance—but you might want to avoid roasting when you have guests coming over.
On not being able to fine-tune the roast level
There are two modes: Medium and Dark. Medium gives roughly a medium roast, and Dark roughly a dark roast. (In the photos, Medium is on top and Dark below.)
To be more precise, Medium is about a medium roast and Dark is about a city or French roast.
The machine can’t produce a medium-dark roast, which is probably the level most people prefer, so if that’s the coffee you want, you may need to get a little creative.
Overall
Roasting your own coffee beans is surely something every coffee lover wants to try at least once.
Downsides aside, I’ve come to like this machine quite a lot and use it regularly.
The fun of choosing green beans, being able to watch the roast unfold—it really broadens how you enjoy coffee.
I wouldn’t recommend it to everyone, but if you’re curious about roasting your own coffee and want to give it a try, it’s an easy and relatively affordable way to start—so for those people, I’d recommend it.
I’d been wanting to read at night, and with Amazon Black Friday on, I decided to buy a Kindle.
The thing is, there are about four Kindle variants to choose from.
I used to have a Kindle Paperwhite from a few years back, and the screen was so easy on the eyes even after long stretches that I was leaning toward that one again. But I saw that the basic Kindle also gets good reviews, and since I just plan to use it hard and only read at night, I figured the cheaper one would do and went with the plain Kindle.
For Black Friday it was marked down from about 9,000 yen to about 5,000 yen. On top of that, buying a Kindle device gets you three months of Kindle Unlimited (normally 980 yen/month) for free, so effectively I paid around 2,000 yen for the device. What a deal!!!!
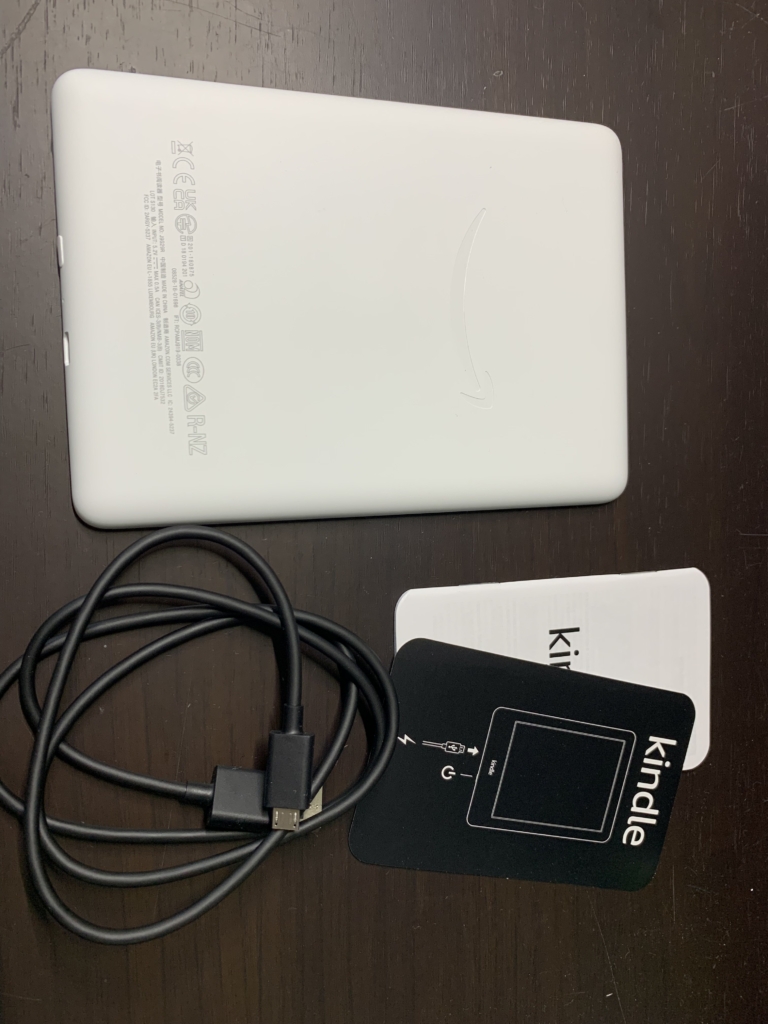
Here’s the actual Kindle.
The first thing that struck me when the box arrived was how incredibly thin it is.
The contents are simple: a charging cable, the device itself, and a manual. The cable is micro-USB, which is a bit inconvenient now that USB-C is everywhere, but since you only need to charge about once a week, it’s really not a drawback.
Unlike the Kindle Paperwhite, the screen uses a front light and has a lower resolution on paper, but you’d only notice that in a side-by-side comparison; in practice the image quality is more than enough for reading.
Reflections are also kept well in check, and reading at night doesn’t tire my eyes at all. My first impression was that it’s better than I expected.
What I disliked most about the old Kindle Paperwhite was how sluggish it was; searching for books or turning pages was fairly stressful. This Kindle is noticeably faster than that, roughly like using a slightly older smartphone.
Given the price gap, whether the other models are worth more than twice as much really depends on the person, but the basic Kindle offers excellent value and works well as an everyday device.
And because it was cheap, I can use it as hard as I like. I feel like I made a really good purchase.
I got my left earlobe pierced. I thought my impressions might be useful for anyone thinking about getting a piercing, so I’m writing them up here.
This time I didn’t use a piercing gun on myself — I went to a clinic and had it done for me.
I went to Clinic Bizarrea, near Sakae Station in Nagoya. Website They have what they call a “Piercing Center,” and it’s a place that comes up almost without fail when you search for clinics to get pierced at in Nagoya.
What stands out here is how cheap it is: one earlobe piercing, starter earring included, cost me 1,600 yen. A piercing gun at Don Quijote runs about 1,000 yen, so for roughly 600 yen more you get to consult someone and have them do it for you — an incredible deal.
You can also choose from a variety of starter earrings, so you can have something a bit stylish in from the very beginning.
That said, if you look up reviews of the Piercing Center, there are both good and bad ones — the staff seem to vary from day to day, and so does the service. Basically the piercing itself is done assembly-line style, so there isn’t much room for the service to be good or bad, but it might matter when you want to discuss where to place the piercing.
Getting pierced
From arriving at the Piercing Center to actually being pierced took about 20 minutes in total.
I checked in, picked out an earring, and got a brief explanation. I already knew my earlobes were fairly thick, but it’s surprisingly hard to tell how thick they are compared with other people’s. That matters because people with thick earlobes have to watch the size when using an over-the-counter piercing gun.
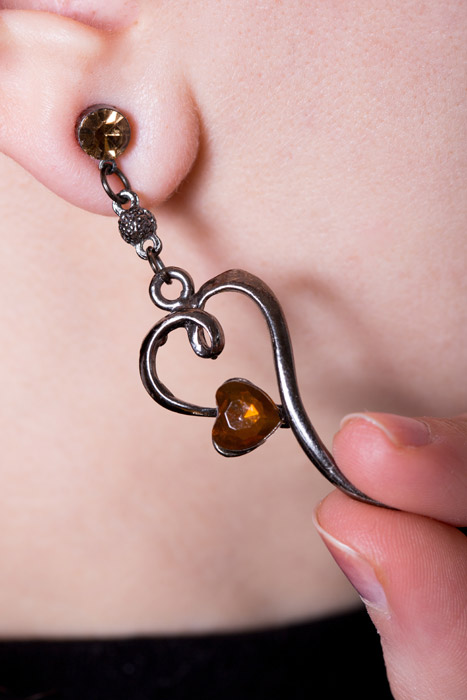
This Piercing Center has long-type starter earrings for people with thick earlobes, which is reassuring. Sure enough, mine were on the thick side, so I ended up with a long-type earring.
Once I’d chosen an earring, they handed me a marker and asked me to look in the mirror and mark where I wanted the piercing.
Marking the spot yourself while looking in a mirror is surprisingly hard, and my mark ended up pretty haphazard. Earlobes are floppy, and the angle means you’re drawing with your arm bent, so your hand isn’t steady at all. How does everyone manage this…?
Haphazard as it was, apparently it was good enough — they disinfected the spot, counted 3, 2, 1, and punched it through. No numbing or icing, just straight to it. It was like bungee jumping, where once you’re on the platform things move along briskly so you don’t have time to get scared. Whether that’s to keep you from getting nervous or just for efficiency, I couldn’t say.
Afterward they checked the placement, and once I said it looked fine, I was free to go. It really was over quickly and smoothly.
So how much does a piercing actually hurt?
For the record, the moment of piercing hurt quite a bit, and I could feel the needle passing through my earlobe. Who was it that said getting pierced doesn’t hurt?
It kept hurting moderately for about two hours afterward, and after that there was a persistent odd sensation. People used to wearing earrings probably wouldn’t mind that much, but as someone who almost never wears them, even that bothered me a fair bit.
The pain was a dull ache, entirely bearable. Touching the earring doesn’t hurt, and water doesn’t sting when I shower, which I’m grateful for.
I suspect the reason the needle hurt as much as it did in my case is the thickness of my earlobes. So if your earlobes are thin, it may genuinely not hurt at all.
Either way, it only hurts in that moment, and it’s easy to put up with when you think about the accessories you’ll get to enjoy afterward. Once it’s done, you just think “Oh! It’s done!” — and all the dread you felt beforehand vanishes.
I’m looking forward to thinking about which earrings to wear from here on.
I want to take proper care of it so it doesn’t get infected.
The Arduino UNO uses a Microchip microcontroller called the ATmega328 as its main chip. Once you start digging deep into Arduino programming, you inevitably end up having to read the microcontroller’s datasheet, so it is worth taking a look at least once. (Which is exactly the situation I’m in now.)
The Arduino has three timers (Timer/Counter). These timers govern timing in Arduino programs. Functions such as delay() and tone() rely on them for their measurements.
Timer/Counter
Pin number
Bit width
Role
PWM frequency
Timer0
5, 6
8 bit
Manages Arduino timing delay(), millis(), micros(), etc.
977 Hz
Timer1
9, 10
16 bit
Servo library, etc.
490 Hz
TImer2
3, 11
8 bit
tone(), etc.
490 Hz
This time we will change the PWM output frequency by manipulating these timers. Incidentally, since this alters the timers at their core, you might also be able to tweak functions like delay() in useful ways. (Though it seems more likely that they would simply be thrown off and behave erratically.)
Because TImer0 generally affects the system as a whole, I recommend using TImer1.
The overall approach is to change the Arduino timer’s register settings so that the PWM output frequency can be set freely.
The goal is to be able to output low frequencies, so the program is written to produce 10 Hz.
Here I connect an LED to pin 10 and write a program that lets you freely change the frequency and duty cycle of its blinking. Since we are using pin 10, we work with TImer1.
First, include <avr/io.h> in order to change the register settings.
#include <avr/io.h>
Next, to build a function that works together with delay() to repeat a 10 Hz output every five seconds, we define a function called HzWrite. Its arguments allow you to specify the frequency and duty cycle.
void HzWrite(int frq, float duty) {

}
Next comes setting the mode. The registers used here are TCCR1A/TCCR1B. (TCCR: Timer/Counter Control Register) The “1” indicates TImer1; if you want to use Timer2, use TCCR2A/TCCR2B instead.
To set the PWM frequency to a specific value in Hz, you need to specify the TOP value yourself. The larger the TOP value, the lower the output frequency. Here I use 10 Hz as an example. Since this is very slow compared with the 16 MHz system clock, a large TOP value and a large prescaler are required. For this reason, we use Timer1, which offers the largest range.
With the 8-bit Timer0 and Timer2, the maximum TOP value is 255 (2^8 – 1), while with the 16-bit Timer1 it is 65535 (2^16 – 1). (The reason for the -1 is that the range is 0–255 or 0–65535: the number of values is 2^x, but the maximum value must be one less.)
In terms of how the system works, the counter increments up to the TOP value (counting 0, 1, 2, …), and when it matches OCRxA/OCRxB (where x is the timer number; each timer has two output pins, A and B, assigned to it), the pin output changes state (e.g., LOW→HIGH). Once the counter reaches the TOP value, it then decrements back down to 0 (counting down 65535, 65534, 65533, …), and just as during the increment phase, the pin output changes state when the count matches OCRxA/OCRxB.
On the Arduino UNO, the speed at which this counter increments can be changed to some extent by changing the prescaler setting. (“To some extent” means you can choose from 1/8/64/256/1024.) The prescaler is the ratio (n) used when dividing the frequency (multiplying the frequency by 1/n). In other words, dividing 1000 Hz by a prescaler of 10 gives 100 Hz.
Incidentally, with a prescaler of 1 the timer runs at 16 MHz, the system clock of the Arduino UNO (ATmega328).
In short, by changing the TOP value, the OCRxA/OCRxB values, and the prescaler, you can freely set the points at which the output switches.
Since we want 10 Hz here, we use a prescaler of 256 to leave plenty of margin. On the Uno, the clock is 16 MHz, so one count takes 1 / 16 MHz = 62.5 ns (prescaler 1). With a prescaler of 256, counting all the way to TOP takes 62.5 ns x 256 x 65535 = 1.04856 s, so frequencies as low as 1 Hz can be specified.
This program can generate frequencies from 1 Hz up to 31250 Hz. However, as you approach 31250 Hz it becomes impossible to set the duty cycle precisely. If you want fine control over the duty cycle, you can only go up to about 300 Hz.
By changing the prescaler setting in this program, you can build a version that produces the frequency range suited to your own application.
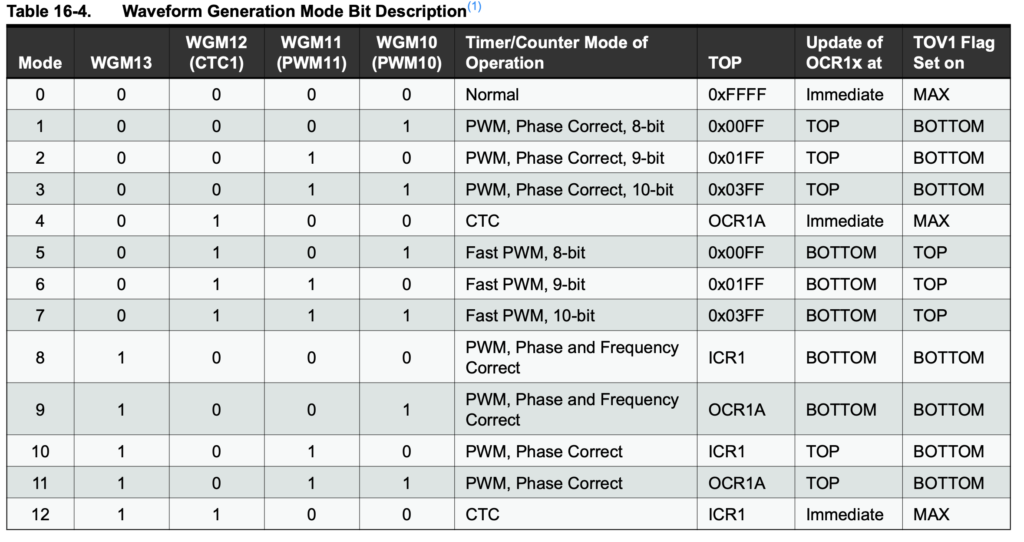
Next, we write what to set in TCCR1A/TCCR1B. The fine details here are rather complicated, so let’s just work through the datasheet and set them roughly.
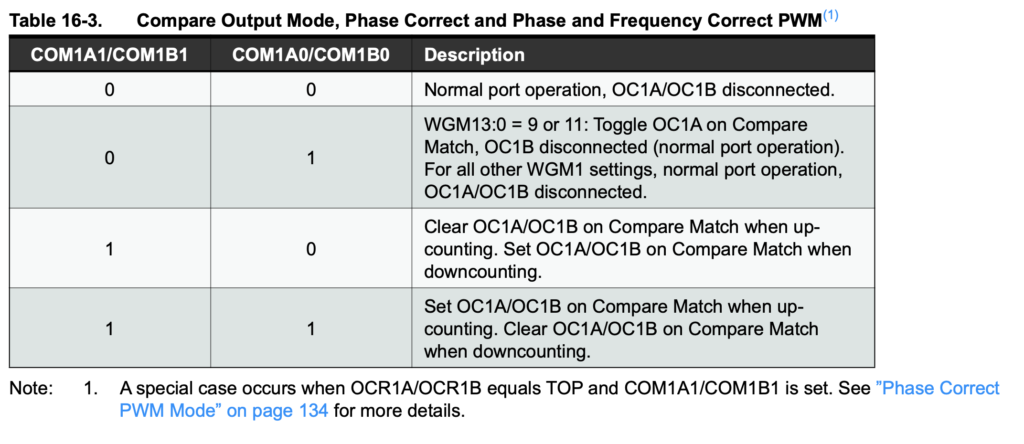
Here the values are given in binary, so they begin with 0b. In TCCR1A you set COM1A1, COM1A0, COM1B, unused, unused, WGM11, WGM10 to 1 or 0. In TCCR1B you set unused (ICNC1), unused (ICES1), unused, WGM13, WGM12, CS12, CS11, CS10, respectively.
For COM1B1 / COM1B0: 0, 0 means no output; 0, 1 means toggle operation (the output is inverted on a compare match); 1, 0 outputs LOW while the counter is between OCR1A/B and TOP, and HIGH while it is between 0 and OCR1A/B; 1, 1 is the inverse of 1, 0.
Here, since we want to switch the output LED between LOW and HIGH to produce the frequency, we set COM1B1 / COM1B0 to 1, 0.
We choose 1, 0 because it makes the sketch easier to follow.
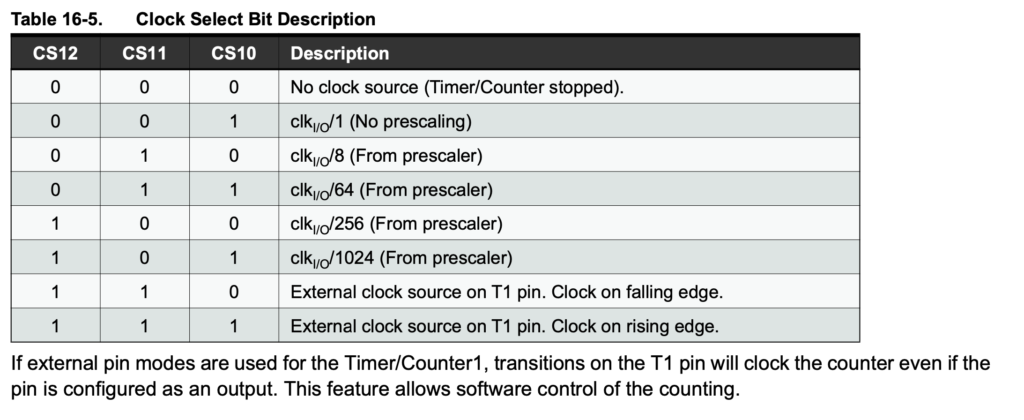
分周比の指定(ATmega328データシートより)
Since we are using a prescaler of 256 here, CS12/CS11/CS10 are set to 1, 0, 0.
To summarize, we get the following.
TCCR1A = 0b00100001;
TCCR1B = 0b00010010;
Next we set OCR1A and OCR1B so that the output is generated with the specified frequency and duty cycle.
PWMPin, i.e. pin 10, is set as OUTPUT, and the frequency and duty cycle are specified with HzWrite(). After waiting with delay(), the output is turned off with digitalWrite(PWMPin, LOW), followed by another delay().
That covers the full program and its explanation.
Afterword
When looking for blog posts on how to change the PWM output frequency, I found many more results by searching for AVR, ATmega328, or 328P than by searching for Arduino.
This post was only a rough overview, so if you want to dig deeper, I encourage you to look into it yourself.
In the program above, the output is toggled between HIGH and LOW. Since delay is specified in milliseconds, delay(1000) waits for one second.
In other words, this program turns the output on and off at 1 Hz.
However, using the delay() function to set the frequency has a number of drawbacks. With this approach, changing the output duration—for example, outputting a 60 Hz signal for five seconds—requires a for loop, which is inconvenient.
That said, because it is so simple, it is a good choice when you just want to try something out.
This function lets you specify the frequency and the duration. So, unlike the delay approach, you can specify the frequency directly without calculating it.
//pinはピン番号
void loop() {
     tone(pin,60);
}
You can write it as tone(pin, frequency) or tone(pin, frequency, duration).
The duration is given in milliseconds, so it is written the same way as delay.
The limitation of this function is that you cannot specify frequencies of 31 Hz or below. In other words, you cannot generate an output such as 1 Hz.
For frequencies above 31 Hz, such as audio tones, it makes specifying the frequency extremely easy, and the code is far shorter and more accurate than using the delay function.
Using PWM output and changing its frequency
Using PWM output offers the greatest flexibility—and it is also why this topic gets so deep.
PWM stands for pulse width modulation. For details, see Wikipedia.
The term alone does not tell you much, but simply put, PWM is a way of modulating an output by changing the duty ratio. The official Arduino explanation is here.
Normally, you would set the brightness of an LED by changing the current. But if the current is fixed and you still want to change the brightness, you can blink the LED at a very high frequency (30–60 Hz is said to be the point where people can no longer perceive the flicker).
Normally the ON and OFF periods are 1:1 (a duty ratio of 50%), but what happens if you make it 4:1 (80% duty) or 1:4 (20% duty)? The former will look bright, and the latter will look dim.
Modulating the output by changing the pulse width in this way is what PWM output is all about.
On the Arduino you can not only generate this output but also change the frequency of the PWM output. The idea here is that by tweaking the register settings—essentially the low-level guts of the Arduino—you can change the PWM output frequency. Incidentally, the default output frequency is 490 Hz, or 980 Hz on some pins.
I will explain how to do this in detail in a future post. Searching for “PWM Arduino frequency change” turns up plenty of explanations.
After reading them about four times, it starts to make sense.
Basically, I suggest looking through these methods to find the one that best fits your own goal.
Python Video Annotator is an application that lets you analyze recorded videos and annotate events within them along a timeline.
Researchers in neuroscience and ethology can use it to record videos of animals and then analyze and quantify their behavior. For example, suppose you are recording mouse behavior and want to score actions such as sticking out the tongue, wagging the tail, or moving the ears. When in the video does each action occur, and how long does it last? Watching the video and logging everything in Excel each time becomes overwhelming once you have defined many behaviors. With a tool like this, you can record annotations directly on the video and export the timing and event information.
There used to be an open-source application called VCode for recording animal behavior. The problem, however, was that it no longer runs on current computer operating systems.
Python Video Annotator works on modern PCs and retains the essential features, while also allowing you to combine it with external sensor data (such as pressure gauges) and behavior-quantification tools like DeepLabCut, making it an extremely useful tool for researchers.
How to install
The official website describes the installation procedure in detail, but I could not get it to install properly on my computer. (Installing it directly may have caused conflicts with packages that were already installed.) So instead I followed the approach described on the GitHub page, building a virtual environment with Anaconda and installing it there.
It sounds complicated when described in words, but the steps are very simple. As of now (October 20, 2021) it does not appear to support the latest macOS (Big Sur 11.6), though this will probably be fixed soon. For that reason, I will use Windows as the example here.
That said, on macOS the steps are basically the same once you have installed Anaconda and can use the conda command, so please refer to this guide once support is available. (For details, see my previous post.)
Install Anaconda and open the Anaconda prompt. Then create a virtual environment and activate it.
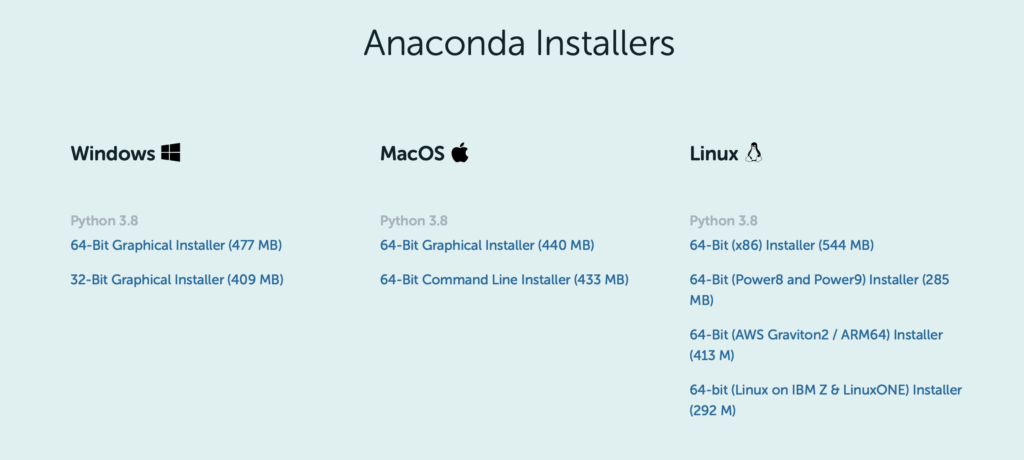
Choose the installer that matches your environment. Since this guide covers macOS, select the 64-bit Graphical Installer.
Launch the installer and follow the instructions to complete the installation.
There are two installers for Mac. The 64-bit Graphical Installer installs Anaconda through a GUI, which is the more familiar approach, and unless you have a specific reason otherwise, this is the one to use.
Downloading the 64-bit Command Line Installer gives you a *.sh file. This is a shell-script installation, used when you want to install from the terminal.
Since installing software on Linux is normally done from the terminal, people used to Linux may find this option easier. (Probably.)
Configuring the command line environment
After installing on macOS, all you get is Anaconda-Navigator in your applications list — as is, you can’t use Anaconda or Python from the terminal.
If you want to use the conda command to install packages and so on, you need to activate Anaconda. To activate Anaconda (i.e., to make the conda command available):
conda activate
Run the above. The conda command should now work.
If activating the conda environment every time is a hassle, you can have it activate automatically. To do so, run the following in the terminal:
~/opt/anaconda3/bin/conda init シェル名
Run the above. Use the name of the shell you actually use. If you have no idea what that means and have never changed it, you’re probably on the default shell (zsh on macOS), so substitute that for the shell name.
~/opt/anaconda3/bin/conda init zsh
Now, when you restart the terminal, the conda environment will be activated automatically and you won’t need to type conda activate.
Many of you have probably heard of GitHub before you ever heard of Git. When looking for a program or a piece of software to use as a reference, you often land on a GitHub page, and I suspect many of you have simply downloaded something without really understanding how the site works.
GitHub is indeed a place where programs are shared, but it is more than just a sharing site: it is a tool for using a tool called Git online.
Git is a tool for version control of files. By modifying files and recording those changes, you can return to any recorded version at any time.
When you ask someone to review a presentation draft, you probably save the file before the review, the reviewed file, and the file you revised based on the comments as separate files. With a tool like Git, you can handle those changes easily, and all within a single file.
A record made with Git, and the act of making that record, is called a “commit”.
The place where commits accumulate is called a “repository”. In other words, a repository is the place that holds the change history. A repository on your own computer is called a “local repository”, while one hosted remotely, such as on GitHub, is called a “remote repository”.
When you want to manage files with Git, you specify the folder that Git will manage. Within that folder there are three areas: the working tree, the staging area, and the Git directory.
The working tree is where your files live, and simply editing a file here does not yet save the change history as a commit.
The staging area is where you register the files to be committed. Files on the stage likewise have not had their change history saved yet; think of it as the place where you declare, “I am going to commit this file.”
The Git directory is where commits are stored. Files committed here are stored as files that will never be altered. In principle, the content recorded by a commit cannot be changed or deleted afterward. Once something is committed to the Git directory, it has been recorded as part of the change history.
Basic use of Git
I will leave the detailed usage for you to look up, but here I give a rough overview of the actual operations.
Git is generally operated using Git Bash on Windows (installed together with Git) and the terminal on macOS and Linux. (Here I will refer to both simply as the terminal.)
There are GUI tools that may feel more familiar, but once you get used to it, using Git from the CUI is extremely convenient, so I recommend starting with the CUI from the beginning. You should get the hang of it within an hour.
First, to start managing files with Git, create a local repository. Begin by moving to the directory you want Git to manage in the terminal. Then,
git init
Entering this gets you ready to use Git for version control.
Next, to record changes in the staging area,
git add ファイルパスもしくはディレクトリパス
Running this registers the specified file in the working tree to the staging area.
Next,
git commit
This commits the files in the working tree.
To check which file is currently in which state,
git status
run this. The commit history can be
git log
checked by running this.
Basically, the workflow is to run git add, then git commit to create a change record, and to use git status to check the current state whenever you run into trouble.
Below is a reference. It is a book that is very easy to follow even for beginners, and I referred to it while writing this article. If you want to study this in more depth, I recommend it.
![How to Install labelImg [Updated December 2022]](https://www.tankobucreate.com/wp-content/uploads/2021/06/python_cover.png)
![[Updated for 2022] How to Choose the Right 3D Printer: Key Points to Consider and 4 Recommended Models](https://www.tankobucreate.com/wp-content/uploads/2021/11/Sermoon-D1-1.jpg)








![Changing Pulse Wave Frequency and Duty Cycle Using PWM Output [Arduino UNO]](https://www.tankobucreate.com/wp-content/uploads/2021/04/eyecatch-arduino-2.png)